By bite alarms, fishermen understand certain devices attached to fishing rods that help detect fish bites.
The price of fishing alarms can be very different, ranging from 20 rubles for simple bells, and ending with entire carp installations for several hundred dollars.
But if you came to this article, then most likely you want to make your own bite alarm, investing a minimum of money and time.
Types of bite alarms
So, let's start by figuring out how alarms can notify us about a bite, and they can do this in the following ways:
- Sound signal;
- light signal;
- movement.
Sound alarms include: rattles, bells, electronic sound sensors and other noise elements.
Light sticks include glow sticks that are attached directly to the tip of the fishing rod or to the float. Signal lights are used only at night.
As for motion alarms, these include: soft tips, side nods, or bright rattles that are attached to a sagging fishing line. Side nods can catch the slightest bites and can be used both on a spinning rod and on a donk.
We've sorted out the theory, now let's move on to practice, in which we will try to clearly describe the process of assembling various alarms from improvised means and tools.
How does a bite alarm work?
The principle of operation of the donkey guard is based on the fact that at the moment of a bite, the fishing line transmits vibrations of the equipment, recorded by a signaling device. The fish, having grabbed the bait, moves in any direction. The donkey alarm responds to fishing line pulls, regardless of their strength.
A powerful jerk is much more noticeable - it can be recorded by both a factory and a homemade device. Large fish often bite cautiously, and it is important for the alarm to be sensitive in order to detect such a bite.
Requirements for signaling devices for donkey:
- high sensitivity;
- simplicity of design;
- protection from water;
- reasonable price.
Each angler chooses bite indicator devices depending on:
- fishing conditions;
- own needs;
- weather conditions;
- expected fish in the catch;
- time of day.
At night, visual indicators are ineffective, even with lighting. It is impossible to sit for several hours without taking your eyes off the rod, and if you are distracted, you will miss the bite. Therefore, at night, sound sensors are needed for donkeys. And if they also provide a visual effect, the return on such equipment increases significantly.
The weight of the transducer is important, and this concerns not only the convenience of the angler. In strong winds, a lightweight design will show false bites, and the meaning of the device itself is tripled.
Buying a signaling device is not difficult; stores sell models for both summer and winter fishing. But quality equipment doesn't come cheap. Therefore, many fishermen prefer to make sensors themselves from scrap materials; it is cheaper and takes a little time.
Do-it-yourself sound alarm (instructions)
This alarm is very easy to manufacture, which is why it is most popular among fishermen, especially mature ones.
Stages of a homemade bell:
- Take out a small bell;
- find a hollow rubber hose up to three centimeters in diameter;
- cut a piece of hose 2-5 centimeters long;
- make a slot in one part of the tube into which the fishing line will go;
- put this tube on the bell, if it does not fit tightly, then glue it with glue;
- wrap a braided or nylon cord around this entire installation.
The principle of such an alarm is that it clings to the fishing line with a tube with a slot, at the moment of hooking the bell comes off the fishing line so as not to interfere with fishing, and we tied the thread so that the bell does not fly away and get lost. Tie the thread to something that the rod rests on, for example, a flyer or a rod rest.
You can also use a wine or champagne cork along with a rubber tube. If we compare this alarm with a rattle, which is attached like a clothespin, then the bell turns out to be more convenient, since it resets itself when sweeping, and the rattle must be removed manually so that it does not interfere with sweeping.
Sound alarm
The simplest are a bell or a rattle. The bell is often used at long distances on a spinning fishing rod.
Principle of operation
A set of fasteners in which, for example, a bell is attached to the top of a feeder. If it starts to peck, the top of the feeder, on which the alarm is attached, begins to oscillate and our device produces a sound. The advantages include low cost, sensitivity to the slightest bites, and the possibility of use at long distances.
Step-by-step manufacturing instructions
Would need:
- A flat spring about 20 cm long , you can take it from an old alarm clock or watch. It should be smooth, without errors.
- Aluminum wire 20 cm long.
- Plastic strip 20 cm long.
- Dye.
We make holes with different diameters on the sides of our spring.
We fasten the plastic strip on one side with wire so that it holds securely against the passage ring. On the other side we make a hook that holds the spring. Sound bite alarm
At the end we glue a hairpin on this piece of tube.
Do-it-yourself light electronic bite alarm
A simple analogue of this signaling device is a phosphorus stick, which glows if it is broken.
But the good thing about our device is that it lasts for a long time, and the phosphorus stick only lasts for the night.
So, for our homemade product you will need the following materials and tools:
- Straws for cocktails;
- scissors;
- glue gun with glue sticks;
- LEDs;
- batteries (3 V);
- heat-shrink tubing;
- lighter;
- crocodile clips.
Sequencing:
- Cut a piece of straw 3-5 cm long.
- Fill a cut piece of straw with hot glue.
- While the glue is hot, insert the LED into the straw. The LED leads should stick out about 5 mm.
- Insert the coin cell battery into the heat shrink.
- Cut off the excess part of the heat shrink so that 1-2 cm remains on each side of the tube.
- Insert the straws into the heat shrink on both sides.
- Use a lighter to heat the shrink wrap to pull it off over the straw.
- Connect the straw to the diode and heat shrink so that one contact of the diode touches one side of the battery, and the other contacts the other side of the battery.
- Glue a hairpin onto the free end of the tube with a glue gun, which will be attached to the fishing line.
And now the same thing only in video format. Enjoy watching.
Another option for an electronic signaling device
Here are a few more options for homemade bite alarms
Making a bite alarm: simple, fast, reliable
To make a simple do-it-yourself bite alarm you will need:
- Wire
- Pliers
- 2 cambrics
- Scissors or utility knife
- No more than 10-15 minutes of free time
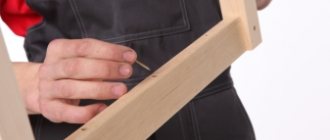
First of all, we take the wire. The size of the piece of wire depends on what rod you will attach it to. On average, you can take 30 cm. It doesn’t matter what material you take, but it will be difficult for you to work with strong steel wire. That's why we use simple aluminum, which is soft and durable.
Now we need to prepare the cambrics. This is necessary so that our entire structure holds and the fishing thread does not get stuck in the alarm. You also don’t need to buy cambrics, because this is something that is always at hand.
You can take any cable that fits the diameter and take part of its insulation. We take the cable from a television or satellite dish. We need to cut off part of the cable with scissors or cut the insulation with a stationery knife, and then remove it.
After this, we cut the large piece into 2, because we need exactly this amount.
Let's return to our wire. We need to bend one end of it as shown in the photo. This part will be attached to the rod, so we round one edge, and let the lower part remain flat. In this case, the edge of this bend should extend to the base of the alarm, so that later you can secure it all with a cambric.
After this, we immediately put 2 of our cambrics on this structure, we do this for further ease of manufacture.
After this, we bend the other edge of the wire, while the finished eye should be directed upward (we need to make a bend in the other direction, compared to the first side). You don’t need to bend much, but enough to create a second ring.
And after that we make the second ring, here you can make a completely round shape. We leave a little wire that is adjacent to the base of the alarm; this will be secured with a second cambric.
We put on cambrics in order to clamp both sides. We see the finished product, which now just needs to be attached to the fishing rod.
You can also use thicker wire to make the structure even stronger and more reliable.
In order to attach this alarm, you just need to remove the cambrics and fasten the first bend to the rod (on the first large ring), and pass the fishing thread through the second.
When the rod is folded, the alarm does not interfere with your transportation of fishing gear.
The positive thing about this alarm is that you do not waste money. You get a really high-quality product of your work, which will be enough for a huge number of trips to the river. Due to the fact that the alarm is made of metal, namely aluminum, you will not see corrosion or breakage.
Probably every fisherman has encountered the fact that the plastic analogue from the store does not withstand a long period of use and breaks. And with all this, you do not spend a huge amount of time and effort on manufacturing. The alarm works well when fishing with bottom rigs; you will notice even a slight bite and respond to it in a timely manner.
When hooking and removing fish, the alarm does not interfere, nor does it during long-distance casting of bait. There is no need to prepare the alarm for every cast of the fishing rod; everything is always ready for flawless operation.
Sologub M.V. — Especially for Homemade FISH, Ukraine, Kyiv
- Side nod for donkey
- Side bite alarm for feeder
Rattle built into stand
And here is another option for a signaling device that we found on the Internet. A very interesting idea. The recess for the fishing rod is stretched with rubber bands between bent wires.
It is worth noting that this design is not sensitive and is capable of detecting only powerful bites.
Author of the article: Vitaly Leonidovich Ivanov, 2021.
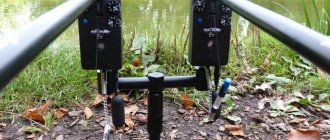
Electronic signaling devices
This modern miracle of technology is equipped with light or sound devices, with the help of which the bite can be seen instantly.
How does it work
- It is installed on the shore of a reservoir and attached to a fishing rod.
- The fishing line must be threaded through a special roller, a hole on the alarm, and connected to the slot of the reel.
- When the bite starts, the built-in gear on the roller will move and a signal will sound.
The advantages of electronic signaling devices include:
- Hypersensitivity. The time and intensity of the bite is clearly visible.
- Thanks to sound and light indicators, there is no need to be constantly near the fishing rod.
- Works in all weather conditions.
- Long distance is not a barrier.
Experienced fishermen say the only drawback of this device is the inconvenience when fishing in “still” water. If the fish does not go “to the shore” when biting, then you can simply not notice it.
Electronic bite alarm
How to do it yourself
To make it cheaper and more efficient, you need to use the most ordinary keychain with sound as a basis. The contacts of the key fob, preferably in the form of two plates, should be removed outside.
We close the key fob button and attach it to the fishing rod stand. We take a piece of plastic (strip) 2 mm thick and attach it to the fishing rod between the first ring and the reel and bring it out between the contacts. As soon as it starts to bite, the line will pull out the plastic, a short circuit will occur and the music will start playing.
Kinder bite alarm
Before you start making our device, you need to prepare the following parts and tools:
- Wire (diameter up to 2 mm).
- Cambric (you will need to lay a wire folded in half in it).
- A large-diameter ball (an oval-shaped case from a Kinder Surprise for children is perfect).
- Large beads.
- Clothespins from old baguettes.
- Pliers, drill, wire cutters, drill bits.
At the very beginning of work, you need to drill a hole in the clothespin using a drill. The diameter of the hole must match the thickness of the wire. The wire should fit freely into the resulting hole, but the clothespin should not dangle from it.
You need to insert the wire into the resulting hole and bend it.
Steel wire must be tightly wound around the resulting structure. The approximate number of turns is 12. Having wound the wire, it must be removed, but carefully so that the turns are preserved.
- See the review of the Deeper wireless echo sounder for ice fishing