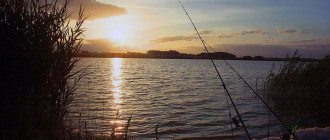
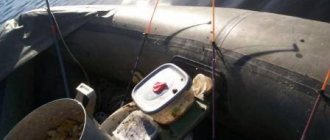
In specialized “Amateur Fisherman” stores you can buy simple tackle with a hook and with bells and whistles. And for any fishing trip: winter, summer. Below are textual, schematic and video tips on how to make a fishing rod.
But skilled anglers do not spend money on purchasing German or Swedish fishing rods, but willingly make their own. Then you will quickly learn the basics of a generally simple matter.
It is enough to fish for a dozen days, and your fishing rod will only have time to hook the caught fish. And you will begin to make devices for hand fishing using any method. For example, how to make a fishing rod for a balance beam with your own hands.
Where to start initially?
Choosing a fishing rod is not an easy matter. Industry and imports have flooded the market for all kinds of fishing gear.
But don't rush to buy an expensive fishing rod. They have qualities that only an experienced fisherman can understand. And they are made of newfangled carbon fiber, which is very fragile, and not bamboo.
An ordinary budget “telescope” (retractable plastic links) is intended for fishing for beginners. So, we bought a fishing rod, at first no longer than five meters, but we still need to pick it up:
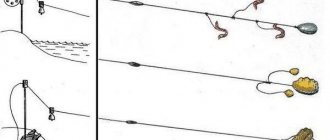
Polymer fishing thread 0.2 mm thick. Learn and change it to a thin one, with it you will get a bite more often. The first one will insure the beginner against cliffs that are inevitable during fishing through snags on snags.
A float holder (no heavier than three grams) for a hook with bait.Buy fish grips that are thinner (number sixteen). They are used by both professionals and beginners; they will help you catch even large fish.
Make weights (a pair for one rod) from pieces of lead and tin.
Check it out here too!
- DIY crafts from beads and seed beads - photo ideas, tips, instructions
Do-it-yourself winter fishing rod - an overview of the best options. Instructions for creating an unusual winter fishing rod from different materials
DIY boat anchor: making a homemade anchor for PVC boats (95 photos and videos)
Finish them well, and then they will not wrap the line. Attach one closer to the bait, the second – fifty to seventy centimeters higher. Squeeze them with pliers to prevent them from slipping.
Plastic reels. The fishing line is attached to the rod using any tying method.
Manufacturing process and installation of gear
A small stick 5-8 cm long must be sawed down to half, stepping back 2 cm from the edge.
After this, it is split lengthwise so as to chop off half before cutting.
Then 2 grooves are cut on it closer to the edges for tying the cord. On a solid part the groove is cut in a circle, on a chipped part only along the rounded side.
After this, you need to find and cut 2 branches with a branch. One of them is cut off just before the fork. Its thickest branch is shortened after 30-40 cm, and the thinnest after 10 cm. For the second branch, you need to leave 60-100 cm in front of the fork and 10 cm on the branches. Its long side becomes sharper.
Then a long, even rod is also cut from a living branch. If this is not found, then it can be connected from two branches. The rod rests between the horns of a stand made of a long branch with a fork inserted into the ground. It is pressed down from above with a short fork.
A 30-60 cm cord is tied to the end of the rod. A loop is made at its second edge with a slight indentation, turned over and the middle of the cord is inserted into it. The result is a knot that is tightened on the short workpiece from the split side. For reliability, it needs to be secured with a regular knot.
Another piece of cord is tied to the second slot of the short workpiece. A fishing line with a hook and sinker is attached to it with a knot or through a swivel. To alert the tackle, you need to pull the top of the rod down by the tied piece of wood and hook it onto a stick with a notch driven into the ground.
When the fish takes the hook and pulls on the line, the hook will move and the rod will strike when leveling off. Instead of a straight stick, you can use an inverted spear to hook the tackle, the same one that presses the rod.
For an ice fishing trip
The winter bite in many Russian reservoirs continues until mid-April. The main thing at this time is to choose a safe place for the hole so that the fishermen themselves do not go under the ice.
In the remaining time, beginners need to either buy ice fishing tackle or learn, including our instructions, how to make a winter fishing rod with your own hands (video).
This is a simple matter; skilled people, especially those living near lakes, ponds, rivers and streams, can do it within one day. After all, for ice fishing you don’t need a huge spinning rod with numerous bells and whistles.
Check it out here too!
- How to make a zherlitsa with your own hands - features of making winter and summer gear (110 photos and videos)
Fishing camera: rating of the best models and tips for building a homemade device (135 photos + video)
Do-it-yourself boat tuning - modification options, tuning directions and improvements to serial PVC boats (130 photos and videos)
What materials and tools will be needed to make a fishing rod:
- reinforced foam
- relatively soft spring
- fabric-based abrasive file
Step-by-step instruction:
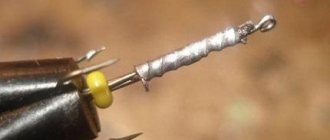
Cut out a handle for a fishing rod from foam plastic. The handle will also come with a reel. This is a kind of spinning reel for fishing line. Consists of a pair of wire hooks, wound to the handle and located in different directions.
The fishing line is wound around them before fishing begins. Then add a nod. Consider the diagram of both the reel and the nod in diagrams or drawings on fishing portals.
Feeders
Fish feeders have been made for many years - with the development of technology, more and more new types are appearing, and they are constantly being improved. The advantage of feeders is that you can cast them quite far, thus counting on large fish, as well as a good result and the absence of a snag.
Today, feeder feeders and carp feeders are made - the former are much more universal, and the latter are used mainly for carp, since they are larger.
You can also divide feeders into types according to shape - square, oval, spring, etc. The choice is wide - the main thing is to decide in advance where the feeders will be used.
In addition, they are made open and closed - the latter are suitable for animal feed, and the former for vegetable and cereals.
The materials used to make feeders are different - plastic is cheaper, but it is short-lived, but metal will last longer, especially if it is coated with an anti-corrosion compound, although such feeders are not cheap.
You can make a feeder yourself - also from plastic or metal. The first can be made from a plastic bottle - the neck and bottom are cut off from it, and the cylinder is cut across. The plastic sheet should be about 6 by 12-13 cm in size. The hole points are marked on the plastic sheet, at a distance of about two centimeters.
The cylinder is closed with an overlap and fastened with paper clips. Afterwards, the holes themselves are burned out - they can also be punched with a hole punch or drilled. When the base is ready, you need to cover the joint with a lead strip and put a fastening unit on one end - after this the plate is compressed at both ends.
A metal feeder is more difficult to make and requires a lot of materials and tools.
With a “mousetrap” - for perch
This is the name of a self-cutter, developed on the principle of catching domestic rodents. The fish bites the bait and pulls on the line.
The trigger is immediately triggered and the line is clamped. This is how the fish is hooked. Instead of a spring, take the so-called airline rubber band. It is enough to find a suitable scheme. Take a look at how to make a winter self-hooking fishing rod with your own hands.
Check it out here too!
Do-it-yourself fishing gear: making equipment, catchy models and practical advice from experts (105 photos and videos)DIY bait recipes: simple and effective baits for fishing for different types of fish (125 photos and videos)
DIY jigs: video master class on how to make, main varieties and rules of use (125 photos + video)
Spinning reelless
Make a device for biting on a reelless bait from a champagne cork. It will act as a mini pen.
Next are a few steps on how to make a fishing rod for a reelless fish:- a piece of old winter gear;
- drill the plug, insert this whip into it;
- Wind the fishing line around the cork lengthwise or crosswise.
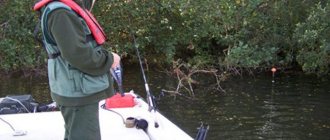
Homemade product for luring fish under the ice using a spoon
Difference from bait gear: greater strength, cut the handle from wood or aircraft foam. Attach a reel or spinning drum, as well as a whip, to it. Attach a spinning tip to the fishing rod. The whip is not very hard.
Decide on a reel. There are with and without inertia. Both types can be used in luster. Since for this type of fishing much greater depths are chosen than for other types of fishing, the catch is quite high.
And you have to pull out a rather heavy fish. This means that the line must be released and reeled in time. This is sufficient advice.
We read them and make a fishing rod with our own hands. Practice shows that even inexperienced fishermen can cope with this task.
Fishing rod
I took a piece of wood and drilled a hole at the end of it. You need to make it with such a diameter that the rope can fit into it. If you can't drill, you can skip this step and simply tie a string or strong thread to the end of the fishing rod. You also need to make a hole in the wooden bead. If you are using buttons, thread the thread through the holes and then tie it to the string.
Australia: A group of enthusiasts have restored a steam tractor to working condition
Why Denis Matrosov did not find happiness with Kulikova and did not recognize his older children
No tight ponytails and more: 7 tips on how to speed up hair growth
After this, you should sand the surface to which the magnet will be glued. I had a fairly smooth stick, so it didn't need sanding. But if another material is used, make sure it is smooth. Do not forget about the safety of the child so that he does not get hurt while playing. I glued a magnet onto the sanded surface, after threading a thread through the bead and tying it with a knot at the end.
This can be done using a glue gun or any good quality durable glue. I made two fishing rods so that I could play with my child. This will be a great competition.
Photo of a fishing rod with your own hands
Read here - DIY boat anchor: making a homemade anchor for PVC boats (95 photos and videos)
Advantages
When I read how useful an educational game with a fishing rod and fish is, I had no doubts about making it myself. Firstly, the manufacturing process itself is enjoyable, since the baby himself can participate in it. Ask him to give you items, and he will receive this offer with genuine delight. Here are the skills that will help your child develop the following abilities:
- development of movement coordination;
- development of dexterity;
- patience;
- desire to win.