How to make a summer zherlitsa with your own hands?
Zherlitsa is considered an original Russian invention. It is intended for catching predatory fish; live bait is used as bait.
In general, it is generally accepted that the summer bait is a purely pike tackle, however, it is not uncommon for fish such as catfish, asp, burbot, pike perch and large perch to be caught on it.
For example, in areas with dense aquatic vegetation or trees hanging low over the water, this is the only way for productive fishing.
How to make a summer zherlitsa with your own hands?
There are many different baits and tackles on sale today. Catching large predatory fish, for example, pike, is considered effective using artificial lures, wobblers, and silicone fish.
Fishing for pike with a zherlitsa gives good results only in winter. In summer, this fishing method is inactive. Nevertheless, the vent is reliable and easy to manufacture. For installation, it is enough to have fishing line, live bait and hooks on hand.
A do-it-yourself trap will be appropriate in places where spinning fishing will not bring the desired results. The gear can become indispensable when fishing in reservoirs with a lot of snags and grass vegetation.
Some fishermen, before going fishing, make several similar gears in reserve at once, since you never know where the gear will get caught or go under water. In addition, you can simply forget the place where the structure was placed in the evening, and often, if it is poorly secured, it quickly drifts to the side.
It is convenient to fish with girders both from a boat and from the shore. These are original old Russian homemade products, simple to make, but quite successful when catching pike in the summer, and throughout the entire season.
Do-it-yourself summer zherlitsa
The uniqueness of the zherlitsa lies in its simplicity. Anyone can make this tackle with their own hands. Regardless of the variety, be it a flyer, a floating vent or a vent with a flag, they are all easy to manufacture, assembled from scrap materials, and do not require any special skills or a lot of time.
Design of the vent
There are many ways to make a vent, but the principle of operation is similar for all. For the base, any available material is used (wooden flyer, foam circle, plastic bottle, etc.), onto which you can wind the required amount of fishing line or nylon thread.
In this case, one end of the fishing line is fixed to the base and wound onto it in such a way that it can easily unwind from it. A sliding weight and a metal leash with a hook are attached to the other end of the fishing line.
Design and equipment of the girder
First, let's look at the principle of operation of the girder, learn how to properly rig it, and how to attach live bait.
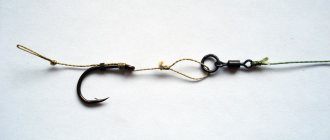
Essential elements
The zherlitsa has many shapes and manufacturing options, whether purchased or homemade. However, the main elements (see photo) in it, as a rule, remain unchanged. This:
- base with flag;
- coil;
- fishing line;
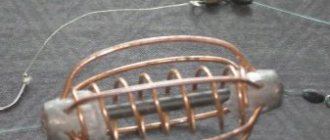
- sinker;
- swivel;
- leash;
- hook.
Principle of operation
A special feature of the girder is its very simple operating principle. It works like this:
- The live bait falls into the hole.
- The fishing line of the required length is unwound.
- The spool with fishing line is fixed by bending the flag and resting on the spool of the reel.
- When the bite occurs, the pike will try to drag the bait away.
- The line will begin to unwind from the reel.
- The signaling part of the rod will be released and rise up, eventually starting to signal the angler about a bite.
The main disadvantage of the hole is that the open hole can become covered with ice at any moment.
How to equip a winter rig for pike
Installation and equipment of a winter girder for pike occurs as follows:
- the required amount of fishing line is wound onto the reel;
- a sinker is attached (can be either fixed or sliding);
- A winding ring or a carabiner (swivel) is attached to attach the leash. Instead, you can simply tie an end loop. Some anglers prefer to attach the leader directly to the working line.
- a leash is mounted;
- hook(s) are attached.
Thus, there are practically no special difficulties in equipping a winter girder for pike. This work can be handled not only by a professional with significant experience, but also by a beginner who has decided to test his strength in this type of activity for the first time.
Fishing accessories and gear for fishing with summer girders
What the girder actually consists of, let’s look at each type in detail:
Zherlitsa-flyer
To make it you will need:
- a wooden branch in the shape of a slingshot with a total length of 15-20cm (of which 10-15cm is on the slingshot and 5cm on the base) and the thickness of the knots is 1.5-2cm;
- strong fishing line or thin nylon cord, the length of which is determined based on the depth of the reservoir plus 5 meters, usually no more than 10 meters;
- a load weighing 10-12 grams, depending on the liveliness of the live bait and its size;
- carabiner with clasp;
- a metal leash, preferably made of nichrome wire with a diameter of 0.3 mm;
- hook.
Floating vent
To make it you will need:
- a disk with a hole for a wooden pin in the center and a groove along the edge, as a rule, an easy-to-process and buoyant material such as polystyrene foam, wood or polypropylene is used (you can also use a plastic bottle, a tin can, or a “chmak” type structure instead of a disk);
- nylon cord 2mm thick, the length is determined based on the depth of the reservoir plus a reserve of at least 6 meters;
- undergrowth made of monofilament 0.4-0.5 mm thick and 1-2 meters long;
- “olive” weight weighing 10-15 grams;
- swivel;
- carabiner with clasp;
- metal leash;
- hook.
Zherlitsa with a flag
To make it you will need:
- stick 30-40cm long;
- homemade flag;
- inertial coil;
- monofilament with a thickness of 0.4-0.5 mm and a length of up to 20 meters;
- cargo;
- carabiner with clasp;
- metal leash;
- hook.
Making a summer girder
So, having decided which girder and what you plan to make it from, having selected all the necessary materials and gear, we begin the assembly process.
Classic flyer
- It is necessary to cut off all excess knots from the wooden slingshot blank so that there are two ends left approximately 10-15 cm long, and the thicker one should be very short - no more than 5 cm. There is no need to clean the bark from the rod; we only cut off the excess irregularities that may prevent the fishing line from sliding freely.
- The long ends must be slightly split with a knife so that they run along the plane and not across.
- To securely attach the flyer, you need to cut a groove at its short end along the entire radius, where the cord of the flyer is wound and tied in the form of a loop for further attachment to the pole.
- We equip the girder with a nylon cord or fishing line based on the following calculation: depth at the fishing site plus 5-7 meters. To attach the fishing line, a deep notch is made on one of the long ends of the flyer, through which it is passed and tied in the same groove on which the cord is attached. After which it is wound around the long ends of the spear in a figure-of-eight motion.
- weight weighing 10-12 grams is attached to the fishing line
- A carabiner is attached to the end of the fishing line and a metal leash is fastened to it.
- A hook is attached to the leash , preferably a tee or double, on which live bait is attached
- A long pole 2-3.5 meters long is stuck into the coastal bottom of the reservoir at an inclination of 45 degrees so that the bait fish cannot tangle the fishing line around it.
- We firmly tie the girder to a pole, or hang it from tree branches and start fishing.
Zherlitsy with a flag
The basis of the girder is a rail 30-40 cm long.- An inertial reel and a flag are attached to the rail, which can be made from a fragment of a tape measure or a plastic bottle. In this case, the reel must be secured so that the flag begins to straighten as its drum rotates.
- Monofilament is wound onto a reel.
- A sliding weight is attached to the thread.
- We attach a carabiner to the end and fasten a metal leash.
- We attach a hook to the leash and attach live bait.
- In conclusion, it is necessary to drive a long stake into the shallow coastal waters and use a wire or rope to tie the pole of the girder to it.
Secrets of making a bottle from a bottle
It’s not difficult to make a zherlitsa from a plastic bottle with your own hands. To make the design you will need:
- tape or tape;
- scissors or sharp knife;
- rubber;
- thin spring;
- nylon cord or fishing line 3-3.5 m long;
- plastic bottle with a lid with a volume of 1-1.5 l;
- hook;
- a piece of tarpaulin;
- sinker.
The process of making the girder:
- Remove the bright label from the plastic bottle. Wind a fishing line or cord into the middle, tying it with a strong knot at the neck. Under the lid, attach a rubber ring, which additionally secures the fishing line.
- Attach a treble hook to the end of the cord. The sinker can be attached to the fishing line directly in front of the hook or 30-40 cm above.
- Using tape or tape, attach the spring to the side of the bottle. Attach a bright tarpaulin flag to its end. Bend the spring to the bottle and secure the position by threading the fishing line under the elastic band.
Place the live bait on the hook and lower the bait into the pond. When the fish swallows the bait, the line will unwind, releasing the spring with the flag. Take out your catch and attach a new baitfish.
Using a thread, the girder can be attached to a wooden or iron stick, polystyrene foam or board. This will make it easier to remove gear and catch from the water.
To prevent the bottle from getting lost in the algae, paint the bottom red, pink or red. Bright shades will help you find the zherlitsa among coastal bushes and snags.
Water should not leak into the bottle. Fill the place where the lid is screwed with waterproof glue or screw a piece of bandage onto the thread. Check your equipment every 60-80 minutes; in case of even minimal leakage, the vent will completely go under water.
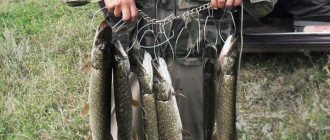
Catching pike with summer homemade girders
It happens that the terrain does not allow the use of a spinning rod, or the pike simply does not respond to any of the baits.
Then that very simple girder with live bait as bait can come to the rescue, which not a single pike can resist. And besides, this activity is not too troublesome: set up your gear and go about your business.
In summer, it is best to check your catch in the morning. In general, summer is considered a productive season for this fishing method.
Do-it-yourself vent from a plastic bottle
Using plastic bottles for fishing
(baby top, floating girder, float case, feeder)
Many fans of making fishing tackle have already realized that plastic bottles are a good, and most importantly, affordable material for realizing their ideas. I bring to the attention of readers a few more designs that I have come up with or seen from other fishermen, and I hope that they will be useful to many.
Some of them can be done in a home workshop, others will help out if for some reason you find yourself on a pond without gear. Making them on the go will not take much time, and there are much more empty bottles on the banks of our reservoirs than we would like.
1. Little top
It is intended mainly for catching minnows and other types of fish.
You will need two empty two-liter bottles, a sharp knife, scissors, an awl or a nail. To solder plastic parts, it is convenient to use an electric stove, but if you don’t have one, prepare a knife or scissors to cut the bottles for this operation.
The cutting lines should be as straight as possible. We will need parts I and II from one bottle, and part III from the other. In part II, using a metal tube 0 3-5 mm with a sharply sharpened edge, punch perforations on the entire side surface. Such holes can also be burned with a hot nail or copper wire wound around a soldering iron tip.
Insert part I into II, as shown in Fig. 2. The outer diameter of part I must be equal to the inner diameter of part II. If necessary, trim any protruding edges with scissors.
Connect the parts by inserting a disc liner made of corrugated packaging cardboard between them, the diameter of which is equal to their internal diameter.
Press their edge against a heated electric stove burner, frying pan, etc. and, slowly rotating, achieve soldering of the edges, then remove the liner - this is not difficult to do, since it has three holes for fingers.
The hole in the center of the disk will help fix part I during the most important technological operation - forming an edge that provides the necessary rigidity.
Lightly melt the edge of part III so that it acquires additional rigidity, and connect it to the prefabricated part 1+11 (Fig. 3).
In camping conditions, you can simply sew the parts together using a needle and a piece of fishing line f6 0, 3-0, 4. In the upper edge of parts I and II, use an awl or nail to pierce three holes for attaching the bridle (Fig. 2), which is secured with a rubber ring , installed on the top.
Figure 3 shows the assembly and installation of the top. Don’t forget to put a piece of bread inside it - it will be washed away by the current, and it will attract potential baitfish from afar.
2. Floating vent
In Fig. 4 you can see that this is one of the varieties of the well-known circle, although I don’t dare call it that - it’s still the same plastic bottle. To make such gear, you will need a bottle with a groove on its side surface. It works no worse than a traditional circle, and in some cases it even has some advantages: it has greater windage, and therefore speed of movement across a body of water.
A rubber ring serves as a clamp for the fishing line.
To prevent it from flying off during a bite, secure it with strips of tape in two or three places. A flag spring (for example, from an old alarm clock) is also attached to the bottle using adhesive tape. The flag can be made of any bright, quick-drying, or even better, waterproof material (a piece of Mylar cookie film is ideal).
Tie the main fishing line to the neck of the bottle and wind it into a groove on its surface. Press the flag against the bottle and secure it in this position with several turns of the main fishing line, which, in turn, is pressed with a rubber ring.
When bitten, the fishing line is pulled out from under the elastic band and unwinds from the bottle, releasing the spring of the flag, which signals that the predator has taken the bait.
Further actions are known to every fisherman. Assembly and installation of gear are shown in Fig. 5.
Fishing for pike on girders in summer
Today, fishing has turned from a way of obtaining food into entertainment, so hunting for predatory fish is of particular interest. Avid fishermen use girders - gear for catching pike. These devices were used in ancient times, and today they have been modified and improved, which ensures a guaranteed catch.
The participation of the fisherman when using the girders is limited solely to the installation of gear and removal of the catch.
The advantage of girders is the ability to use gear in any place, even hard-to-reach places, where other devices cannot be used.
Fishing for pike on girders
Navigation — Home → Hunting and fishing → In the spring, immediately after the ice melts, the pike begins to actively feed until spawning, which usually begins with some warming of the water in early May, and before spawning, the pike intensively fattens and walks in the shallows.
At this time, the pike's zhor is well led by schools of fry jumping out of the water and large splashes of pike and stains on the water that the pike creates while chasing the fry. At this time, it is caught in many ways, but fishing with a slingshot is the simplest but at the same time catchy method.
The slingshot is an ordinary fishing line, where the fishing line is wound on a ragatulina, the fishing line is wound in the form of a figure eight and a notch is made with a knife to fix the fishing line so that the fishing line does not unwind arbitrarily and is not unwound by live bait.
Usually, however, it is not fishing line that is wound, but nylon or modern fishing threads, they have many names. Fishing with a slingshot is one of the oldest ways of catching predatory fish on our rivers, and not only that. In addition to the slingshot, the fishing line can be wound on anything, for example, on a board. But now, more and more often, such summer piers are made from a water hose.
Cut a piece of hose about 15 cm long, tie a thread or fishing line, and wind it about 10 meters. At the edge of the hose, make a slot with a knife to clamp the fishing line. The end of the fishing line is equipped with a small weight, weighing 15-20 grams, and a metal leash is tied with a double or triple hook at the end, on which live bait is attached behind the dorsal fin.
Typically, such girders are placed on the so-called pike trails, these are places where pike constantly hunt, for example, along the edge of a reed or weeds, in places with a sharp change in depth, in gaps between the water cover.
Especially in the spring, pike prefer natural baits in the form of live bait, ignoring artificial ones, so girders are a very catchy method of fishing. Also, live bait on a hook swims like a wounded fish, and for pike it gives additional motives for attacking, so it will almost always attack live bait rather than small things swimming nearby.
Usually, the pike does not immediately swallow the live bait, but having grabbed it for a certain distance, it lies down to the bottom and suffocates the live bait, pinching it in its mouth, and only after making sure that it does not flutter, it turns it in its mouth with its head towards the stomach and swallows it.
The same principle applies to fishing with mugs, only they are not tied and float driven by the wind.
A circle is a disk with a diameter of 15-20 cm, with a groove around the perimeter and a hole in the center for a stick. Mugs are usually made from foam, but other materials that float well are also suitable.
The fishing line is wound around the circle along a groove and passed through a stick inserted into the central hole of the circle.
They also now make piers from plastic bottles. Typically, for medium-sized pike, this type of face is used.
Take a 0.5 liter plastic bottle, insert a fishing line with a knot through the neck, screw on the lid, and wrap the required supply of fishing line (5-6m) around the neck. Make a notch in the plastic plug with a knife to secure the fishing line.
And so that the bottle does not float with the current and the wind and remains in place, a fishing line and a weight of a very long length are tied to it so that it does not sink.
Such girders are placed in large numbers on shallows, where there are no bushes to tie the girder, and the depth does not allow sticking stakes.
When the pike grabs the bait, the line jumps off the clamp and unravels from the neck of the bottle, and when it runs out, the bottle floats behind the pike.
The disadvantage of this method is that you don’t know whether there was a bite or not, and you have to check all the holes for bites and the presence of pike.
Peculiarities of catching pike with summer girders and their types
Depending on the season, girders are divided into winter and summer. In other words, gear for closed or open water, which determines their design. According to the installation method, there are floating ones (circles), on a stationary pole (postavukhs), and slingshots for fishing from the shore.
Summer to winter zherlitsa
Winter gear for catching predators can be easily converted into a summer version using sheet insulation and thick rope. In open waters, with the help of an installed signal flag, the bite is quickly detected. The effectiveness of winter girders, which are competently converted, subject to the calculations of the technical characteristics of the gear, is not inferior to their summer counterparts.
The depth of the bait should not be less than 1 meter and no more than 2 meters, since it is in these layers of the reservoir that the temperature is optimal for live bait.
Mugs (floating mugs)
The essence of this fishing method is the natural movements of the bait, which should interest and provoke the predator to attack. Correct calculation of the technical characteristics of the fishing rod will ensure a guaranteed catch, and the slightest errors and errors in the manufacture of gear will reduce efforts to zero.
Slingshot from the shore
The most ancient way of catching pike is using a slingshot. This type of summer girder is used in reservoirs with a large amount of algae, snags and other obstructions that make it impossible to use a spinning rod. The tackle is a spear with a line wound around the branches of a fork in the form of a figure of eight. Even material found on the shore - dry branches, etc. - is suitable for a slingshot.
Summer rig for pike
To set up the gear you will need:
- leash - the optimal length when catching individuals up to 5-7 kg is at least 35 cm, for larger fish you will need over 70 cm. This increases the number of bites. You should not make it longer than 1.5 - 2 m, since the likelihood that the fish will go into the thickets increases. It is also not advisable to take a soft or thin leash without a plastic coating, as the pike can chew the line or break it.
- fishing line or nylon thread - the length is selected specifically for the selected reservoir and most often up to 20 m, and the diameter does not exceed 0.5 mm.
- sliding load - for floating girders, the optimal weight of the load should not exceed 5-10 g. It is calculated for each tackle depending on its diameter, size and weight of the live bait individually.
- swivel - is a mandatory component of the rig, used to prevent tangling of the fishing line and stops the sliding load. This element contains a roller mechanism that ensures free sliding of the line when fishing for fish up to 20 kg.
- hook - doubles or tees are used. Their choice depends on the type of bait and the method of attaching it. A live bait is placed under the gill cover on a double, and under the back - on a tee.
How to properly place girders on pike in summer
To successfully catch pike in the summer using a zherlitsa, you must:
- Choose the right fishing line thickness, taking into account the expected weight of the individual, fishing conditions, and the passivity of the pike;
- The place should be shaded, near springs and springs, near the border of clear water and thickets of water lilies;
- Considering that pike feeding time occurs from dawn to 9 am and after the heat subsides in the evening, the girders are set out at night or very early in the morning;
- The shore fastening of the gear must be securely fixed;
- The strength of the current and its presence in principle, as well as the weight of the live bait, determine the size of the sliding load and the type of swivel;
- To keep fishing simple, it is not recommended to install more than two leashes.
How to catch pike with a winter bait
In order to catch a pike on a girder, the following principles should be observed:
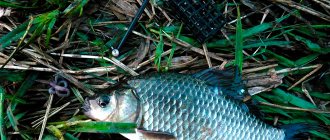
- Choosing live bait for fishing. It is advisable to use small fish as live bait that can be caught in a pond. Pike bites well on bream, perch, roach, and ruff;
- Correct placement of vents. To find out where pike can live and feed, the tackle needs to be installed in different places. It is advisable to drill new holes next to the installed vents, so that later the vents can be moved to another location. The rearrangement must be done until the pike begins to bite;
- Sweeping. As soon as the pike starts to bite, the flag installed on the alarm will immediately straighten. However, you do not need to immediately pull out the girder, otherwise you may scare away the fish. It is advisable to wait a couple of minutes, and then smoothly pull out the line along with the fish.
How to catch pike on girders in summer
The presence of a current requires a more careful calculation of the weight of the sliding load and the method of fastening the vents. This differs somewhat in the way the gear is installed. Put it right
On the river
Fishing for pike on the river involves the use of a fishing line with a diameter of up to 0.6 mm and a length of no more than 8 m. Considering the presence of many snags near the bays of the reservoir, it will not be possible to insert a short fishing line into the “fishy” places. The weight of the sliding weight is chosen to be slightly larger than 10 g in order to keep the line flowing and balance the movements of the live bait, bringing it closer to the natural feeding behavior of the pike. In addition, a weight lying motionless on the river bottom holds the leash with bait in the desired position.
Video: Summer fishing for pike with girders on the river
Fishing for summer girders. How to catch pike using these devices in the video below:
On the pond, on the lake
For lake and pond fishing, it is optimal to install 5-10 girders, which are placed near the confluence of tributaries, islands of algae, rocky ridges and snags, various holes, in thickets of reeds, sedge, and pondweed. Pike feed most often on the border of multidirectional flows or slow and fast currents. The length of the fishing line for lake fishing is from 12 m, which allows the predator to swallow the bait without interference.
Pike bait is interesting when it is live. To do this, you should carefully place it on the hook without injuring the fish, but at the same time secure it firmly.
If the vent has been triggered, you should not approach it immediately. You need to wait until the caught predator unwinds the entire line, and then hook it.
How to catch pike with a bottle
A pike fishing bottle works the same way as a circle. The advantage of this device is that it is easier to manufacture and can be used even by novice fishermen.
The best time to fish with a bottle is during Indian summer. At this time, for successful fishing in this way, you need to choose a large body of water in which large animals live. If you plan to use live bait, you need to choose a river or lake that contains a lot of pike, perch, and pike perch. It is not recommended to choose small bodies of water, because... It will be more difficult to choose a bait that will definitely bite.
Having chosen a suitable place for fishing, take care of the reliability of attaching the live bait. Place it on the hook using one of the following methods:
- Behind the back: the hook is inserted under the dorsal fin so as to securely fix the bait without damaging the spine. The latter can lead to the fish stopping moving and the pike not seeing it in the water.
- By the lip: the hook is fixed on the upper lip of the bait so that it cannot come off during movement.
- By the gills: the end of the hook for attaching to the fishing line is inserted into the mouth cavity of the bait, brought out through the gills, then secured. With this method, the baitfish is not injured, so it can attract predators longer.
- By the tail: to secure the live bait in this way, you must first wrap its tail with thread, then thread the hook under it.
How to make summer girders for pike with your own hands
To make a trap for predatory fish, you need to choose the type of gear depending on the type of reservoir where you plan to fish. The most common in summer are mugs, homemade slingshots, as well as converted winter girders. Let's take a closer look at how to properly make one or another summer girder for pike with your own hands.
From the winter zherlits
You can prolong the pleasure of pike fishing in the summer using a winter girder with the help of a small modification. More details in the video below:
Mugs
To make this tackle you will need polystyrene foam, a spool of fishing line and a stand for it, a plastic stick-pin, and red paint. A circle with a diameter of up to 20 cm is cut out of foam plastic up to 2.5 cm thick. A stand for the reel and a signal flag are installed in the center so as not to interfere with the movement of the fishing line. A hole is made in the circle for laying fishing line with a hook attached at the end.
With the help of a 2-3 meter long rope and a load, the circle will not be carried away by the current or wind.
Only the top side of the tackle should be painted red. This way the bite will be noticeable, since the circle will turn over, and the whiteness of the bottom will be more noticeable from afar.
Slingshots
This device is made from branches of a bush, willow, hazel or young willow with a slight divergence angle. If such material is not found, you can take a twig with a slightly larger fork angle and tie it with twine during the drying process.
It is not allowed to speed up drying using a stove or other devices, as this will make the wood brittle. It is also undesirable to drive nails into it or use tools for rough processing of wood - cracks or other damage will make the tackle unusable.
The drying time after removing the bark should be at least a week in a dry place. To better secure the fishing line on each rod, stepping back a little from the crevice, screws are screwed in or recesses are made. A nylon thread or fishing line with a diameter of half a millimeter and a length of up to 5-10 meters is wound in a figure of eight on the spears. Finally, a sliding sinker, a tee and a leash are put on.
Do-it-yourself summer girders for pike
In summer, when the water warms up, pike prefer to stay in the depths of the water, but there are a lot of small specimens in shallow water at the height of the season. When catching a predator, it is better to choose places overgrown with reeds and vegetation.
It is in these places, where the use of other gear is simply impossible, that a simple design of a pike rig will come in handy.
To make it yourself, you will need a regular slingshot as a base. You can use a pole to attach the tackle to the tree.
To assemble the vent you need:
- equip the cord with a float;
- attach the lace;
- tie her rope to a cord;
- install near vegetation;
- secure the slingshot;
- place live bait on the end of the rod;
- attach a fishing line, pass a sliding sinker through it;
- equip the tackle with hooks.
Pike fishing is successful with fast and agile live baits
It is also worth paying attention to their correct placement on the hooks in order to maintain mobility for quite a long time. You can hook the bait fish by the lips or tie them with threads, threading them under the gills (the fin is behind the back)
When fishing for pike, it is important to approach with full responsibility not only the choice of a girder, but also the installation of this equipment
It is worth paying attention to the food. In the middle of summer, the predator rarely swims up to the bait
At this time, small fish are swarming around right near the shore, and the bait can become completely ineffective.
You also need to take into account the direction of the wind. To avoid winding the bait around the driven stake, it should be slightly tilted taking into account the direction of the current and wind, preferably installed at the exit from the holes.
If the installation of the pole is hampered by the bottom or rocky shore, then it is reasonable to place it on the water in a vertical position and secure it to the shore with the thick end. Press the thin end with a weight to prevent it from moving along the shore in the wind.
It will be interesting to see how to sew a cover for fishing rods with your own hands.
Do-it-yourself summer zherlitsa from a plastic bottle
Ordinary plastic bottles have found their use among fishermen - inventors who are accustomed to making tackle with their own hands. It’s better to fish for bottle bait from a boat. For the convenience of transporting it together with other gear, you should choose a bottle with a volume of 0.5 liters.
First you need to make the base of the vent, for this:
- cut the bottle in half in the middle;
- use scissors to make slits up to 2-3 cm in length in the upper part of the bottle for subsequent fixation of the fishing line;
- bend the resulting tongue inward at the cut site;
- make a hole in the center of the lid;
- place the cord in a figure eight under the lid and secure it;
- From the inside, to make a reel, fasten a cord (fishing line) under the neck of the bottle. You can use tape for these purposes.
- screw on the vent cover, and the design is ready.
There can be several options for making a summer bottle from a bottle:
- The fishing line can be wound around the neck of the bottle.
- Equip the end with a tight rubber ring, i.e. from several loops around to achieve greater rigidity.
- At the moment of a bite, the line will begin to freely come off the bottle. For the fisherman, this is a signal to start catching fish.
A plastic bottle is a summer floating tackle, which is best used from a boat, having been mounted with a large volume (1.5 liters):
- fasten the fishing line under the neck of the bottle across the base;
- place a free loop under the rubber ring;
- To detect bites from a distance, fill a bottle with some water and you can go in search of a predator.
When the bait is captured and the line begins to come off the bottle, and the neck part goes under the water
Of course, the predator will begin to resist, and here it is important not to miss the moment to get its bearings and start fishing for it in time. The bottle will serve as a float and at the same time a bite alarm.
The fisherman will only have to take all precautions to pull the caught (sometimes quite large) prey ashore. Zherlitsy are old, native Russian gear, quite catchy and suitable for catching predatory specimens with live bait.
Zherlitsy are old, original Russian gear, quite catchy and suitable for catching predatory specimens with live bait.
Zherlitsa are excellent for fishing with live bait, even in the heat (at the height of summer), when the fish almost refuses to feed. With proper manufacturing and use of gear, you can catch not only pike, but also burbot, large perch, and asp.
These gears are easy to make and quite successful when catching fish in hard-to-reach places, where dense vegetation and low-hanging trees over the water make it difficult to use a spinning rod, a float rod, or other well-known gear. Zherlitsy are the most productive for catching predatory inhabitants of the area.