Why do fishermen make so many elements of equipment with their own hands? There are several answers to this question.
- Not all gear is available in stores, especially on the outskirts of cities or in small villages.
- Factory devices require improvement.
- Not all fishermen can afford factory-made products.
- It’s more pleasant to fish with gear you’ve made yourself.
We started the story about how to make sbirulino with a question about our fishing Kulibins, because we didn’t find a float for this gear in the nearest store, and we didn’t want to go to another one.
Components of bombarda (sbirulino)
Bombarda or sbirulino (both names are correct) is a large float with good flight characteristics and is minimally noticeable to fish. This sliding float is attached to the fishing line using stoppers, and the fishing line passes through the body and antenna of the sbirulino.
Bombard elements:
- Hollow drop-shaped white or transparent body. There is no need to paint the float, since it does not carry a visual load, and the bite is determined by the tip of the rod.
- A long antenna, the purpose of which is to increase casting range by stabilizing the flight.
- The load, which determines both the flight data and the buoyancy of sbirulino.
Bombard body
Let's begin the description of materials for the manufacture of gear elements with the most voluminous part of the structure - its body. Let's analyze and evaluate the materials from which the body of sbirulino can be made:
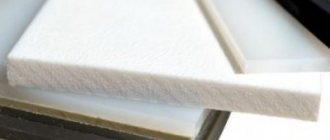
- Styrofoam. One of the most popular materials among homemade fishermen. So many good things can be done from it! Including turning the body of the bombard.
- Syringe. Great for our homemade project as a water-filling float with variable weight. It can be used to make both a floating and a sinking bombard model.
- A ball from a bottle of deodorant. A transparent ball will not scare the fish, who will mistake it for an air bubble.
- Wine bottle corks. In terms of popularity for making floats, they are quite capable of competing with the foam plastic mentioned above.
- Capsules for medical shoe covers. Also an excellent water-filling float.
- Barrels of chocolate eggs with a surprise. You can fill them with water and fill them with lead pellets.
- Details of broken factory floats. It would be a pity to throw it away, but it might come in handy here.
If you make float bodies from a different material, leave your feedback, we will be only too glad.
Antennas
A homemade bombard must have a long antenna, at least twice as long as its body. Moreover, it should be made of durable but light material. For this purpose, you can use various plastic tubes, which are easy to find yourself:
- The refill of a ballpoint pen works great for light floating floats.
- Tubes from sucking candies like Chupa Chups also have sufficient strength, but only long ones are suitable for us, since the choice of such candies is now huge.
- The core of the gel pen already has stronger and thicker walls. It can already be used for heavy floats.
- Anti-twist tube designed for feeder fishing. It is very durable because it can withstand the weight of a filled feeder.
- Cocktail straws can also be used for large sbirulino.
Loading
Here we need to talk more not about the materials for giving weight to our floats, but about the method of surrounding the sbirulino bodies with them. After all, in fact, there are only two materials for this: water and lead. But now we’ll look at how to surround bodies with them.
Hollow structures such as syringes, deodorant balls or Kinder surprise capsules can be immersed either in water or using lead balls. Solid structures - foam and cork, only lead.
If it’s easy to pour water into hollow bodies and place pellets, then you will have to sweat over loading the foam to do everything correctly.
One way to weight bodies is to encircle them with thin lead tape. This option is suitable if you managed to acquire sheet lead. The second method is to drill holes and glue pellets into them.
Assembly
Let's assume that we have prepared all the elements of sbirulino. All that remains is to assemble all the parts into a single whole. Let's start collecting, keeping in mind some factors.
- We drill a through longitudinal hole in the body of the float for the antenna. The diameter of the hole must match the outer diameter of the antenna.
- We glue the selected antenna into the body so that it does not stick out from below. Before using glue to connect parts of the structure, you need to do a test gluing. This is done to ensure that the selected adhesive will not corrode any of the materials.
- We enclose the bombard body using one of the above methods.
- The place where the pellets are glued must be additionally filled with glue for greater reliability of fastening.
- Final processing: sand and coat the elements with paint or varnish.
- Dry the product.
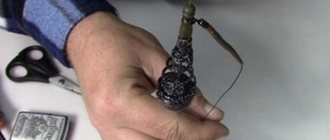
Manufacturing technique
As a rule, to create a “bombard”, fishermen use the simplest parts that have already served their purpose and are not suitable for their intended use. Such details may include:
- a plastic tube or part thereof, which previously served as a housing for any part;
- to obtain the necessary buoyancy, the plastic tube is loaded with ordinary solder, which can be placed inside the body of the plastic tube;
- Epoxy glue is necessary to form the bombarda's sealed body.
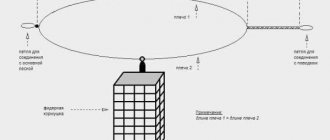
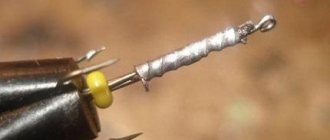
To make a load, you need to wind brass wire in several layers onto a metal pin, the diameter of which is equal to the diameter of the antenna.
And here's what you need to know: Do-it-yourself feeder top
(I used a 4mm drill shank for this). Then remove the weight from the drill and place it on the end of the antenna.
Model preparation
On the factory Jaxon bombard you need to pull out the original antenna (it is secured with a drop of glue), drill a hole with a Ø 4 mm drill, and insert our antenna there - a piece of anti-twist.
Mold making
First, briefly about the essence of the operation.
An epoxy compound is placed in one half of the pipe. The model (factory bombard) is pressed into it.
Then the second half of the pipe is filled with epoxy, which is pressed against the first half.
After hardening, the halves of the pipes are separated, the model is removed, and we have two half-forms in our hands, each of which has a recess - an exact impression of the model.
Now in detail. The inner surface of the half pipes is cleaned. In order for the epoxy mixture to bond more firmly to the metal, it is advisable to make marks on the cleaned surface with a drill.
I didn't do this at first, so part of the hardened mold broke off from the base. I had to glue it with superglue.
The epoxy mixture is prepared according to the instructions. After heating, it becomes plastic and sticky. The mixture is placed in half of the pipe.
Before pressing the model, you need to coat it with some kind of oil so that it does not stick to the epoxy. (I used chemically inert silicone oil).
The main thing you need to pay attention to when pressing the model is that it is immersed exactly halfway, and that the mixture adheres to it over the entire area, including the surface of the antenna.
The mixture in the first half-pipe must be given time to harden - about 2 hours. After this, the second part of the mixture is prepared and placed in the other half of the pipe.
Then both half-pipes are connected (forming a whole pipe) and tightened with clamps. Excess epoxy mixture is squeezed into the joint of the half pipes. It needs to be cut off and thrown away.
It takes about a day for the composition to completely harden.
Do-it-yourself bombard; casting it has its own difficulties. There is one problem that you need to prepare for in advance. Its essence is that it is very difficult to make half-forms that are the same in depth.
It turns out that one is shallower, the second is deeper.
A cast bombard is always difficult to remove from a deeper half-mold; there is simply nothing to grab it by. You can't grab the antenna, it will bend.
To make it easier to remove the product, we had to come up with a kind of mortgage in the form of a thin nylon cord.
A hole with a diameter of 0.8 mm is drilled in the center of a shallow half-mold. A cord folded in half is passed through it, with a loop at the end that captures the antenna tube. It is through this cord that the bombard is subsequently removed from the deep mold.
Well, now to the point. We measure the required amount of polystyrene into a cup (two filled halves of the mold) and add water to it. Lubricate the mold halves with separating oil and place the antenna with the weight in the shallow mold, passing it through the loop of the cord.
We fill the half-mold with wet polystyrene (with a heap) so that it covers the entire surface of the mold, including in the area where the tube comes out.
Place another half-form on top and tighten them with two clamps. Heat the mold over the surface of boiling water for 20-25 minutes. Then remove and let cool naturally.
When the mold has cooled to a temperature that your hand can withstand, you can further cool it with cold water. Remove the clamps, then the small half. Using the cord, we pull the bombard out of the deep half-mould. We pull the cord out at one end, use a knife and fine sandpaper to process the surface of the product, removing all irregularities.
Fishermen use classic options for mounting bombards, using the simplest components to assemble the device:
- a fragment of a plastic tube selected to form the body of the product is treated with coarse sandpaper. This is required to ensure stronger contact of the surface treated with glue;
- To manufacture a device with a greater weight, a procedure for loading it is carried out. To do this, you need to wind lead solder wire onto a prepared plastic tube and secure it with epoxy glue;
- The body of the sbirulino is formed using epoxy glue (cold welding).
Using this principle, a variant of a floating bombard is designed. To do this, it is enough to include a part with good buoyancy in the model. As a rule, an inexpensive float purchased in a store with a through hole is used.
Bombard made of foam plastic and gel pen
To make a bombard from foam plastic and a gel pen, do the following:
- Cut a rectangle 5-6 cm long from hard and dense foam plastic.
- Shape the foam rectangle into an oval shape using sandpaper.
- Poke an awl or drill a hole with a screwdriver in the center of the foam blank with a diameter corresponding to the diameter of the gel pen ampoule.
- Spread the ampoule with glue that does not corrode the foam, insert the ampoule into the foam.
- Use lead to bring the bombard to the desired weight.
Do-it-yourself bombard made of plexiglass - filling float
There is another way to make a bombarda with your own hands at home. The manufacturing process will be a little more complicated, but the appearance of the bombard will be practically indistinguishable from store-bought ones. If you have at least the slightest metalworking ability or a passion for needlework, then everything will be elementary for you. But if you are a lover of everything simple, then it is better for you to use the first method of making a bombard.
To make a bombard you will need:
- sheet of metal for making a mold for a bombard. Sheet thickness is about 1 mm, length 30 cm, width at least 3 cm.
- plexiglass;
- epoxy adhesive;
- thin wire for making brackets for fastening fishing line;
- sandpaper;
- file or grinding wheel;
- oven.
Manufacturing process
It will be more clear to you from the video below the article, but I will still describe the main points. It is necessary to make a mold for the sbirulino float from a sheet of metal, which is a sheet bent in half with a certain bend radius. The ends of the metal sheet are joined to form a teardrop shape when viewed from the end. This is exactly the shape our bombard will be.
Next, you need to cut out a piece of plexiglass that will protrude about 10 mm beyond the edges of the metal mold. We put it all in the oven at a temperature of 110 °C and wait until the plexiglass begins to melt and settles into the mold.
We take out the mold with plexiglass, let it cool and grind off the excess plexiglass along the end of the metal on a grinding wheel. So we got half of our sbirulino float. By repeating the procedure, we get a second, identical, symmetrical half. They need to be well sanded so that the planes with which the halves will be connected are even.
Metal mold
Form dimensions
Place plexiglass on the mold
Melt in the oven
Repeat and get 2 halves of the float
It is important that your wife does not notice that you are cooking in her oven.