Yuri 12/15/2020 343
Perch hunting is popular among fishermen. There are many techniques for successfully catching a predator. Often anglers, especially beginners, are interested in whether perch bites on a worm? Fish are famous for their gluttony, so there will be no problems. The predator readily bites on this bait. This method does not require experience or training. It is important to choose the right gear, and of course know the “fishing” places.
Features of the bait
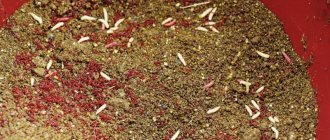
Catching perch with a worm is one of the most undemanding methods. It is popular with both beginners and experienced fishermen. You can buy a live worm at any fishing store. But store-bought worms do not have a specific “natural” smell that attracts fish. Therefore, many fishermen prefer to prepare them themselves, although this is not the most pleasant experience.
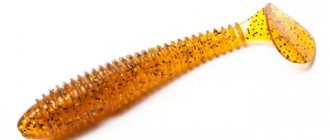
There is also an alternative to live food - silicone worms. They are treated with flavorings that drive the predator crazy. In stores you can find worms of different sizes and shades. The most successful colors are black, brown and red.
It is also important to choose the right tackle for catching perch with a worm. Many people, out of habit, prefer spinning - you can cast it far from the shore, as well as fish from a boat at depth. But a regular float rod is more suitable. Perch is not large in size, so a light float weighing up to 1 g is enough.
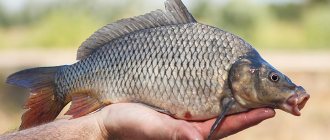
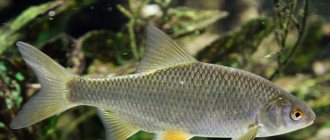
Catching large roach with a worm
If small roach are not of interest, then you should stock up on worms. As a rule, only large roaches are caught with this bait. Note that in addition to roach, bream, perch, burbot and pike perch can bite on the worm in winter, so the tackle for such fishing must be strong.
For fishing in areas of the reservoir where the depth is more than three meters, it is recommended to use medium-sized jigs, on which a small worm is attached as bait. Note that it is with a worm in winter, especially at the end of winter, that you can catch large roaches.
Autumn fishing
Catching perch with a worm in the fall is possible both from the shore and from a boat. Small individuals remain throughout the entire water area - both in deep and coastal waters. Large fish often go deep, hiding behind underwater snags, stones and other obstacles. In autumn, the frequency of biting depends on the size of the flock found. If there is a food supply, the fish lingers in one place for 30 minutes or more.
Another feature of autumn fishing is the changeable weather. An excellent bite is ensured on warm sunny days with stable pressure. Fishing in cloudy weather accompanied by precipitation and sharp gusts of wind is unpromising. The situation changes with the arrival of the first cold weather. The fish senses the approach of winter and actively goes in search of food. This is the best time to catch a predator with a worm.
Types of worms for fishing
Despite the many personal names, worms belonging to the same family are used for fishing. The first of these is worth mentioning earthworm . It is called differently: rain, crawl, underleaf, and so on. In fact, this is one species - an earthen one, it’s just that fishermen gave it a lot of names based on its location: in the ground, after rain on the surface of the soil or even asphalt, under rotten leaves.
The dung beetle is another species from the same family that is successfully used in fishing. As the name implies, it can be found in stale manure, compost, and rotting food waste. Getting it is, frankly speaking, unappetizing, but what can’t you do for your favorite hobby!
The dung beetle, unlike its earthen counterpart, is much more unpretentious and demanding in terms of keeping conditions, however, some principles need to be known when handling this potential bait.
All earthen subspecies and the dung beetle do not get along together: they require different conditions of detention. In addition, the dung beetle is capable of poisoning its earthen counterpart with toxic secretions.
Home storage
The most common way to store worms at home is to use specially prepared containers filled with nutrient substrate. The ideal container would be a wooden box, but in the absence of one, you can use plastic or metal buckets and basins. In the latter case, you need to say goodbye to the integrity of the container: you need to make holes in it for air circulation. Worms need a large living space, so the larger the container, the better.
The container must be filled with nutrient substrate. The simplest option: this is loose soil (for dung beetles - food waste, manure) mixed with fallen leaves. Peat, moss, hay, straw can also be used, and chalk or eggshells can be used as a neutralizer. It is necessary to moisten the resulting composition - and you can move in the residents. The container must be covered with something, otherwise you will collect crawling creatures throughout the apartment. You can’t seal the “house”: the residents will suffocate. You can stretch a piece of cloth or gauze over the top - it will be ideal.
The ideal storage temperature is 6-10 o C. You can use a balcony or loggia for this purpose, but in the summer heat this is not the best option. A cool basement or cellar is ideal, or, in their absence, a household refrigerator. Just don’t forget to enlist the support of your household: not every wife will be sympathetic to the proximity of a box of worms and a pot of borscht.
During the process, you need to monitor the moisture and oxygen saturation of the soil. The substrate needs to be periodically watered and mixed, but you should not overdo it with water: the soil should be moist, but not wet! This is why the worm needs to be stored in an unsealed container: excess water drains through the holes and oxygen enters.
When kept for a long time, the “fish delicacy” needs to be fed periodically (once a week is enough). For this purpose, you can use chopped banana peel, drunk tea, cottage cheese, chopped raw potatoes, and moistened paper without printing ink.
Handling bait in the heat
Even the undemanding dung beetle becomes lethargic in the heat, so during summer fishing you should pay special attention to keeping the bait in a marketable condition.
If we are talking about a long fishing session, you can take a container with worms kept at home and place it in the most shaded place, in a draft. It is advisable to dig a hole under it: then it will be even cooler there.
You can simply store worms in a marketable form in a hole , and this method can be used both while fishing and at home if you have a cellar. To do this, you need to dig a hole, line it with a layer of mosquito net or loose fabric (preferably burlap, but many even use ordinary tights for this purpose).
After this, you need to fill the improvised container with soil of sufficient looseness (you can add sand or sawdust), populate it with worms, and then tie the fabric into a makeshift bag. An alternative option is to use a fine-mesh metal or plastic mesh as a “cover.” If the hole is deep, well lined to the top, and there is not much substrate with worms, you can do without tying the fabric or other protection against spreading.
During storage, one should not forget about periodic aeration of the soil with the addition of a sufficient amount of water. To maintain the optimal temperature, it is recommended to cover the hole from above with spruce branches.
[THERE IS AN ANSWER] How to catch pike perch in winter from ice?
Sometimes fishermen use linen bags or ordinary work mittens filled with substrate for similar purposes. They are hung in the shade in the wind and periodically dipped in water to moisten. For a one- or two-day session, this option is quite valid.
Storing worms in freezing conditions
When going fishing, the main thing is to prevent the bait from freezing. To begin with, you should pack it together with the substrate in several bags (to avoid tears), tie it up and put it in a fishing box. If the frost is mild and the box has sufficient thermal insulation, you can store bait there during fishing. Otherwise, you will have to follow the example of the fishermen of the past and warm the precious bait with your own heat, placing it under your clothes.
Please note that sealed containers and plastic bags are not intended for long-term storage: the worm does not receive enough oxygen, and the substrate quickly becomes compressed. To increase its viability in these conditions, you need to take fewer worms per amount of substrate and periodically let them “breathe” fresh air.
Tips from experienced anglers
And at the end of our publication, according to tradition, we offer you advice from experienced fishermen:
In modern conditions, there is no need to bother with the extraction and provision of optimal living conditions for worms: in a specialized store you can purchase not only the necessary equipment, but also any bait. In short, if you have the desire, there will always be an opportunity for great fishing!
So, it is better to take a plastic container of the selected volume, in one of the corners of which at the bottom make a drainage hole with a diameter of about one centimeter. I have already shown and told how to make excellent ventilation
Good day, dear readers of my blog!
With the onset of cold weather, the problem arises - how to preserve the worms until next spring.
In this article, I will describe to you the most accessible methods of keeping them, which will help not only preserve the population, but significantly increase the number of earthworms, stimulating them to reproduce.
A place for such temporary detention can be equipped anywhere; the earthworm is not picky about conditions of detention, and even the loudest sounds do not frighten it at all.
However, even a slight vibration terrifies the worms, they stop eating and often run away.
This is a defensive reaction developed over many thousands of years of evolution; vibration is perceived by them as a signal of the approach of their worst natural enemy - the mole.
If you are a regular reader of my blog, you probably already know the four most essential factors for successfully keeping earthworms.
- Excellent ventilation.
- Room temperature.
- Sufficient humidity.
- Rational nutrition.
But that's all later. And you need to start with the most important thing - with a container for keeping animals. Yes, I didn’t make a reservation – specifically animals. An earthworm is the same animal as a dog or guinea pig and therefore requires respectful treatment and the creation of suitable living conditions.
I myself keep my million-strong hornless herd all year round in a stall under the house - with a useful volume of 8 cubic meters. m. where I regularly bring “forage”.
But if you still decide not only to store worms in the winter, but also to increase their population, then you need to calculate the volume of the future home - approximately one liter of container per 10 individuals.
For simple conservation, without creating breeding conditions, you can use a much larger population in the same liter container, up to 100 heads.
So, it is better to take a plastic container of the selected volume, in one of the corners of which at the bottom make a drainage hole with a diameter of about one centimeter. I have already shown and told how to make excellent ventilation
Temperature Successful storage of worms should be carried out under optimal temperature conditions for their maintenance, from +17 to +23 degrees.
Humidity The humidity of the substrate should be at least 70%. If it is larger, then there is no need to worry too much about it - excess moisture will go out through the hole in the bottom.
Rational nutrition You can feed such animals with any organic waste . When moving to a new place of residence, I recommend moving them with a small amount of natural substrate. Thus, in an unusual habitat, the necessary microflora and fauna are quickly formed, and rapid adaptation to new living conditions occurs.
The main mistakes that almost all beginners make:
- grind kitchen waste, turning it into a homogeneous “porridge”
- cover the entire surface of the substrate with this “porridge”,
- They make a thick feed layer from this “porridge”.
Worms, like us, love a variety of foods and choose what they want at the moment. And if the assortment is wide, then it is eaten with greater appetite than a monotonous mishmash. Unground components release moisture more evenly and longer, and only to a shallow depth, than ground components. Therefore, the stability of the bulk of the living microcosm of the substrate is not disturbed.
If we cover the entire surface, even with a thin layer of mash, the ventilation of the entire volume of the substrate will be disrupted and the complete death of our living creatures may occur .
Therefore, you need to cover only one third of the worm territory and in no case with a thick layer. The maximum layer of “porridge” is 5-10 mm, or better yet, not crushed at all and on the same area.
And carefully cover the food supply with several layers of waste paper, cardboard or old rags, which will prevent a war with midges on the TV screen and on the computer monitor.
I even fill my huge stall for worms under the eco-house with food only in relatively small portions.
I hope that my experience in preserving worms in cold conditions will be useful to you and help you preserve these useful animals until spring.
Subscribe to my blog articles and be sure to share with your friends on social networks. A lot of new and interesting things await you ahead!
Just as we cannot remove the words from the song, in the process of writing three recent articles, we could not do without preparing and eating two pies with carp and one with herring in honor of the holiday.
[THERE IS AN ANSWER] How to make a winter fishing rod with your own hands?
PS I won’t be offended if you congratulate me - after all, today is Fighter Aviation Day!
Health and prosperity to you! Best regards, Victor Dulin.
It is important to remember that the place where you store the worms should be cool. In this case, the best option would be a refrigerator. However, not all fishermen have the opportunity to place a large container with invertebrate creatures inside the refrigeration chamber for a long time. That is why you have to look for other places, for example, a balcony. There are several other options for storing worms at home. One of them is an aquarium, the second is a canvas bag.
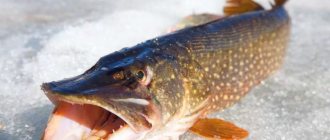
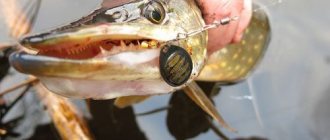
Perch in winter for worms
There is an erroneous stereotype that you can only hunt predators in summer and early autumn. Inexperienced fishermen are wondering: is it possible to catch perch with a worm in winter, or should they wait until it warms up? This is quite real - in winter, the worm often helps out fishermen.
In general, the predator is active all year round and rarely goes into complete hibernation. But a lot depends on weather conditions. In the first weeks of cold weather, the fish live a normal life and attack the worm with appetite. But as the ice cover thickens, the water temperature drops and there is less oxygen. The fish begins to change location in search of food and oxygen supplies. But until severe frosts hit, she is actively looking for food, so you can count on a generous catch.
Catching perch in winter with a worm requires patience. You may have to drill several holes before you find a “fishing spot.” Again, it all depends on weather factors. You can start when the reservoir is covered with ice at least 5 cm thick. But if there is no snow, any movement on the ice can scare away the fish. If you don’t want to wait for snowfall, you can use this trick:
- Drill holes in advance.
- Lay out a raincoat on the surface of the ice.
- Prepare the equipment and install the seat.
- Feed the predator.
During the first ice season, the number of the flock reaches 10-15 individuals. If the bite is successful, you can catch most of the fish. When there are few individuals left, they leave the place to join another flock.
Small perch can be caught using worms in coastal waters in winter. This is relevant in the dead of winter, when oxygen reserves are depleted, the fish loses activity and sinks to depth. But small individuals often spend the winter near the coast, where the oxygen concentration is higher due to thin ice.
By the end of winter, in addition to the lack of oxygen, the food supply will become scarce. With the advent of a thaw, the thickness of the ice decreases, and the fish rise to the surface again in search of oxygen and food. You can use a trick - feed not the perch itself, but its food supply (small fish). And when a hungry predator happily comes to places where there are a lot of fry, you can start fishing with a worm.
Catching perch with a worm is a simple and affordable way to get a generous catch.
Experienced fishermen advise baiting several worms - a moving ball attracts a predator. In addition to live bait, you can use silicone analogues. In appearance they do not differ from living worms. If there is no bite in one place for a long time, it is worth changing the location.
TAGS:
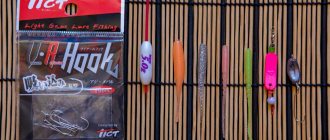
Jig fishing tactics
A jig is a lead droplet with a hook soldered into it and a hole for the line to pass through. The fish are probably seduced by this impetuously moving object, whose “behavior” is reminiscent of many small aquatic animals. The more skillfully the jig plays in the hands of an experienced fisherman, that is, the more natural its movement, the more catchy it is.
The techniques for fishing with a jig are very diverse and are easy to master in practice.
The jig is first lowered to the bottom, then slowly raised up 5-10 cm, lowered to the bottom again, etc. Sometimes it is useful to lift the jig up 60-90 cm with a short twitch. A reasonable question arises: how to find the desired speed of movement of the bait and amplitude of oscillations? There is only one answer - empirically.
First, you can give it any speed and any amplitude. If this leads to success, then the choice was correct. But this happens very rarely. Sometimes you have to try one, two, three speeds and amplitudes until it becomes clear what the fish likes.
There are many techniques for playing with a jig. It is advisable to know them more. But first, you can get by with the most commonly used ones. By the way, they are suitable for all periods of ice fishing, you just need to adjust the speed of movement and the amplitude.
Here are the techniques developed by practice:
1. The jig is placed on the bottom; after a few seconds they begin to rise with a small twitch; from a height of 15-20 cm they are again placed on the bottom and again raised to the same height with twitching; This is repeated until the bite, which, by the way, often happens at the moment the jig comes off the bottom.
2. With small twitches, the jig is made to tremble at a certain depth, gradually raising it by 0.5 m and lowering it to its original position.
3. From the bottom, the jig is slowly raised, twitching, to the height of an outstretched arm of the fisherman sitting on the box: then it is quickly lowered to the bottom and again slowly raised with twitching to the same height.
4. As in the previous version, the jig is slowly lifted from the bottom, but without twitching or with twitching on individual segments of the rise.
5. With a twitch, the jig is lifted from the bottom to a height of 0.8-1.2 m, stopping periodically for 3-5 seconds.
6. Sharply lowering the jig, hit it on the bottom 2-3 times (knock), then with frequent twitching raise it to a height of 0.5 m, after which the operation is repeated. The “ground stirring” technique attracts fish with raised turbidity.
7. When fishing at shallow depths, performing any technique, move the line from one wall of the hole to another.
8. Raising the jig from the bottom by 3-5 cm, make it rotate around its axis. To do this, use the thumb and index finger of your free hand to slightly twist the fishing line.
9. The jig that has touched the bottom is slowly lifted, every 2-3 seconds the twitching is made a little stronger.
10. The jig is slowly lifted from the bottom by 15-20 cm. Here it is given oscillations for 10 seconds, then stopped for 3-5 seconds, after which it is slowly raised higher by 15-20 cm. And so it is raised with pauses to the height of an outstretched arm fisherman
11. The jig is driven close to the bottom, often hitting (the drum) with the index finger on the fishing rod.
12. The jig is lowered and raised at different depths, tapping the whip on the outstretched index and middle fingers of the left hand.
13. The jig lowered to the bottom is allowed to lie on the ground for 3-5 seconds, after which it is raised, first slowly, and then faster and faster. Sometimes the move is delayed for 1-2 seconds.
Experienced fishermen also use other techniques for playing with a jig, as well as various combinations described above. If all fishing techniques are used from the bottom, the jig is played in half-water or at the lower surface of the ice. You just need to take into account that in half-water and under ice, bites do not happen immediately: the fish need time to find the bait here and get used to the new pressure.
A jig, as you know, is attached to the end of a fishing line. Being at the same time a sinker, a hook, and bait, it is very sensitive. The perch eagerly grabs such a bait.
Other fish are also readily caught using a jig with bloodworms: ruff, roach, ide, and silver bream. They are caught with a jig and with a float immersed in the water.
Having lowered the jig to the bottom, the float is fixed 2-3 cm below the surface of the water. Many anglers who regularly engage in ice fishing use bait. The best bait is considered to be small bloodworms, cakes, bran, and steamed oats. The bait is lowered to the bottom in bait bowls. Various small fish scurry around the bait, and perches come after them.
When fishing with a jig in reservoirs with a strong current, you can tie a thin leash 20-25 cm long with a blood hook to the fishing line at a distance of 10-12 cm above the jig. With such equipment of the fishing rod, there are often cases of simultaneous catching of fish with both a hook and a jig.
But there is also an inconvenience - when fishing for a large fish caught on a hook with a nozzle or on a jig, the free part of the tackle sometimes clings to the lower edge of the ice, and the fish breaks off. To prevent this from happening, the holes must be made wider and the lower edge of the ice must be carefully cut off.
The best fishing lines for fishing with jigs are, of course, vein ones without knots. You cannot fish with a jig using a line with knots: even the slightest frost will cause ice formations near the knots. The fishing line becomes heavier, loses its elasticity, and bites become unnoticeable. Even when fishing on a fishing line without knots, ice pieces form on its surface part - they must be constantly removed.
Tags
Carp Buffalo Spring Vobla Asp Winter Crucian Rudd Summer Fishing baits Lower Volga Perch Autumn Fisherman's reminder Lures Bite forecast Fishing in Astrakhan Fishing baits Fishing tackle Fishing secrets Catfish Fishing methods Pike perch Catch Pike