How to tie braid to braid: the most reliable knots
In fishing, as in any serious business, there are no trifles. Especially when it comes to fishing line attachment points. Let us consider in detail how and when to attach the braid.
When tying knots from braided fishing line, it is worth considering the following features:
- Wetting. This is a mandatory requirement when performing nodes. When dry, the line heats up. Of course, this is a short-term process, but it affects the structure of the fishing line - it is destroyed.
- Section. As the knot is tightened, the line becomes twisted, which reduces its strength. Lines with rounded shapes have the least curl, unlike flat braided ones.
- Treatment. To increase the strength of the nodes, it is recommended to apply glue to the places of the nodes and fastenings. The maximum holding time should be at least 24 hours.
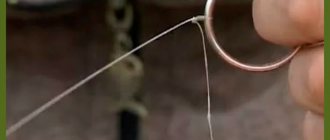
- Tying. When tying knots, you need to leave free ends of the fishing line at least 4 cm long. Then, after verifying their strength, the ends can be removed, taking into account the remainder of 4 mm.
Before considering the main components, introducing some concepts:
- running end - part of the fishing line that makes movements;
- root end - part of the fishing line not used for tying;
Knots for tying a hook
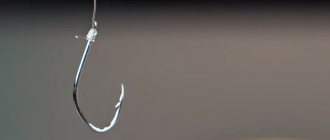
Palomar knot
Almost all fishermen know this. Its purpose is to attach swivels to the main fishing line, as well as connect twisters to hooks that have eyes. Unfortunately, knitting it requires that the fishing line be folded in half, and this increases the overall dimensions of the knot.
"Crawford" knot
Very often used for tying hooks with eyes, since the knot strength reaches 93% of the strength of the fishing line. It can be used on any fishing line (braid or monofilament), where it shows excellent strength results, and knitting it is quite simple.
"Bayonet" knot
It knits well on monofilament fishing line, but it is not recommended to use it on braid.
"Fisherman's Eight" and "Canadian Eight"
They have good reliability when attaching a hook and eye. If desired, such knots can be easily untied.
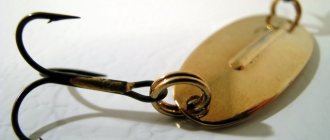
"Grab" knot (Clinch)
Perfect for connecting braided fishing line and a hook made of thin wire. However, this knot is not recommended for use on thick wire, including for attaching the winding ring.
Knot "Stepped"
Intended for tying hooks that have a spatula rather than an eye. Hooks with a spatula have increased strength, as they are created using forging methods. The reliability of such a unit is quite high and corresponds to the stability of the fishing line itself (that is, 100%).
Twisted Dropper Loop Knot
With its help, you can tie a hook to the main fishing line at any point, but before that you need to form a loop on the fishing line. It is often used in sea fishing, when it is necessary to very often change one hook for another or the bait of one type for the bait of another.
Centauri Knot
Does not affect the strength of the fishing line, therefore does not reduce the reliability of the connection.
"Hangman's Knot"
It is one of the most reliable units in terms of strength.
"Scaffold Knot"
Refers to sea knots, where you need to tie hooks to a fairly dense fishing line.
"Snelling A Hook"
A fairly complex knot, but it is reliable and durable and is intended purely for tying hooks to fishing line.
"Turtle" knot
Easy to knit but has good strength when crocheted with eye hooks. Ideal for drop shot rigs.
The best knots for attaching braid to braid
Triple Knot Method
Instructions:
- First you need to fold 2 braids, taking into account the alignment of the ends. Next, counting a segment of at least 20 cm from both ends, you need to clamp the fishing lines.
- After this, holding both fishing lines together, you need to form a loop.
- Then you should triple thread the ends of the braids into the formed loop.
- Next, you should tighten both ends of the folded braids.
- Finally, to fully form a strong knot, you need to pull each braid separately.
A high-quality assembly should not retain empty gaps between parts of the turn. This knot is characterized by maximum strength.
Centaurus method
Instructions:
- To begin with, the fishing lines need to be placed in a parallel manner.
- The running end of the fishing line is wrapped around the second fishing line at least 5 times. In the initial turn you need to leave an open part in the form of a small loop.
- The tip of the running gear of the braid is passed through the resulting loop in the initial turn and pulled tightly.
- Similar actions are performed exactly with the other fishing line.
- At the end, the ends of both lines should be stretched to the sides - the turns will move towards each other, forming a stop
The advantage of this method is its versatility and compactness. In addition, the strong fixation ensures stability and reliability while maintaining a load capacity of more than 95%.
Method "Blood Ties"
Instructions:
- The fishing lines need to be folded one on top of the other (crosswise) , leaving an end of at least 20 cm for each braid.
- You need to hold the intersection of the lines with your finger and make at least 8 turns of one line around the second.
- After this, the running end of the winding braid comes back and is passed through the crossed part of the lines. In this case, the through part of the lines should be clamped with a finger, with a loop at the base of the intersecting part.
- The running end of the second fishing line needs to perform similar actions , return it back and insert it into the free part of the fishing line pressed with a finger. Then you need to pull each knot in turn, of course, wetting the knots.
- Finally, you need to trim off the excess parts of the running ends of the fishing lines.
The characteristic difference and advantage of the unit is its strength and practicality.
Reliable fishing knots for braid
Braiding knots are needed for attaching various elements when assembling equipment. Beginners often do not know how to properly tie a spoon or swivel, or how to connect two cords or thread with fluorocarbon and nylon. The reliability of the gear depends on this. A well-chosen knot will prevent the line from breaking in a critical situation and will allow you to safely retrieve the trophy.
Characteristics
- By location:
marine, freshwater - Fishing season:
open water - Type of fish:
predatory - Types of fishing:
spinning - Fisherman's experience:
I've never fished, I fished as a child, I know what I'll fish with - Line type:
braided - Knot type:
Palomar, Albright, Carrot Leader, Uni, Clinch
Braiding knots are needed for attaching various elements when assembling equipment. Beginners often do not know how to properly tie a spoon or swivel, or how to connect two cords or thread with fluorocarbon and nylon. The reliability of the gear depends on this. A well-chosen knot will prevent the line from breaking in a critical situation and will allow you to safely retrieve the trophy.
Good knots for braided line must meet the following requirements:
- ease of knitting;
- universalism;
- minimal loss of strength;
- wear resistance;
- durability.
Knots for cord differ from the methods of knitting monofilament core. This is due to the difference in the structure of materials, their properties and application features. Not every time is suitable for braiding, since it can disrupt the integrity of the fibers, which will lead to its rapid deterioration.
How to tie a spinner?
The most important question to be decided is which fishing knots for braid are best to use to tie the bait? The lure can be attached directly, using a leash or a swivel clasp. In any case, there are two main options that are most popular among experienced anglers - Clinch and Palomar.
The Palomar knot for braiding does this:
- Fold the free end of the braided thread in half. It is optimal to obtain a double section of 20–30 cm;
- We thread it halfway through the eye of the bait, clasp or swivel;
- We make a single knot, but do not tighten it completely. The bait should be freely in the resulting loop;
- We thread the spinner into the formed loop;
- Now you can smoothly tighten the knot by cutting off the extra piece of thread.
This method is simple and highly reliable. It can be safely recommended to beginning spinners. More durable, but more difficult to knit, Clinch. The algorithm for knitting it is as follows:
- The free end of a thread up to 20 cm long is threaded into the eye of the bait;
- This end should be made 5–8 turns around the main line;
- Now we thread the cord into the loop formed near the eye of the spinner and pass it through the large loop formed;
- All that remains is to smoothly tighten the braid and trim off its excess end.
In addition to the versions discussed, there is also a Uni knot for braiding. It is not used often here, but it is popular among our Western spinning colleagues. It's done like this:
- The braid is folded in half and passed into the eye of the spoon;
Advice! The length of the folded section should be about 40–60 cm, and it should be threaded halfway through.
- Bend the free end of the cord in half again and fix it with the fingers of one hand;
- We make five to seven turns around the thread, each time threading its end into the resulting loop;
- All that remains is to slightly moisten the thread and slowly tighten it.
- If you use a large diameter thread, then you do not need to fold it in half. For additional reliability, the assembly itself can be glued with waterproof instant glue.
How to knit two braids?
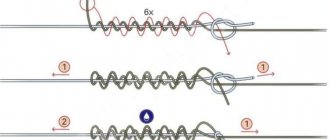
Situations often arise when you need to knit braid to braid. For example, merging the backing with the main core. Since many cords have a smooth structure, to connect them you need to use self-tightening options that will not unravel under load. There are different ways to tie the braid together, but the best is considered to be the Bloody Knot, performed as follows:
- The two free ends of the multifilament fishing line are brought towards each other;
- We wrap the second around one. We make about 5–7 turns;
- Now in the opposite direction we wrap the second braid around the first. Also 5–7 revolutions;
- We return the free ends back to the beginning of the knot and thread them into the resulting loops;
- All that remains is to smoothly tighten the threads, cutting off the excess ends.
If we are splicing a thin and thick multi-filament thread, then it is advisable to fold the small-diameter fishing line in half. This option is suitable if you need to tie a monofilament line to a fishing line. Other fishing knots for line are either more complex or have less strength.
How to tie fishing line or fluorocarbon?
In spinning fishing, there is often a need to use monofilament or fluorocarbon as a leash. Taking into account the different structure of the thread materials, it is necessary to choose an option that will equally provide strength to both the cord and the fishing line. The most popular knots for braid and fluorocarbon are Carrot and Albright. Let's look at each one separately.
The Carrot knot for braiding is popular among ultralight lovers. With its help, you can connect braid with fluorocarbon, which allows you to get the most inconspicuous but reliable equipment. This is relevant when hunting chub, trout, ide, rudd, asp and small-medium perch. It is performed as follows:
- Closer to one end of the piece of fluorocarbon we make a single knot, which we do not tighten completely;
- We thread the braid through the loop and make about ten turns around the fluorocarbon in one direction;
- We intercept the line with the other hand and perform the same number of turns in the opposite direction, carefully laying the turns so that they do not overlap each other;
- We draw the free end of the thread into a loop;
- All that remains is to smoothly tighten the lines so that the knot is formed correctly.
Trim off the excess pieces and you're done. To avoid spontaneous unraveling, a locking knot can be made at the free end of the “flurique”.
The second option that answers the question of how to tie braid with fishing line is Albright. It is no less effective than Carrot. It fits like this:
- We fold the fluorocarbon leash in half;
- A thread is threaded into the resulting loop, which is wrapped around the double leash up to ten times in the direction of the loop;
- Then it is passed back into the loop and wrapped around the single line several more times;
- All that remains is to moisten the threads, tighten them smoothly, and trim off the excess.
This variation of tying fishing line and braid is the most universal. It is suitable for different diameters, can be used with two monofilaments or cords. The strength at the node is practically not reduced.
Ways to increase strength
In order for the fisherman’s knot to serve faithfully, you must follow certain rules when knitting it:
- It is not allowed to tie knots in broken, frayed or damaged areas;
- All turns should lie side by side, without overlapping each other;
- Tighten should be smooth, without sudden force;
- Before tightening, you need to moisten a piece of thread to reduce its heating from friction.
The strongest knots are obtained on braided fishing line with a round cross-section. Flat cords become excessively twisted when tightened, which impairs their strength characteristics. As a result, their strength can be reduced by half, beards often appear, and breaks occur when hooking, fishing, or sharp jerks with the rod.
Finally
This material reviewed the best knots for braiding, which have proven their worth over the years. They are easy to learn, reliable and do not reduce the strength of the equipment. Before you start mastering spinning fishing, you need to learn how to properly attach the bait and connect the line together so as not to fail on the pond.
See you again! Yours sincerely, Profishing 39.
We are located at: Kaliningrad region, village. Kutuzovo, st. Promyshlennaya, 1 (landmark - Trade and Service Park "Robinson"). Telephone
How to tie a braid to a leash?
Loop in loop method
Instructions:
- First, you need to take a braided line in the form of a main fishing line, leave a section of at least 40 cm, fold them in half, forming a simple loop.
- With the running ends of the fishing line, you need to perform at least 3 passing, winding actions along the loop, as a result of which a knot is formed.
- The knot is tightened by holding the loop and the free ends of the fishing line. During the tightening process, the knot should be wetted; (similar actions must be performed with the leading line).
- Next, the loop of the braid should be threaded into the loop of the leash, and the root tip of the leash should be threaded into the loop of the braid. As a result of the actions, the root ends of the fishing lines should be pulled together.
Loop in a loop: 2 options
If done correctly, the loops form an “8” shape.
The advantage of this method is the greatest strength, as well as practicality and ease of use. Equally easily used in tying leashes of any type. In addition, the process of dismantling and replacing with other leashes is very simple.
Clinch method
Instructions:
- Take a leash line with a length of at least 30 cm. The leash must be folded in a double layer, placed against the braided line and pressed with your finger.
- You need to throw the running end of the leash over the braided line and the auxiliary end, thereby forming the shape of a loop. In this case, the braid should be inside the loop.
- After this, you need to make at least 6 turns along the braid and one part of the leash. In this case, the loop should be held with your finger.
- At the end of the action , you need to move the running part of the fishing line to the loop, tighten the ends of the fishing lines;
- The remaining ends of the running lines must be trimmed, leaving at least 2 cm.
The advantage of this fastening method is that it can be used when fishing in difficult conditions: rocky bottom, snags and algae.
Attaching the braid to the reel spool
When connecting braided fishing line to reel spools, it is necessary to take into account the peculiarity of the braided line, namely the presence of slipping, as a result of which the cord may jump out.
Therefore, the use of adhesive tapes is recommended.
An elementary type of fastening is the following option:
- The line should wrap around the spool.
- The running part of the fishing line is bent around its solid part.
- The section of fishing line going to the bending point of the spool is superimposed with the 7th reverse layer of the fishing line limb.
- It must be taken into account that most of the braid is inside the loop.
- Next, the main part of the fishing line should be threaded through a loop , taking into account the coverage of most of the fishing line and tightened tightly.
Arbor knot method
- First, you need to wrap the line around the reel. A section is left for tying a knot.
- After this, by wrapping the line going to the reel , you need to form a knot at the running end of the braid. This ensures that the nodal part of the line slides towards the reel.
- An additional knot is made on the free part of the braid , which will serve as a stopper. Through it, the first node will be securely attached.
- When tightening the knots using wetting , the remnants of the running and main ends must be cut off in order to prevent tangling during winding.
This method provides a powerful hold and self-tightening function.
Attaching the bait to the braid
Tight loop method
- A loose, loose knot is formed , with a segment of no more than 15 cm from the ends of the braid, the running end of which is threaded into the bait ring.
- A free end is left with a segment of up to 10 cm , which will be drawn in the middle of the braided knot;
- A tight knot is pulled behind the main line. It should be pulled behind the working end, as a result of which a loop is formed.
- Next, by wrapping the working part of the braided main line , you need to form an additional knot.
- The additional knot must be tightened with the main braid to the primary knot. It is necessary to cut off the remains of the braid, leaving a 4 mm piece.
It is considered the most universal method of attaching almost all types of baits.
"RAPALA" method
- A knot is formed with an open part in the shape of a loop , located at a distance of up to 20 cm from the ends of the braided fishing line, and one of the running ends of the fishing line needs to make passes along the bait ring.
- Leaving the running part of the fishing line with a segment of at least 15 cm , you need to pass it along the central part of the knot.
- You need to wind the running end around the main part of the braid with 6-7 turns , pull the loop closer to the bait ring, pulling with the running end. The length of the remaining part must be at least 2 cm.
- After this, the running part of the fishing line returns back and is passed again through the central part of the knot.
- The final stage is to alternately and carefully tighten the main and working lines.
The remaining excess part of the fishing line is cut off, separating a 3 cm piece.
The priority of the knot is to ensure the correct position of the bait and its free play. By its nature it is non-slip. Easy to do. It is reliable with a strength level of more than 95%.
How to tie a leash to spinning braid
For some, fishing is a hobby, for others it is a passion, and for some it is a full-time income, but each of the fishermen develops individual methods and skills in it over time. Skills, in turn, do not stand still - they are constantly honed, supplemented and improved. One of these skills that we will look at today concerns purely technical issues, namely, how to properly tie a leash to a fishing rod. After all, anything can happen while fishing, and it’s better for a novice fisherman to be prepared for anything, and for an experienced one just to improve his knowledge.
Fishing specialists are often faced with such a seemingly insignificant question of how to make a leash for a fishing rod, since the fishing line tends to partially lose its strength in water, or the knot itself with which we connect the leash reduces the strength of the fishing line by half. And, as you know, good fishing depends on the reliability of the gear, otherwise we risk returning home without the gear itself and without a good catch.
What knots will fit on the cord?
Braid is becoming more and more popular and there are several reasons for this:
- Having a small diameter, it is stronger than a homogeneous fishing line and at the same time remains elastic enough so as not to tear when casting or a sharp jerk from the fish.
- Thanks to its good elasticity, it is possible to make longer casts.
- High strength means you don’t have to worry about the line breaking; rather, the hook will bend; therefore, when catching large fish, it is recommended to take hooks made of thicker wire.
However, before tying a leash to it, you should study all the disadvantages of the material, including:
- poor relationship with temperatures below zero, due to which it can lose elasticity, becoming more “oaky” and brittle, respectively;
- high, sometimes even prohibitive, price compared to conventional gear, which is not always justified by quality, so you should carefully choose it.
But if we return to the topic of knots, the strength of the braid makes a well-tied fastening more reliable and resistant to friction. However, the fluorocarbon leash is attached to it differently than to a regular fishing line; often in such a situation, experienced fishermen use a palomar or a “uni” knot.
Knots for all occasions
Successful fishing constantly depends on such an insignificant detail as a fishing line knot, because if the knot on the fishing rod is of poor quality, then the risk that it will break or creep at the most inopportune moment increases significantly. To avoid such unpleasant situations, let's look at how to knit a few simple and reliable knots, after studying which you will automatically learn to master them well.
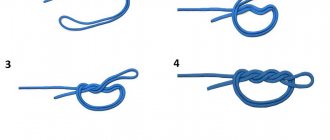
Common loop-to-loop knot
These leash mounts are perfect for tying a wide variety of types: fishing line, fluorocarbon, metal, etc.
In order to knit a fishing line with a similar knot you will need:
- Measure approximately 7-8 cm from the tip of the leading line, bend the measured size and place it along the leading line so that you get a double line that does not intertwine with each other.
- Wet the line with water.
- The tip of the double line behind the loop should remain 3-4 cm long.
- In the area of the fold, leave a double loop of a large size, suitable for sticking a finger through, and the rest must be wrapped together twice (immediately behind the loop).
- On the last (third) winding, we should bring the tip of the double fishing line to a segment from the loop we are holding and carefully pull it off.
We managed to tie a strong single knot with a regular loop, the unnecessary ends of which we cut off with a sharp object. After the first loop is ready, we debug it and proceed to the next one. We knit the second knot of the leash in a similar way, upon completion of which we should have 2 completely identical loops on our hands.
Photo 1. Two identical loops.
In order to attach the loop to the leash, we prepare the leashes as follows:
- We take the shortest leading line (the leash itself), widen its loop and thread another loop into it (from the main line of the rod).
Photo 2. Connect two loops.
Photo 3. Finished loop-to-loop connection.
Upon completion of knitting, we should have a double loop knot (“loop to loop”), which is connected even more tightly by normal tension.
Attaching a side leash
If you need to attach a side leash to the main line, you can use a simple and practical fishing method - a “running knot”.
In this case, first prepare the leash itself:
- On one leash, which we will connect to the leading line, we make a fixing, very ordinary knot.
- We wet the leash itself.
Now let's move on to the main line:
- To do this, we wet the fishing line again and make a loop in the part we need, with a diameter of 3-4 cm. Lay this loop out on the floor, we should get a large letter “B”.
- To tie the diverter leash, we thread it through the loop of the letter “B”, so that the fixing knot remains on the lower left side (behind the loop).
Photo 4. We make the letter “B” from one cord.
Photo 5. We thread the second cord from both sides.
The side leash is ready for use; if necessary, we will know how to tie a second or third one.
For monofilament fishing line, unlike braided line, many types of existing fishing knots are suitable. With braid, the situation is a little more complicated, since it is tied using universal methods, taking into account special types of fibers. All braids differ from each other both in the composition of the outer coating and in the internal structure.
Such popular knots as “Grinner” and “Palomar” will help you solve the problem of how to tie a leash to a spinning braid.
Standard "Grinner"
An important quality of each knot is reliability and strength; the fishing “Grinner” knot, also called the “Uni” knot, has these qualities. This knot is most common in cases where you need to attach hooks or swivels with miniature eyes; it is also good for leashes to the main fishing line.
The sequence of how to tie a hook with a Grinner knot is as follows:
- We take the tip, measure 7-8 cm and thread it into the eye of the hook.
- Stepping back a little from the hook, we make a small loop.
- Holding the resulting loop, wrap the tip of the braid around the leading one.
- After making 6-8 turns, we return the tip of the braid and thread it directly into the held loop.
After tying the hook with the Grinner correctly, we wet the braid to make it even stronger and slowly tighten the knot. Carefully cut off the remaining unnecessary parts with a sharp object.
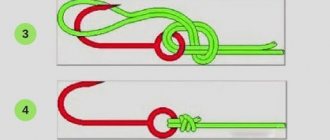
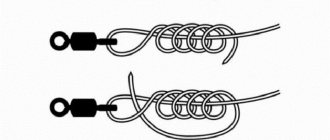
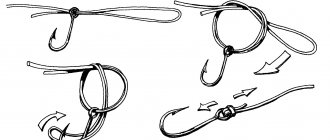
Fishing hub "Palomar"
The standard double “Palomar” is rightfully considered one of the best knots for slippery braids, which also fits well with monofilament. This type of knot is most effectively used for attaching swivels and hooks.
You can solve the problem of how to tie a hook with a double “Palomar” as follows:
- We take the tip of the braid, bend it parallel to the leading one (we make it a double braid) and thread it into the standard eye of the hook.
- Hold the resulting loop and weave the tip with the leading braid towards the hook (turn 3 times).
- After the above steps, we insert the hook into the loop of the guide itself, wet the future knot and begin to carefully tighten it.
We finish the tied knot by cutting off the excess ends of the braid with a sharp object.
Do not leave knots in the braids on the spool
It happens that a small knot or loop does appear, but they are not very large and are easy to wind on the spool. You shouldn't do this. During casting, there is a very high probability that the fishing line will touch this loop, therefore the range of your casts will noticeably decrease and the braided cord may also become tangled.
Ultralight rod and reel - make the right choice when purchasing.
The correct equipment for a spinning reel and rod is in one of the previous guides.
Multiplier reels for trolling - we buy only what is really needed during trolling fishing.
Eliminate leash overlaps
The whole process of painstaking preparation for fishing can be covered with a copper basin if, when casting the tackle, the angler did not take into account possible options for the leash to overlap.
To avoid an unpleasant situation and minimize the overlap of the leader tackle during casting, use the following recommendations:
- Using monofilament line. A leash made of a material such as monofilament line will help to minimize the overlap of the gear. Its elasticity significantly reduces the twisting effect when casting.
- Application of braid. The material initially has increased bending rigidity, which also reduces the likelihood of the leash overlapping.
A retractable leash is perhaps the most effective jig rig for catching passive perch. For the bait passes by...
A simple homemade tube for a spinning rod. Anyone can do it, the idea is not new, but...
After the heat, strange weather set in in Moscow. It’s getting a little colder and the sun is giving way to rain, the pressure is jumping,...
Reverse cone spool
The braid is wound on the spool with a reverse cone
A cone-shaped spool will greatly help you fish with braid. The wide part of the reel is the upper part, the narrow part is the lower part (the so-called reverse cone spool). This way, when casting, the line will not fly off the spool in whole turns. This is a very important aspect. If your reel does not initially have a cone-shaped spool, simply wind it with electrical tape or tape, widening the front part and gradually reducing the extension to “no” towards the bottom.
Our list of popular reels that include a reverse cone spool.
Instructions on how to tie a braided line to a leash. The most effective nodes
Fishing has been known since ancient times - it was a widespread way to feed yourself and your family. Now it is difficult to even imagine how our ancestors caught fish and what tricks they used to preserve their catch.
Modern men know how to competently and correctly tie a braided line to a leash, using special knots that add strength to the structure.
Some modify them on their own, adapting them to their own needs. Braid is a material for which almost all types of knots can be used.
What is special about the knots used for braiding?
Fishermen know that braid can be created in two ways:
- several threads are intertwined into one common cord;
- To create a cord, several fibers are glued together.
If the product label does not indicate the method of execution, it can be determined by eye. When creating a knot, several nuances should be taken into account, depending on the method used to make the braid.
For braids whose fibers are soldered together, knots should be used in which a small number of tightenings are expected. Cords with a braided structure are highly resistant to deformation, however, they are afraid of knots that are tied too tightly. If you tighten the knot, a fraying effect occurs - the fibers can break from excessive tension.
How to increase node reliability?
One of the most vulnerable places in fishing equipment is tied knots. Three factors influence how strong the fishing line is:
- material used to make fishing line;
- node type;
- fishing skills.
In order for the node’s efficiency to increase, several rules will need to be followed:
- Tie the knot evenly and efficiently, avoiding weak spots and gaps.
- It is recommended to melt the tip of the braid over low heat - this procedure helps prevent the layers from shifting.
- When you attach the braid to the spool, make sure to tighten it well - this will help protect the structure from unraveling.
- The leash can be made of various materials - over time you will learn to select the material and length that suits you.
- The type of leader depends on what kind of fish you plan to catch and what kind of bait you will use.
- Do not forget to wet the braid - this procedure significantly increases its strength.
The main factors influencing the tensile strength of braid
Wetting
Wetting any fishing knot while tightening will greatly increase its strength. This happens because when tightened without wetting, the braid heats up as a result of friction. Despite the fact that heating occurs for a very short time, the structure of the inner and outer layers of the cord may change, and this will lead to a loss of strength. It should also be noted that the more complex the knot, the much stronger the effect of destruction during tightening will be, since the friction will be more noticeable.
Section shape
It directly depends on the weaving method. The thing is that no matter how round the cord is when purchased, after several fishing trips its cross-sectional shape will change slightly. It will become flatter. On the other hand, the more round the braid, the more threads it is woven from.
The number of threads in all cords can be from three to eight. The fewer threads, the easier it is to weave. But, on the other hand, it will be cheaper. Also, the braid will be looser and softer, and it will not fly well. Therefore, if you take two cords of the same diameter, one of which is woven from four threads, and the other from eight, then the quality of the braid made from eight threads will be better.
Also, when tightening fishing knots, there will be much less twist on a rounder braided line. Twisting during installation reduces strength
Thickness
Since it consists of several threads, the larger its diameter, the more threads are used in manufacturing. This leads to the conclusion that thicker braid will be more durable.
Step-by-step instructions for creating nodes
There are several methods for connecting braid and leash. Let's look at some of the most durable and effective ways to create knots.
The knot helps maintain up to 75% of the braid's strength. The compact size of the unit allows it to easily slide through spinning rings. But before you learn how to tie a Bloody Knot, you will need to spend a sufficient amount of time training.
- we direct the ends towards each other so that they overlap;
- we make several turns of one edge around the other;
- We separate the braid in the middle of the area to form a gap - we thread one edge into it first, and then the other. The ends should be facing towards each other;
- to increase the efficiency of the assembly, it must be thoroughly wetted and only then tightened;
- Excess line needs to be trimmed.
Uni is characterized by a high degree of strength and ease of execution. It is believed that he is completely free of flaws.
- the braid is threaded through the eyelet and a loop is made;
- the free end is placed over the braid and inserted into the loop;
- the braid is folded in half and wrapped at the end 7 turns;
- Before you tighten the knot, you need to wet it.
Palomar is considered the best for tying slippery braid to a leash; it is durable and versatile - suitable for attaching a swivel and hook. When executing a knot, the fisherman may face a problem - not all eyes are capable of passing a double line through themselves. In addition, when performing Palomar, the leash is significantly shortened.
- the end of the braid is bent parallel to the leader so as to form a loop. Everything fits into the eye of the swivel;
- the tip is woven to the main loop towards the swivel - it is important to hold the loop;
- we connect it to the resulting structure, wet it and tighten the knot - but not too tightly;
- after the first knot is tied, cut off the excess ends and duplicate the above steps with the leash - attach it to the opposite eye.
The knot has a high degree of strength, however, the thinner the braid, the more turns will need to be made.
- the braid is threaded into the eye of the hook so that the length of the working end is 15 cm. A simple loop is formed;
- using the working end, a simple knot is formed - slightly tighten it, but do not close it completely;
- We wrap one end of the main fishing line - at least 5 turns;
- the working end returns to the main loop, is wetted and pulled up;
- the knot is pulled by the main fishing line to the hook and trimmed - the length of the ends should not exceed 1-2 mm.
The knot guarantees a high degree of strength; it can withstand a decent load, but its implementation requires skills that come with experience.
- an end 15–20 cm long is passed through the eyelet twice;
- create a large loop - no closer than 5 cm from the bait;
- we wrap the tip of the braid around its double section, directing it inside the loop;
- make 7 circular movements, cut.
Loop in loop
Even a fishing novice can perform a loop-to-loop knot. It demonstrates a high degree of reliability and durability. This knot performs well in both fresh and salt water.
- Using a simple figure eight, we create a loop on the main fishing line. The length of the loop varies from 5 to 7 cm.
- we duplicate the actions, creating a similar loop on the leash;
- we thread the loop located on the leash into the loop located on the fishing line;
- There is no need to moisten the loop, just tighten it;
- trim both ends of the braid.
These simple techniques and tricks will help turn fishing into an interesting and useful event.
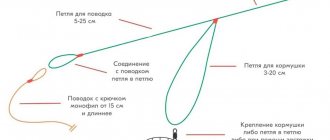
Knots for shock leader
Shock leader
- is a piece of fishing line of large diameter, the length of which is about 8-11 meters. This segment has increased strength due to its large diameter, so special units are used to secure it.
It is better to fix this connection point with a drop of superglue. This will not only strengthen the connection, but will also make it easier to pass it through the rod guides. During fishing, you should control the location of the knot: it should always be at the bottom so that when casting the fishing line does not cling to it.
"Carrot" (Mahin knot)
It has small compact dimensions, and with its help you can tie several monofilaments and a shock leader from the same fishing line.
Albright Special Knot
Refers to a series of simple knots, but reliably connecting the main line with the shock leader. You can see it in the video above.
Blood knot
It is used when tying fishing lines that differ in thickness by no more than two times. The reliability of the connection is 90% of the strength of the fishing line.