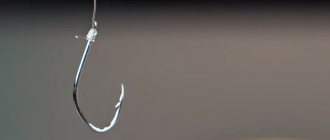
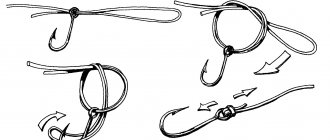
Hooks without an eye: main knots
Leash or whip
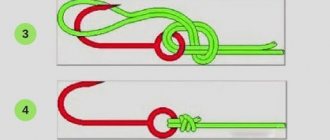
A popular type of connection for products with a spatula, including lugs. How to tie a loop on a fishing line:
- form an open loop along the stem;
- wrap the end of the cord 7-8 times around the loop and rod;
- slide the tip into the loop, pull the root end to tighten;
- moisten the fishing line to fix the knot, pulling simultaneously on both ends: the running and root.
Bloody
They use a method for tying leashes to hooks: one or more, carabiners, sinkers, straps, etc. How to knit:
- pass the running tip along the rod, make a wide turn around it;
- after another turn, grab the hook rod and the main tip;
- pass it through the formed loops;
- Pull both ends and tighten the fastener.
Salmon - universal knot
This method of tying is distinguished by its strength under traction load when using cords: braided and monofilament synthetic. How to do it:
- place the end of the cord behind the spatula (or into the ring);
- Make 2 turns around the root tip from bottom to top;
- lower the tip of the chassis downwards, place it behind the root loop, guide the line into the lower loop;
- Carefully move the knot onto the rod of the product and tighten it.
Deflection or shell knot
Knit a synthetic plumb line of any type onto the rod of the product. What to do:
- move the end of the chassis down the rod and make 6 turns around it and the plumb line;
- bring the end of the chassis into the loops that have formed;
- pull the ends: root and chassis and carefully tighten the fastener.
Stepped
Fix leashes with hooks without eyes. What to do:
- fold a flat loop from the running end parallel to the hook rod;
- circle the running end around the stem and the tip of the root 2-3 times;
- continue the turns around the flat loop and the stem;
- tighten the fastener carefully.
Trombone loop
Used for tying hooks with a spatula or ring. They will be securely held by braided, natural or synthetic monofilament. How to knit:
- use the running tip to make a loop, retreating from the edge - 10-15 cm, it should be open;
- attach a hook to its middle, directing the rod parallel to the root end;
- from the running end, make 8-10 turns along the rod and root end;
- pass the end of the chassis through the loop;
- wet the material and tighten the fastener.
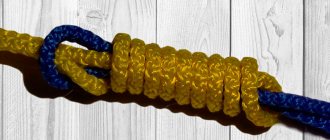
The strongest knots for tying “braid” with fluorocarbon
Method of tying a knot “Mahin leader knot”
The first knot we will look at is called the “Mahin leader knot”, or simply “carrot”. Let's consider the method of knitting it:
- We take the end of the fluorocarbon fishing line and tie an ordinary (edge) knot without tightening it.
- We insert the end of the “braid” twenty centimeters long into the resulting knot.
- With the inserted tip of the “braid” we wrap the fluorocarbon, making ten turns.
- The tip of the “braid” remaining after the completed revolutions is wrapped back around the resulting turns six times.
- After returning the wraps to the loose knot, insert the tip of the braid into the loose fluorocarbon knot.
- Wet the knot and tighten it by pulling the braid and fluorocarbon in different directions.
- We cut off the ends, leaving about one centimeter.
Method of tying a knot “Double uni knot”
The second knot we are looking at is called the Double Uni Knot and is most often used to tie a fluorocarbon leader to the main line - the braid. Let's consider the method of knitting it:
- We take the ends of the fishing lines and fold them with their tips towards each other.
- At the end of the “braid” we make a loop, in the opposite direction from the folded tip.
- We wrap the remaining tip between two fishing lines inside the loop for three or four turns.
- Pull the end, tightening the knot.
- We repeat a similar procedure with the other fluorocarbon tip.
- We tighten the resulting knots into a single knot, pulling the fluorocarbon and the “braid” in different directions.
- Trim off the excess ends.
How to properly tie a “Carrot” knot for a shock leader - practical instructions for use.
For a step-by-step fishing guide - fly fishing for beginners, see below.
Tying patterns and a detailed story about the conditions and fishing techniques using lead rigs are in the next article.
Which node should I choose?
First of all, you need to take into account that each knot tied on the fishing line significantly reduces its strength. Of course, you can fish with one hook, two or several.
But the more connecting nodes, the less the overall strength of these fishing tackles will be. In addition, we must not forget that the strength of the fishing line in water is much less than in air. Therefore, when deciding how exactly you plan to fish, you need to weigh all the available circumstances.
Of course, not all types of knots have the same effect on the strength of the entire tackle. The knot that has fewer bends will be stronger.
The quality of the fishing line also plays an important role in this matter. When choosing it when purchasing, keep in mind that low-quality fishing line means a high risk of it breaking.
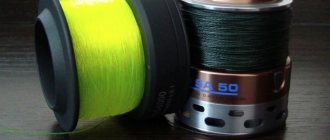
Attaching the braid to the reel spool
When connecting braided fishing line to reel spools, it is necessary to take into account the peculiarity of the braided line, namely the presence of slipping, as a result of which the cord may jump out.
Therefore, the use of adhesive tapes is recommended.
An elementary type of fastening is the following option:
- The line should wrap around the spool.
- The running part of the fishing line is bent around its solid part.
- The section of the fishing line going to the bending point of the spool is superimposed with the 7th reverse layer of the fishing line end.
- It must be taken into account that most of the braid is inside the loop.
- Next, the main part of the fishing line should be threaded through a loop, taking into account the coverage of most of the fishing line and tightened tightly.
Arbor knot method
- First, you need to wrap the line around the reel. A section is left for tying a knot.
- After this, by wrapping the line going to the reel, you need to form a knot at the running end of the braid. This ensures that the nodal part of the line slides towards the reel.
- An additional knot is made on the free part of the braid, which will serve as a stopper. Through it, the first node will be securely attached.
- When tightening the knots using wetting, the remains of the running and main ends must be cut off in order to prevent tangling during winding.
This method provides a powerful hold and self-tightening function.
What knot to tie the bait to fluorocarbon
Fluorocarbon is a complex material in terms of retaining the knot in its final state. Under constant dynamic load, the knot connected to this material relaxes, then completely unties and, as a result, the bait and possible catch are lost. As a result of accumulated experience, the majority of advanced anglers agreed that the Nesevri knot gives the best results in the reliability of fluorocarbon tying. By experimenting with tying this type of knot at home, despite its initial complexity, you can gain stable tying skills and carry out the practiced technique directly on the pond itself.
iarybak.ru
Attaching the hook and swivel to the braid
With hooks:
Uni method
- The running end of the line should be inserted into the eye of the hook, taking into account the formation of a loop. The running part of the braid is placed on the upper side of the fishing line and threaded into the loop.
- Next, you need to wrap layers of braid around the chassis, making more than 8 turns.
- After this you need to tighten the knot.
Uni node
The node is considered the simplest, but at the same time the most reliable.
Clinch Knot Method
Instructions:
- The running end should form an open loop shape, the length of which should be 12 cm.
- The upper part of the loop is threaded through the ring of the hook and pulled out in this way, as a result of which the end of the undercarriage should be at least 6 cm.
- After this, the root end and the loop should be framed with a 6th reverse layer of the running end.
- Next, after completing the windings of the fishing lines, the chassis must be passed through the loop of the fishing line.
- The knot should be moistened and tightened tightly, and the excess parts of the fishing line should be cut off, leaving a length of at least 3 mm.
This method is the most common and quite practical. With it you can tie not only hooks, but also baits, swivels and a number of equipment elements.
With swivels:
"GRINNER" method
- First, the braid must be passed twice over the eye of the swivel for maximum strength.
- The running end of the fishing line should be placed on top of the fishing line in a cross position, forming a loop shape. You need to grab the braid, taking into account the 10 cm height above the swivel for tying the knot.
- After this, you need to pass the running gear of the braid along the loop and make 6 turns around the braid. In this case, it must be taken into account that having completed the last turn, the running end of the fishing line must be pulled to the outer side of the loop, thereby forming the shape of a knot.
- After moistening the knot, you need to gradually tighten the knot so that the position of the turns is tight.
- Finally, the main part of the fishing line needs to be pulled so that the knot should slide towards the eye of the swivel.
This type of knot is considered one of the most reliable, used in the case of tying elements with rings. A characteristic feature of the unit is its excellent load capacity, amounting to 90%.
Palomar method
First, the running end of the fishing line is inserted into the eyelet, pulled out for 5-8 cm, and the fishing line is passed back through the eyelet, leaving behind a part of the fishing line that is not completely pulled into the eyelet, in the form of a loop. The loop is held with your fingers.
Next, a knot is made
In this case, you need to pay attention to the location of the eyelet in the central part of the knot.
After this, the windbreak with a carabiner is threaded into the loop and tightened in the opposite direction. In this case, you need to wet the knot.
A similar method can be applied to the hook.
"Palomar" is the most common and practical method. It is quite simple in design, but provides high strength and reliability.
How to knit, installation methods
You can tie two hooks to a fishing line in different ways: each angler chooses the more suitable one. There are only four main installation methods, we’ll call them this:
- Zhivtsova,
- basic,
- accelerated,
- stopper.
They are all somewhat similar to each other, but each of them has certain characteristics. Next we will look at another interesting method, few people know about it. He doesn't even look like everyone else.
Zhivtsova
This method was nicknamed “Zhivtsov” because of its original purpose. It is also called no knot because no knots are used to install hooks. Fishermen noted that this method is the most effective when catching predators with live bait (fry). But later people realized: it is also suitable for other fishing conditions. Here both hooks are tied to one leash.
This is done very simply:
- Let's take the fishing line. We thread it through the eye of the hook.
- We make nine turns around its forearm.
- The other end is also threaded through the ear hook, and the structure is tightened. Similarly, you should tie the second hook to the fishing line. Not a single node! Then we tie the resulting leash to the main cord.
The distance between them depends on the size of the bait and the preferences of the fish being caught. For example, for catfish you can make 10–15 cm, for silver carp or chub - 20 or more centimeters.
Basic
It is considered one of the most reliable. Here, each hook is tied to a separate leash. Why we called it “main”, you will see for yourself. So let's get started:
- We take a thin leader line and one hook.
- We fold the fishing line so that we get a circle with a diameter of 9–10 centimeters. We attach it to the hook and hold it.
- Insert two fingers into the resulting loop: index and middle. With one we will pull the cord along the base of the hook, and with the other we will wrap it 10-12 times.
- We grab the end of the fishing line with our teeth and pull (we try to hold the main end) until the knot is reduced to the maximum.
- After this, dip your fingers in water, and then lubricate the resulting knot with it. You won't be able to tear off or untie the hook! The second hook is attached in exactly the same way, only its leash must be tied at a certain distance from the first one so that there is no overlap.
The method is very suitable for mounting two hooks on a float rod, since in this case reliability is most important. This gear is often used to catch two large fish at a time, but in this case there is a high probability of the hook coming off, especially if the line frays.
Accelerated
During active fishing, you can observe constant hooks and breaks. Hooks and leashes constantly have to be changed, and this needs to be done as quickly as possible. This method involves not only the simple installation of two hooks, but also the quick replacement of components. That's why we called this method “accelerated”.
To knit the second hook we will use the Canadian figure eight. Like this:
- We thread the end of the fishing line through the ear hook.
- We make a loop around the fore-end, and then insert the tip into the loop.
- We try to tie the knot as tightly as possible. We get a leash with a hook.
- Exactly the same for the second hook.
You can also use a “blind” or “bayonet” knot.
The “accelerated” method allows you to attach two hooks to a float rod in a matter of seconds, even in active fishing conditions. You just need to always take spare parts with you!
Stopper
To install the second hook, it is best to use the knot described above, which is knitted without using an eye. But we attach the leash differently:
- At the empty end of the leash with a hook, we make two figure eights so that we get one massive knot.
- The main cord has a tightening loop, as in the picture.
- We insert our “double” knot into it.
- We take the main line with both hands and pull in different directions.
How to tie a spinner?
The most important question to be decided is which fishing knots for braid are best to use to tie the bait? The lure can be attached directly, using a leash or a swivel clasp. In any case, there are two main options that are most popular among experienced anglers - Clinch and Palomar. Additionally, we wrote about how to tie a swivel here.
The Palomar knot for braiding does this:
- Fold the free end of the braided thread in half. It is optimal to obtain a double section of 20–30 cm;
- We thread it halfway through the eye of the bait, clasp or swivel;
- We make a single knot, but do not tighten it completely. The bait should be freely in the resulting loop;
- We thread the spinner into the formed loop;
- Now you can smoothly tighten the knot by cutting off the extra piece of thread.
This method is simple and highly reliable. It can be safely recommended to beginning spinners. More durable, but more difficult to knit, Clinch. The algorithm for knitting it is as follows:
- The free end of a thread up to 20 cm long is threaded into the eye of the bait;
- This end should be made 5–8 turns around the main line;
- Now we thread the cord into the loop formed near the eye of the spinner and pass it through the large loop formed;
- All that remains is to smoothly tighten the braid and trim off its excess end.
In addition to the versions discussed, there is also a Uni knot for braiding. It is not used often here, but it is popular among our Western spinning colleagues. It's done like this:
- The braid is folded in half and passed into the eye of the spoon;
Advice! The length of the folded section should be about 40–60 cm, and it should be threaded halfway through.
- Bend the free end of the cord in half again and fix it with the fingers of one hand;
- We make five to seven turns around the thread, each time threading its end into the resulting loop;
- All that remains is to slightly moisten the thread and slowly tighten it.
If you use a large diameter thread, then you do not need to fold it in half. For additional reliability, the assembly itself can be glued with waterproof instant glue.
Auxiliary units for outlet and side leash
Knot for a temporary loop used to attach a diverter leash
QUESTION: how to tie a lead leash to the main line?
ANSWER: It is knitted as follows:
- The main line is made two turns around the index finger of the non-working hand (for a left-handed person - the right, for a right-handed person - the left) hand. In this case, the tension of the fishing line is not strong.
- The resulting turns are carefully removed from the finger and fixed with the fingers of the other hand at the base;
- Above the turns on a thick fishing line, make a 4-6 centimeter simple loop;
- The loop is threaded through the turns;
- Having fixed a thick fishing line near the resulting knot, pull it by the top of the loop and tighten it;
- A leash with a limiting knot (“figure eight”) is threaded into the resulting loop and secured with a suspender to the main fishing line;
This is interesting: Retractable leash for perch: installation, fishing, bait
If the need arises to replace or completely remove the leash, carefully cut off the restrictive assembly and remove it. The temporary loop knot is untied by pulling the main line near it in different directions.
Knot forming a permanent loop for tying a side leash
QUESTION: How to tie a side leash to the main line?
ANSWER: Let's consider the scheme for tying the side leash to the main fishing line:
- A regular cross loop no more than 10 cm long is formed on the main line;
- Having fixed the base of the loop with the fingers of the left hand, the top is thrown over the hand;
- Then the base of the loop is intercepted with the fingers of the right hand, and with the left hand its upper part is placed behind the fingers of the right;
- Having grabbed the base of the loop again with the fingers of your left hand, repeat the manipulations described in the previous paragraph;
- After repeating these steps 4-5 times, lightly tighten the loop at its top;
- Between the turns of the fishing line, pass the upper part of the free loop and tighten it slightly;
- Having moistened the knot, it is carefully tightened with a uniform pull at the opposite ends of the connecting lines.
Unlike the previous one, such a loop can no longer be removed from the fishing line. The leash is attached to it using a “Loop to Loop” knot connection.
How to tie a metal leash to the main fishing line
Many of us are spinners. We catch pike and know very well that sometimes it is impossible to do without a metal leash. However, not all of us are fans of the classics of the genre. Many people like ultralight fishing, where an extra link coarsens the equipment (swivels, carbines).
To avoid excess weight in installation, you can tie the already popular twist of string without using unnecessary elements. Simply weave the braided cord into the twist of the leash, or tie it with a knot.
How to weave braided cord into a twisted string
Unravel the twist halfway. We pass the end of the braided cord through the eye of the string.
We make 8 - 10 turns around the twisted turns of the string.
We weave the remaining tail of the braided cord into the turns of the leash.
We cut off the excess section of the braid. It turns out to be a quite strong connection.
I haven’t tried it with thick braided cords, since I use a knotless cord with them, but the thin cord holds up well. At the same time, it does not lose its strength characteristics at all.
The knot for connecting the string to the braid is the same palomar. I fold the end of the cord in half and knit.
Like an epilogue
All presented options for tying leashes are simple. It’s worth practicing at home on a clothesline and you can easily knit them right while fishing, even in windy and frosty weather. They are reliable and reliable when used in any situation.
One small but important nuance. Regardless of what kind of knot you use to tie the leash to the main fishing line (monofilament or braided), it is always necessary to wet it. Otherwise, under the influence of friction, the fibers heat up when pulled together and, as fishermen say, the fishing line “burns out.”
I believe that seeing the entire process of making components once is better than understanding a hand-drawn diagram. I can recommend taking a look at the page where there are about 20 videos of tying fishing knots. There you will definitely find ways suitable for your needs, how to tie a leash to the main fishing line, tie a monofilament with braid, and secure a hook to a leash.
NHNCH
Other types of knots
Clinch knot for braiding
Using this connection, you can also securely attach a hook or swivel to the braid. The technique for performing it does not involve any difficulties. Moreover, it can be used for both braided and regular fishing line.
The technique for creating a Clinch fishing knot is as follows.
- You need to take the end of the braided fishing line and insert it into the eye of the hook or the ring of the swivel. Moreover, it should not be shorter than 15 cm.
- The other end needs to be wound around the main line about 6 times. It is necessary to ensure that the rings are not too tight.
- Then you need to thread the end of the braid through the small loop that should appear next to the eye of the hook.
- Next it is threaded into a large loop.
- After wetting, you need to tighten the braid.
This connection is ideal for braiding. With its help you can ensure a strong fastening of the hook.
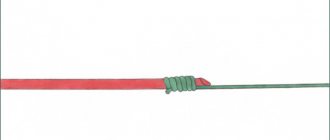
"Bloody" knot
This connection is used to tie together two pieces of braid or fishing line that differ in thickness. It is also suitable for tying cords. Moreover, in this case it is permissible for them to differ from each other in diameter by 1.5-2 times. Using this knot, it is not difficult to tie together the main fishing line and a monofilament leash. In this case, reliable fastening will be ensured. It is very useful for any angler to know how to tie such a knot.
The technique of knitting a “bloody” knot for fishing line and braid involves the following steps.
You need to prepare two pieces of cord and place them so that they lie one along the other. You need to pay attention to the fact that their ends should be taken in different directions. After this, you need to take one end and make about 5-6 turns around the other braid
It is important to ensure that the coils are not over-tightened. Next, we thread the end of the cord through the fishing lines that need to be fastened, immediately after the first turn. You need to do the same with the second segment. It is very important that both pieces of cord have an equal number of turns. The end of the second segment must be inserted into the same loop into which the first one was previously threaded.
However, its direction should be opposite to the first segment. Once the braided line is moistened, all that remains is to tighten the knot. If the segments have residues, they must be trimmed.
Slip double knot
Among the well-known fishing knots for braid, there are those that surpass all others in terms of strength and reliability. The sliding double knot, which most experienced fishermen know about, has similar qualities. This type of connection can be used for fishing lines, braids and cords, whose thickness differs up to five times. This knot can help out in a situation where there is a need to connect two pieces of different materials that differ in diameter. First of all, it is recommended to use it in relation to fluorocarbon. This fastening method allows you to tie it to the main fishing line without much effort.
In order to tie this knot for braided line and fluorocarbon, you must perform the following steps.
- We take the fishing lines that need to be tied together and overlap them. Moreover, they should lie so that their ends are directed in different directions.
- Then lightly press the segments approximately in the center with our fingers.
- We take one end of the fishing line and bring it to the fingers. As a result, we should get a loop.
- We need to insert the end of the braid into it, and then wrap each of the segments. The number of turns on them should be about 5-7.
- Next, after moistening the fishing line, you need to tighten the end. So, we have made one node. We perform similar actions with the other end of the fishing line, but on the reverse side. Upon completion of all actions, we should have two nodes.
- After this, we pull the fishing lines that we connected in different directions. This will cause the nodules to move towards each other until they close together.
- If there are any residues, they must be cut off.
Although this connection resembles a “bloody” knot in knitting technique, it still surpasses it in terms of reliability.
Popular fishing knots
Since it is necessary to tie fishing lines of both the same thickness and different diameters, there are several optimal methods of fastening, practiced in many countries around the world.
Albright knot
This unit is quite practical and simple. It is distinguished from other fastenings by several important advantages, such as reliability and the ability to connect threads of different diameters. What is typical for such a knot is that you can use materials of different structures, for example, fishing lines and braids.
How to make an Albright knot:
- Fold the thick thread in half to form a half-ring in the form of a loop.
- Pass a thin fishing line through the loop and wrap one end around the double main line.
- Make approximately 10-12 turns of the winding.
- Direct the wrapped end of the part through the loop.
- Gradually tighten, moving the winding to the starting point of the loop.
Now the most universal method of fastening the part is ready!
Clew knot
The following connection is widely used in the naval fleet. It is no coincidence that the name itself was borrowed from the ship’s part of the equipment under the designation “sheet”. However, even in the everyday life of a fisherman, this knot is considered a very priority.
The popularity of this knot is due to the simplicity and strength of knitting. There are two types to knit a thread using this method - single and double.
Single way:
- Fold the end of the main line so that a loop is formed, with the short part of the thread located on the right.
- Direct the second free line up through the loop and make a turn on the other side of the eyelet from right to left.
- Pull the leading end of the second thread through the loop and pull it by the edges in different directions, forming a knot.
Double way:
- As in the first case, make a loop.
- On the right side, pull the end of the second fishing line through the loop and make a turn, stretching the tail between the tied and main threads.
- Make a revolution with the working end of the thread similar to the previous one.
- Tighten the edges of the fastening.
A double clew knot takes a little longer to make, but with a guarantee of success in terms of reliability.
Counter eight
“Eight” is one of the ancient knots, used in various spheres of human activity. This technique is used to tie rope materials of arbitrary diameter. Judging by the name, it is not difficult to imagine such a plexus, but there is still a certain technology that should be followed.
Namely:
The main advantage of this fastening is the ability to withstand heavy loads and ease of untying.
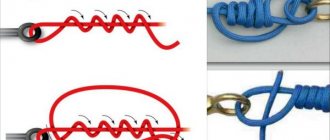
"Grinner"
The Grinner knot has a second nickname as the "sliding double". This connection is intended in most cases for attaching a hook or swivel to the main fishing line.
What you will need:
- First, pass the thread through the eye of the hook or other fastener twice.
- Stepping back a little from the eye, make a good loop around the main line.
- Wind the end of the thread about 5 times around the main line and inside the existing loop.
- Having wetted the thread at the junction, slowly pull up its end so that the turns are consistently tightened and carefully move it towards the base of the part.
- Finally tighten the knot.
Safety of mating is one of the main factors of successful fishing, and this is about Grinner.
Fluorocarbon fishing line is gradually replacing monofilament, yes, it would have replaced it long ago, but the price is quite high. Hunters of predatory fish are very fond of this material, and many people have a question about how to tie a fishing line to a fluorocarbon fishing line. And it's very easy to do. Let's figure out how.
Fastening without knot
You don’t have to tie knots if you don’t have the desire, time or appropriate skills. There is a knotless technique
, which was appreciated by many fishermen. This method is not only pleasant because it saves time and does not require memorizing complex techniques, but it is also useful, because the tackle is attached very firmly in this way.
Bezuzlovka
is a small device that has bends at both ends. It is usually made of steel wire. There is a wide variety of manufacturers; such a device is presented in every more or less serious fishing store.
The knotless connection is very strong.
This type of fastening takes significantly less time than tying a knot. However, the clasp is more suitable for smaller lures. Large gear has a noticeable weight on its own, so it is better to fasten it with a knot. The use of a fastener is more than justified when fishing in competitions, but when fishing from the shore and in snags, it can only complicate the process.
The knotless clasp is used primarily for braided braids.
When purchasing swivels, be sure to carefully inspect their rings for nicks, small roughness and cracks; all these shortcomings will certainly lead to wear and subsequent breakage of the tackle at the most inopportune moment! Try to choose swivels with well-processed rings, otherwise there is a risk of losing both the gear and the trophy.
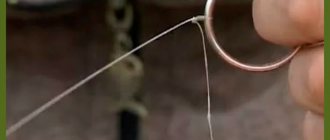
Be sure to wet the thread with water when tightening
, then the fastening will be strong and reliable.
If you want to learn how to tie knots as quickly as possible, practice on regular ropes, tourist or even clotheslines, because practice is the most important thing!
Subscribe to the channel
!
Follow new posts, share with friends and like!
Universal fishing knot
Original name: gallows kno
t (gallows knot).
It gained its fame as a fishing knot in the 60s of the last century: Normad Duncan showed how to use it to attach hooks, and it became known as the Duncan loop
(Duncan loop).
A little later, it was published in many books and magazines about fishing, after which the name “universal knot” or “uni”
(uni knot).
“Uni” can be used in a variety of situations. Let's start with the simplest.
Stopper/marker
Uni as a marker node
Uni can be used as a stopper knot in float and feeder rigs, as well as a marker on the main line to control casting distance.
Node diagram:
Marker
The material for the knot can be monofilament, cord or beaded rubber (feedergam).
Tie fishing line
To connect the fishing lines to each other, you will need two knots that are tied at the ends of the “alien” fishing line:
Uni for connecting fishing line
The result is a fairly neat and very strong connection. For monofilament, 3-4 turns are made; for cord, their number increases to eight.
Fixing the fishing line (backing) on the reel spool
Uni like a sliding loop
You can fix the fishing line on the reel spool using a slip knot, which allows you to tighten and, if necessary, loosen the fixing loop.
It is knitted as follows:
Sliding loop
This loop, but with a large number of turns, is also used for attaching hooks, swivels, and baits.
Attaching hooks and other things
Uni knot for hook
Uni is somewhat similar to a simple clinch, tied on the fastening ring of a hook, bait or swivel.
Simple clinch:
Clinch on the hook ring
Uni node diagram:
Uni on the hook ring
Like the clinch, the uni knot is knitted not only on the ring, but also on the shank of the hook.
Uni on the shank of the hook
Universal assembly on the forend
To catch peaceful fish using bottom and float gear, it is preferable to tie the hook to its shank - a more reliable fastening is obtained, and the implementation of bites is improved.
If the hook has an eye, then the line is first inserted into it (from the side of the sting). For hooks with a spade instead of an eye, the line is simply passed along the shank.
Diagram of the assembly on the forend:
Uni on the shank of the hook
A simpler alternative is .
Among other things, there is one whose strength is less than 100, but more than 90% of the strength of the fishing line/cord used.
Subscribe to , put See you again!
The most reliable knots for braiding
Fishing knots for braiding are distinguished by a wide variety and complexity of knitting technology. We will focus on the five most accessible, understandable and easiest to implement knitting options, which are easy to remember and perform directly on the shore of the reservoir, without resorting to additional equipment and gluing the installation. The scheme of these options is suitable for various types of cord structure and thickness, and will also help to assemble equipment from various installation elements into a single, complete structure.
Palomar, palomar knot
Palomar can be confidently classified as one of the most popular types of nodule. In addition, it is universal and can be applied with equal success to various types of material. This knitting is performed for an accessory that has a winding or fastening ring in its design. To perform the fastening operation according to this principle, you will need a piece of fishing line of at least 40–50 centimeters. The final tightening of the knot leaves the cord strength at 80%. For the most part, braided fishing lines of small diameters are connected using this type, since the technology by which doubly folded material is threaded into the eye of the element does not always allow this to be done with thicker cords due to the disproportion of the winding ring.
Uni, uni knot, grinner knot
The uni knot is a fairly common knitting when the accessory contains a very small element for fastening. Often this is a miniature hook or swivel in a microjig. The technology involves threading a single-diameter cut of wattle into a winding loop, after which we add the main loops, moisten and tighten the knot. The formation of the mating will require at least 50–60 centimeters of material. The strength after tightening will remain at 70–75%. To perform the technique competently, a short period of training time will be required to master a stable skill.
Clinch refers to the simplest tying technology, mastering the twisting technique of which can definitely be recommended to a novice fisherman. The improved clinch ideally copes with the problems of self-untying; it requires a piece of cord of 20–25 centimeters for installation, but the result of tightening the twist has a more negative effect than the options described above and affects the final strength of the fishing line, leaving no more than 65% of the strength to the original parameter.
This option is a type of knot for braided fishing line that allows you to connect two pieces of it. To carry out the joining operation, you will need two ends of the braid of at least 40 centimeters each. As a result of alternate winding of the same number of turns, and for braided cords, 3-4 twists are enough, and subsequent tightening of the installation, we obtain a neat, uncluttered structure. The connection is suitable for mounting leashes and shock leaders. The technology allows you to reliably connect braids that differ in diameter by 1.5-2 times.
Slip double knot
A more complex type of knot that requires a certain knitting skill. The technique mastered by the fisherman allows the use of twisting both for fastening the braid with accessories, and for connecting different diameters of cords that differ in thickness by four to five times. In addition, you can tie braid in this way with other types of materials, fluorocarbon and monofilament. For installation, use 50 centimeters of a free piece of cord, resulting in a connection strength of at least 70% of the initially stated parameters.
How to tie a braided line to a hook
You can tie a hook to a braid using Palomar, Uni and Clinch knots.
Important! The main criterion for choosing a connection option is the presence of a fastening loop on the accessory and a hole size comparable to the diameter of the cord.
Before joining, carefully inspect the winding loop for the absence of metal burrs and nicks that could cause chafing of the fishing line material, and after that they knit a knot, finally cutting off its free end to the body of the formed knit. The tightened installation is aligned along the fastener ring, symmetrically, placing the cord and hook shank in one straight line, and begin to attach the bait.
How to knit Clinch
There are many variations of this knot, but it is enough to learn Single, Single Improved, Double, Reinforced, Reinforced and Locking Clinches.
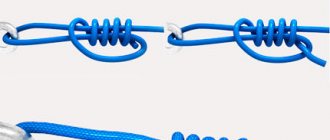
Single Clinch
To tie a simple Single Clinch, you need:
- thread the fishing line into a ring or eyelet;
- make a few turns with the free end;
- thread the end into the loop formed near the ring;
- wet and tighten the connection.
Important! As with any other knot, the line must be wetted before tightening the Clinch. If this is not done, it will “burn out” and the strength of the connection will greatly decrease
To moisten the thread, you can use water from the tap or from a reservoir, but in practice it is more often placed in the mouth and soaked in saliva - this option is much simpler and more convenient.
At the second step of knitting a knot, you need to make at least 6-7 turns. As their number increases, the strength of the connection increases. If you make less than 6 turns, the knot will turn out to be unreliable, and there will be a risk that it will unravel under heavy load.
The single clinch is quite reliable, but instead it is better to use the single improved version as a basic one. It is not much more difficult to knit, but it is noticeably stronger.
Single improved clinch
The improved clinch is a variation of the regular clinch, the knitting of which is slightly different in the final stage. It is well suited for use as the main one.
To connect a Single Improved Clinch, you need to:
- thread the fishing line into a ring or eyelet;
- make several turns with the free end;
- pass this end into the loop near the ring;
- then thread it through another loop that was formed in the previous step.
The single improved clinch is very strong and easy to knit. Compared to regular single knitting, its knitting is only 1 step more difficult.
Double clinch
The peculiarity of this option is that the fishing line must be folded in half before threading it into the eye of a hook, bait or other element of equipment.
How to link it:
- thread the double-folded fishing line into the eyelet;
- give it a few turns;
- thread the free end into the loop;
- wet and tighten the connection.
There is another variation of the Double Clinch.
This knot turns out to be very durable, so it can be used in the most extreme situations. For example, it is well suited for rigging large fish using strong, thick fishing lines. Using a high-quality double clinch, you can pull a real crocodile out of the water with minimal risk of breaking the equipment during fishing.
This video explains the Double Clinch knot:
Hardened
The reinforced or reinforced clinch is similar to the previous version, but knits a little easier.
To do it, you need:
- thread the fishing line through the eye or ring;
- make several turns;
- pass the end into the loop formed at the ring;
- then pull into the far loop;
- wet and tighten the connection.
It works well for knitting fluorocarbon and braid.
How to knit a Reinforced Clinch is shown in this video:
Stop Clinch
This option is used to create a stopper on the main line. Most often this is a stopper for a sliding float. This equipment is used when fishing with a float rod, when the depth at the fishing spot exceeds the length of the rod.
To make a Stop Clinch, you need to take a small piece of the second thread, attach it to the main fishing line and tie a knot. It is necessary to tighten it with such force that the resulting stopper can be moved up and down.
This is a very simple and inexpensive way to create a reliable stopper that is guaranteed to cope with its functions.
For tying a Stop Clinch, a fishing line of the same diameter as the main one is best suited. But it is preferable that it be of a different color - then the knot will be clearly visible. As you move up and down the line, the knot loosens a little. Therefore, when cutting off excess fishing line, it is better to leave the ends longer so that it can be pulled up.
Tying braid and fluorocarbon line
Very rarely, but still you have to connect fluorocarbon fishing line with braid. And it is quite difficult to select a unit for such installation, since both materials are quite specific and original. But although it is difficult, it is still possible.
The setup below uses braid as the main line and fluorocarbon line as the secondary line. I think that hardly anyone uses the installation of equipment on fluorocarbon as the main fishing line, so it’s not worth describing it.
Tying fluorocarbon fishing line with braid is very simple; this is done as follows:
- The working ends of the fluorocarbon and braid must be folded towards each other;
- On the other side of the tip you need to make a loop on the braid;
- Now you need to wrap the braid 5 times, around both lines;
- Pass the end of the braid through the resulting loop;
- Moisten and tighten the knot;
- Now repeat steps 2-5 for fluorocarbon line;
- Now tighten both knots by pulling the ends of the line and cord;
- Remove the excess ends of the fishing line.
Useful for connecting two cords or monofilaments (of any composition), as well as a bundle of braid and monofilament:
Step-by-step instructions for other node configurations
How to knit fishhooks with rings using the following knots:
Akulym
Greater traction strength will be achieved when using synthetic cords. How to knit:
- pass the leash through the ring;
- with the running end, wrap the end 5-6 times around the root and the same running end;
- push the end of the line into the loop on top;
- moisten the joint, bring them closer together and tighten the loops.
Spindle
All manipulations take place on the stock of the product. The fastening will be reliable, will not unravel and will withstand the load when using and pulling any type of synthetic cord. How to knit:
- insert the running tip into a ring and form a flat loop along the rod;
- make 4 turns around it and the rod and pass the end of the line into the loop from below;
- moisten the material with water and tighten the knot.
Tag or deaf
In this quick way, hooks, sinkers and lures are tied, connections are quickly untied to replace the product, preserving the integrity of the thread: polyamide, cotton, soft wire. What to do:
- pass a flat loop through the eye of a spoon, hook or sinker;
- lower the loop down and pass the hook through it;
- carefully tighten the connection.
Double clinch or trailin
Using this method, you can knit braided or any monofilament thread to hooks: single or double and sinkers. What to do:
- pass the running tip through the hook ring twice;
- make 5 turns from bottom to top along the root end;
- pass through the double loop near the ring, running tip;
- tighten the fastening and trim the end of the thread, leaving 3-4 mm.
Loading …
Knots for braiding
Known methods for tying braided thread allow you to assemble any kind of equipment. This results in a strong connection to the cord that can withstand significant loads.
Clinch
The knot is used to attach fishing elements such as a carabiner, swivel or hook to the fishing line. It is so simple that any beginner can tie it. It's done like this:
- Pass the end of the cord into the eyelet and push it out 10 cm.
- Make 6-7 turns with this short section of the long piece of thread.
- Place the end with which the cord was wrapped into the loop that formed at the eye of the hook. It turns out another one, now bigger.
- Pull the knot slightly, wet it and tighten completely.
- Trim off the excess.
Despite the simplicity of execution, the connection is very reliable.
Grinner
Suitable for tying braids. Experienced fishermen call him one of the best.
Easy to knit:
- Pull the cord through the eye of the hook to form a loop.
- Make 5-6 turns, then make another loop.
- Place the end of the braid over the resulting loop.
- Wet the entire structure and tighten the knot.
- Trim off the excess.
The Grinner
Grinner knot is durable because the wear of the joint itself and the material is kept to a minimum.