Knots for jigs with an eye
I’ll start the review of jig knots with those that are used for baits with an eye (built-in ring), of which the bulk are tungsten.
All knots for tying such jigs can be divided into three categories.
Tight knots
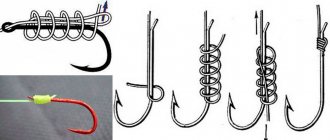
Rice. 1. The easiest and most reliable way to tie a jig with an eye is with a self-tightening knot.
These include those that cover the ring and are firmly fixed to it. By the way, similar knots are used for artificial flies and eye hooks. The most famous and strong of them are “Palomar” and “Improved Clinch”.
Rice. 2. “Improved Clinch”, also known as “improved clinch”, also known as “grabbing knot”. Quite durable (77%). It is knitted by pulling the fishing line through the eye and then twisting it with the free tip, which is then pulled through the resulting loop, and then “through itself.” The knot is tightened like this: first, lightly pull the line and the tip to collect the turns more or less compactly, then pull the line and bait properly (the tip remains sticking out to the side).
Rice. 3. Palomar knot. Probably the best one with which you can tie a jig. Stronger than the previous one (95%), it is knitted like this: fold the fishing line in half, then thread it through a loop and make a simple knot. We pull off its free end-loop and throw it on the bait.
Rice. 4. Knot “Palomar” (continued): having thrown a loop, we begin to tighten the knot, trying to ensure that it clasps not the ring, but the turns threaded through it, and ends up between it and the knot itself.
Advantages:
- Both knots are easy to knit.
- Compact.
- As mentioned above, they turn out to be quite durable.
- The angle at which the jig hangs can be adjusted within certain limits, which allows you to experiment with jigs.
Flaws:
- Strong fixation, less freedom of movement, and therefore a somewhat rougher game (for some jigs this minus turns into a plus, for example, for a devil, which needs to be played strictly along the vertical axis).
Hard knots are recommended for use on thin fishing lines.
Loop knots
Rice. 5. If you tie a jig with an eye on a loop, its action will be perfect.
Here, nothing fixes the bait; it slides freely along the fishing line loop. Similar knots are also used for tying wobblers, some oscillating spinners and flies.
As an example, I will give the most universal knot, very popular both here and abroad - the “Non Slip Loop Knot”.
Rice. 6. “No-tightening loop” - a way to tie a jig with an eye to get a better game. It’s knitted like this: first we make a loop on a simple knot, then with the free tip we wrap the fishing line in several turns (usually about six are enough), after which we pull it into the knot.
Rice. 7. Non-tightening loop (continued). We pull the fishing line, carefully tighten the simple knot, at the same time adjust the length of the loop, then tighten the turns and finally tighten the entire knot.
Advantages:
- Knitting is relatively simple.
- The best bait game.
Flaws:
- The knot turns out to be less strong due to the fact that the ring presses on the end of the loop, where the fishing line is bent.
- The knot is not compact enough, thanks to it the bait can visually increase slightly in size. In the wilderness, this nuance is definitely worth taking into account.
- The bait cannot be given an arbitrary orientation in space - it always hangs at an angle at which balance is maintained. However, this shortcoming is more than compensated by the impeccable performance of the jig.
Loop knots are unrivaled on reelless rigs.
"Hook" knots
They can be considered a compromise between hard knots and loops. Here, only the fishing line is threaded into the ring, and the knot itself is tightened onto the shank of the hook. At the same time, the strength is somewhat inferior to a rigid knot (the line rests against the ring), but it is noticeably higher than on a loop. The game of the bait turns out to be quite high quality. Statistics have shown that experienced fishermen without rewinders like to tie a jig using the “hook” method.
By the way, similar knots are also used to tie a jig without an eye - with a hole, so we will look at them in the next chapter.
How to tie a jig correctly
A jig is an artificial bait that is used primarily for winter fishing. Such baits can come in different colors, shapes and sizes, and each variety is used to catch a specific type of fish.
In addition, all jigs also act as sinkers and help to cast the tackle further. By design, baits can be equipped with an eye or a regular hole. Each type has its own binding methods.
With eye
A jig with an eye or ring is tied in the same way as a regular hook. The most popular jigs with an eye (goats and devils) are tied with a Palomar, Improved Clinch or Trilene knot (Figure 1).
Tying such a bait is easy:
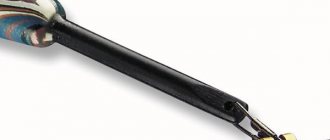
To prevent the line from fraying during fishing, a cambric is placed on the ring. Before tightening, the fishing line is moistened (with water or saliva) so that it does not lose strength.
Without ear
Classic jigs with a hole are tied using self-tightening knots. The only exception may be some types of tungsten baits (Figure 2).
The step-by-step instructions are as follows:
- Thread a fishing line into the hole of the bait, leave a small loop and thread the cord back into the same hole.
- The loop formed by the fishing line is placed spirally on the hook.
- A ring is formed from the free end of the fishing line above the jig and wrapped with a figure-of-eight cord.
Figure 2. Separate binding schemes are provided for baits without an eye
After this, all that remains is to tighten the connection by pulling the fishing line on both sides. As in the previous case, it is better to moisten the fishing line with water to increase the strength of the connection.
Step 3. We begin to tighten the ring by the ends of the fishing line until we get two rings of fishing line, a figure of eight.
How to tie a jig to a fishing line? Depending on the type of jig, it is tied in different ways. Namely, at different angles relative to the fishing line - 45°, 90°, 180°. Naturally, these are approximate, generally recommended figures. Nobody forbids you to experiment and tie the jig to the fishing line at other angles. The main thing is to understand what it is for. For example, I prefer to tie the jig at angles of 45° and 90° with the tip up, because in this case there will be the best hooking of fish.
There are jigs that can only be tied at an angle of 180°. The hooking may be worse and there may be more breakdowns, but it happens that only this jig bites, nothing can be done about it :).
Tips for fisherman: How to attach bloodworms to a jig in winter - Detailed review
You can use a figure eight knot to tie a jig at angles of 45° and 90°. It's simple, anyone can master it.
Step 1. We pass the fishing line through the hole in the body of the jig so that the hook point points upward.
Step 2. Make a ring out of the fishing line and push the end of the fishing line through it three or four times.
Step 3. We begin to tighten the ring by the ends of the fishing line until we get two rings of fishing line, a figure of eight.
Step 4. You need to pass the shank of the jig hook into both rings of the figure eight, the figure eight is threaded through the tip (sting).
Tighten the knot, cut off the excess end of the fishing line, but not at the root, leave about 2 mm, so it will definitely not come undone.
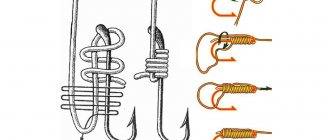
To tie a jig at an angle of 180°, you can use a clinch knot, i.e. behind the eye of the jig hook (see picture below). And don’t forget, when tightening any knot, it is recommended to moisten it with water or saliva, so the fishing line is less deformed.
The knot is also not complicated, everything is clearly drawn in the figure and does not need any comments. Instead of a hook we use a jig, there is no difference. The only thing I note is that in the first step they wrap the fishing line not strictly 5 times, but from 5 to 8, but in most cases 5 is enough. A larger number of times may be required if the fishing line is thick, meaning with a diameter of more than 0.22 mm. It happens that for some reason 5 times is not enough for a thick fishing line and when tightened the knot does not tighten but unravels. Maybe I came across such strange fishing lines, I don’t know :).
For more fishing knots that can also be used for tying jigs, see here - How to tie a fishing hook.
I recommend using jigs made entirely of lead, tin or any other metal, but always with an eye. Lead and tin can be made without an eyelet, but other metals, I repeat, must have an eyelet. Why? If the jig is made of tungsten and does not have an eye for a fishing line, but instead a hole is drilled in the body of the jig, then naturally we will tie the jig by passing the fishing line through this hole.
And at the point where the fishing line touches the edge of the hole in the tungsten jig, a rupture will occur. The fishing line under load when bending is easily cut off at the edge of the hole. A similar disadvantage is observed with jigs that have a plate of harder metal soldered on top, not all of them, but they do, and after you have tied the jig you need to check it. It’s easy to check, pull the jig, while holding the fishing line so that it “rubs” as much as possible against the edge of the hole.
You can try to grind the edges of the hole, but this is jewelry work and does not always work. To solve such problems, there are special units, but they require that there be a thick hole in the jig, and then such a unit is difficult to make in field conditions, and even in cold weather.
This is not the case with lead jigs; lead is soft and it simply crumples at the point of contact with the fishing line. When you buy jigs with an eye, also carefully inspect the eye so that there are no sharp corners in it; it should be round in cross-section.
This article is a continuation of How to assemble a winter fishing rod. You might be interested in the article How to put bloodworms on a hook. By the way, when winter fishing I recommend that you always have a jig detacher with you. If you don’t have the opportunity or desire to buy it, then you can make it yourself - Do-it-yourself jig cutter.
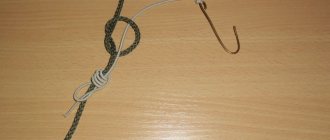
First, fold the fishing line in half. Then we need to make a loop from the double fishing line and wrap the end into it several times - 3 turns will be enough.
Knots for jigs with a hole
Instead of a ring, a lead jig has a hole through which the fishing line is threaded, so the only sure way to tie it is by the shank of the hook. From time immemorial, the same knots have been used for this as for a traditional forged hook.
Classic way
Rice. 9. This is how our ancestors tied hooks. Illustration from the book by L.P. Sabaneev “Life and catching freshwater fish.”
In past centuries, a hook was tied in the following way: the fishing line was placed on the shoulder blade, stretched along the fore-end to the bend, then rewound back, forming a loop, made several turns around itself and the fore-end to the shoulder blade, after which its free end was pulled through the loop and the knot was tightened. By the way, this knot is called “Easy Snell Knot” abroad, which means “simple driving knot.”
This knot was so good that when the first eye hooks appeared, it was also used “out of habit” for tying them. Then they began to use it for jigs, but not immediately, namely at the time when they acquired their modern appearance.
However, over time it was supplanted by another - a more advanced and durable unit.
The best knot for a jig with a hole
It's called "spindle". And it deserves not just a picture, but a small “cartoon”.
Rice. 10. A visual demonstration of how to tie a jig with a “spindle” knot: put a loop next to the fore-end, wrap both of them with four turns, pull the free tip into the loop and pull on it to tighten the turns. Then, holding the tip and the fishing line, we tighten the knot.
Advantages:
- Ultra-high strength. So much so that when using this unit, breaks often occur in those places where the fishing line rubs against the rod rings.
- Good bait game.
- Compactness.
Flaws:
- Some difficulty in tying. It’s not easy to tinker with thin fishing line and small bait in the field, especially in the cold, when your fingers get cold and stop listening. And it’s clear that you have to remove all the “jewelry” from a reelless jig, otherwise tying a knot will be extremely tedious.
- The knot takes up some part of the hook. For moth baits this drawback is not significant, but for mothless baits with beads it may be undesirable. You can forget about it, but only if the diameter of the hole in the beads is larger than the diameter of the knot. However, if it is smaller, then the beads will bounce off the knot when played and will no longer be able to “clink” against the body of the bait and attract fish with sound. If the diameters of the hole in the bait and the knot are more or less the same, then sooner or later the beads will get stuck on the knot, causing the bait to stop playing normally altogether.
The hole is like an ear
From time to time on fishing forums there are messages about attempts to tie a jig as if the hole were an eye. That is, a knot is formed on the fishing line, tightly encircling the jig with a loop (in “tungsten frames” with a wide hole, the knot is generally hidden inside the jig). Moreover, this is offered not only by novice fishermen, but also by fairly experienced fishermen.
Photo 2. A fly agaric, the hole of which can be used as an ear.
I will say this - this method has the right to be used, but not everywhere, but only where you can’t do without it. For example, in order to tie a specific “fly jig” to a fishing line, which has a small soldered head with a hole, and almost the entire fore-end is occupied by dabbing (although, if you get used to it, you can tie a knot on the hook here too).
As for the specific knot, you can use any one used for baits with an eye.
By the way, you can tie any other jig this way, in which the hole is located closer to the side that is opposite the hook. There should be the same amount or more to the sides, but no less, otherwise the loop will not lie along the axis of symmetry and then there will be no point in tying it like that - this will be especially noticeable on jigs like “rice”, “ovinka”, etc.
The point is that if you use a rigid knot, then it will be possible to adjust the angle of orientation of the bait, which is very popular when experimenting with reelless baits. On top of everything else, the hook is free and any bait will have plenty of time to “walk” along it.
Subtleties of tying tungsten jigs with a hole
Typically, tungsten jigs are equipped with a ring. However, some of these baits sold in fishing shops may have a hole. It’s clear that any fisherman, without hesitation, will tie such a jig in the classic way.
However, it often happens that the hole is not processed enough at the factory - it remains with sharp edges, which lead to breakage during fishing.
With a lead jig, everything is simple here - we can “bore away” the burrs at any time with any thin and sharp object like an ordinary needle. With tungsten, this trick will not work at home - it is so hard that industrial equipment will be required.
The fishermen found two ways out of this situation.
Cambric
The easiest way to protect the fishing line from a sharp edge is to thread a piece of cambric into the hole, the length of which is slightly greater than the thickness of the jig, so that its ends stick out slightly on both sides. It will be very useful to fix the cambric with glue (if, of course, it does not sit tightly in the hole).
Photo 3. Jig with cambric in the hole.
Next, the fishing line is threaded into the cambric and tied in the usual way.
Artificial ring
Unlike “monofilament”, braided line is much more resistant to abrasion (I know for sure that some fishermen do not shy away from making leashes out of it for catching pike, which are enough for a certain number of bites), therefore this line is not afraid of an insufficiently flared edge of the jig hole.
People got excited about making an artificial ring out of braided wire.
Rice. 12. Making an artificial braided ring.
- We pull the double-folded monofilament line (blue) into the hole, and use it to hook up the braided line (green), then pull it into the hole until a small loop appears on top.
- We fix the free ends of the braid on the fore-end with a simple knot, and at the same time tighten it.
- We knit another knot with the ends of the braid, but on the opposite side of the forearm.
- We make another knot on the braided line - on the same side of the fore-end - thanks to which the previous one will not come undone. The ring is ready. Now you can knit any knot for a jig with an eye using monofilament fishing line (see the corresponding chapter above).
Something about double and triple pulling
Some fishing literature mentions a tying method in which the fishing line is pulled into the hole two or more times, while looping around the body of the jig. It is quite obvious that this is not possible with all baits, but only with those whose hole diameter is several times larger than the thickness of the fishing line.
Rice. 13. A somewhat unusual way to tie a jig. Please note: thanks to the coils in the hole, the fishing line holds quite tightly - a simple knot is enough to fix it on the shank of the hook.
The point of this method is supposedly to better fix the jig on the fishing line, they say - this way it can be given an ideal horizontal position, even though its center of gravity will be shifted far to the side.
I believe that this practice is not justified, because the extra loops make the whole structure too cumbersome. If the hole is really wide, then it is better to insert a piece of cambric into it. This way, the line will not “slip”, and there will be additional protection against chafing at the edge of the hole.
Well, then - I really don’t want to trust a simple knot that, with a good pull, can come undone - no matter how tightly it is tied.
Tying with a stopper knot
References to this method can be found in some literary sources. Its principle is this: the jig is not tied to a hook. Moreover, it does not attach to the fishing line at all. Simply thread the fishing line into the hole, then tie a locking knot on it, which prevents the jig from slipping. It's funny, isn't it?
Nevertheless, it was in this way that the first tin-lead jigs, invented somewhere beyond the Urals, were tied in the 19th century [1] L.P. Sabaneev wrote about this in his works.
Rice. 14. A way to tie a jig using a locking knot, which uses the well-known “eight” knot.
Advantages:
- Knitting is very simple, and most importantly - fast.
- The line does not touch the hook at all, which is very useful for baitless baitfish.
Flaws:
- Poor fixation of the jig on the fishing line - now it is able to slide up along it, which to some extent can worsen the game of the reelless jig. For bloodworm baits, this drawback is not significant.
- If the hole is not narrow enough, when fishing for a large trophy, the knot may become deformed and slip through, as a result the bait will be lost.
How to tie two jigs in a row on one fishing line
For the “locomotive” or “garland” tackle, a row of jigs should be placed. This is done in a variety of ways, depending on what kind of bait is chosen - without or with a hole.
Installation without lug is made as follows:
Another jig is tied using one of the methods recommended above. For the “locomotive” gear, most often, reelless ones are chosen - goats or devils (nozzleless), but this is not necessary.
Tips for fisherman: How to catch perch in winter with a jig - Detailed review
In the event that baits with a hole are used for the tackle, then tying two jigs one after the other onto a fishing line is also simpler. The top bait is tied with a palomar or clinch knot, and the bottom bait is tied as always.
- Take a jig with a hook, the tip of which points upward, and insert a fishing line into its eye.
- Roll the line into a ring.
- Wrap part of the ring with fishing line and make several turns.
- Pull the resulting winding, i.e. end of the wound fishing line and pull the rest of it to form a figure eight.
- Pass the point of the hook through each ring of the figure eight.
- Moisten the knot and tighten.
A jig is a small piece of fishing equipment; it is a hook soldered into a piece of metal. It is made from tin, lead, and tungsten.
There are two types of jig designs - with and without ears. The steps to attach them to the main line are completely dependent on the design of this part.
Which one to choose?
When choosing a jig, you take into account the depth of the reservoir where you are going to fish, the speed of the water flow in it, and most importantly, what kind of fish you are going to catch.
It is important for a novice fisherman to understand the truth: the greater the depth, the greater the mass of the bait, and also to take advantage of information from the arsenal of experienced fishermen:
- If the depth of the reservoir is no more than two meters, the weight of the jig is 0.3-0.5 g;
- If the depth is four to five meters, the mass of the jig is up to 1.0 g;
- At a depth of seven to eight meters, winter bait should weigh 1.2-1.5 grams.
It’s not enough to buy a jig; you also need to figure out how to tie it to the fishing line, what kind of knot to use to attach it so that it is of high quality and does not come undone. If the knot is knitted incorrectly, it will come apart, and the jig will fly into oblivion, and the fisherman’s mood will be ruined.
The design of the jig determines the method of tying the knot that should be used.
How to securely tie a jig to a winter fishing rod? This question is asked by all novice winter fishermen. Let's figure it out in order.
How to tie a jig without an eye
For a jig that does not have an eye, a simple and popular method among fishermen is used, the procedure is as follows:
- Thread a piece of fishing line into the hole of the jig, the end of the piece should extend beyond the edge of the hole by about 10 cm (the hook points up).
- Form the required loop near the hook.
- Press the hook of the jig with the resulting loop. Wind five turns of fishing line around the hook and loop.
- Insert the end of a piece of fishing line into this loop.
- Tighten the knot after moistening it.
- Remove excess line.
How to tie a jig to a fishing line with an eye
With an eye, a jig can be tied to a fishing line in several ways: Simple Knot, Clinch and Figure Eight. Let's look at each in more detail.
Clinch
For a bait that has an eye, the “Clinch” knot is used.
- Pass the line through the eye of the jig.
- Wrap the main piece of fishing line four or five times, making sure that the very first loop is not tight.
- Thread the end of the fishing line into the loop.
- Moisten the knot and tighten tightly.
- Trim off excess.
A variant of this unit for a winter jig of the “Drop” type:
- Take a jig with a hook, the tip of which points upward, and insert a fishing line into its eye.
- Roll the line into a ring.
- Wrap part of the ring with fishing line and make several turns.
- Pull the resulting winding, i.e. end of the wound fishing line and pull the rest of it to form a figure eight.
- Pass the point of the hook through each ring of the figure eight.
- Moisten the knot and tighten.
These methods of tying jigs are not suitable for tungsten products. This is a hard metal, jigs made from it (even very high-quality ones) quickly destroy it in direct contact with the fishing line.
Tungsten jig
There is a way to improve a tungsten jig so that it does not fray the fishing line.
Eight
- Take a jig with a hook, the tip of which points upward, and insert a fishing line into its eye.
- Roll the line into a ring.
- Wrap part of the ring with fishing line and make several turns.
- Pull the resulting winding, i.e. end of the wound fishing line and pull the rest of it to form a figure eight.
- Pass the point of the hook through each ring of the figure eight.
- Moisten the knot and tighten.
These methods of tying jigs are not suitable for tungsten products. This is a hard metal, jigs made from it (even very high-quality ones) quickly destroy it in direct contact with the fishing line.
Tungsten jig
There is a way to improve a tungsten jig so that it does not fray the fishing line.
You need to do the following:
- Heat an elastic PVC cambric in boiling water, stretch it to the desired diameter size and pass it through the eye of the jig.
- Fix the casing and release it beyond the edges of the countersunk hole. This way the line will be protected from chafing.
This problem can be solved in another way. To protect the line from the sharp edges of the tackle, you need to use braid.
To do this, a loop is made from a cord and fishing line, which is threaded into the hole, while the cord should protrude beyond the edges by no more than 1 mm. The cord is attached to the tackle, and the fishing line is attached to the loop made in the form of a knot. The most famous knots for tying tungsten jigs are Palomar, Trailin, Double Clinch.
How to tie two jigs on one line
Usually, when installing such equipment, a main jig without an eye is used; it is attached from below, in the manner described above, but first you need to secure the top one.
There are 2 options for mounting the upper jig:
use a stopper in the form of cambric or beads and a second one using a lead.
Tips for a fisherman: How to tie a jig to a winter fishing rod correctly - Choosing the best
Subscribe to
Rybak Rybak. Fishing Tricks , put it on