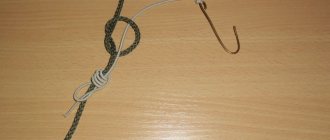
For clarity, you can watch a video with three ways to tie a jig to a fishing line . Here are the options when the jig has an eye.
Hello, dear friends. This article is devoted to analyzing how to properly tie a jig to a fishing line or leash so that the fastening is as strong and reliable as possible. Also an important aspect of binding is the complexity of organizing a particular node. Below are fairly simple and effective ways to tie a jig to a fishing line.
- Jigs with an eye ↓
- Jigs without an eye ↓
- Tying two jigs ↓
In terms of attachment to a fishing line, there are two types of jigs:
- with eye (without hole)
- with hole without eye
When tying a knot on a jig, you should avoid the formation of kinks and tension in the fishing line. If the line is twisted too tightly, it may cause it to break. To protect the fishing line from deformation and make it more manageable, it is recommended to moisten the fastening surface with water.
Experienced fishermen who can explain how to properly tie a jig know that the method of tying a jig depends on the type of jig itself.
You can tie a jig with a hole to a fishing line by passing the fishing line through the hole with a 10 cm release. The tip of the fishing line is bent into a 3 cm loop and directed along the hook foreend. Next, the fishing line is fixed by clamping. You should make at least 5 turns of the loop and tighten it to be secure. The knot should be tightened with the tip of the fishing line.
You can tie a jig made of soft material by passing the fishing line through the hole and tying a knot at the tip. The knot encircles the line, then wraps several times for stability. The sliding loop is put on the hook and tightened onto the fore-end where the jig is attached.
If a fisherman needs to attach 2 jigs to the fishing line, then the lower and heavier jig is tied using the 1st method. The upper jig is attached to a leash up to 15 cm long. The leash is attached to the fishing line at a distance of up to 40 cm from the lower jig.
- Makes it possible to use several different baits at once.
- Different techniques for tying additional hooks give different bait play from each other.
- Increasing the attention of fish to several baits at once.
How to tie two or more jigs?
To increase the chances of a bite, the fisherman increases the number of baits in his gear. And this is justified:
- Makes it possible to use several different baits at once.
- Different techniques for tying additional hooks give different bait play from each other.
- Increasing the attention of fish to several baits at once.
Requirements for tying several jigs:
- The lower rewinder should be heavier than the upper ones.
- The distance between baits is at least 25 cm.
- The first thing you need to do is knit the top jig.
You can knit with a train in various ways:
- With a leash. It is usually attached using a counter figure eight (Flemish) knot.
This design is usually used on bodies of water with current.
- Sliding. Fixed with stoppers. Typically, light pendants are used (phosphorus eye, fly, hook with beads).
Used as a provocative bait.
- With suspension. Knitting technique - palomar knot.
In this way you can quickly tie everything you need, even in the cold. It will be in the correct position, and thanks to the cambric, the line will not fray.
Mormyshka without an ear
The greatest difficulties are presented by models that do not have a ring. They have a through hole in the body of the bait. Typically, breaks occur due to the fact that the fishing line frays on the uneven edges of this hole. The problem is solved by pulling the cambric. But the hole is too narrow; simply inserting a cambric into it will not work. And this is done like this:
Now you can tie the bait. To do this, we use one of the most reliable and simple nodes:
- From the side of the hook tip, we pass the fishing line through the hole.
- We make a loop and press it with our fingers to the fore-end.
- Wrap the free end around the hook and pressed loop 7 - 10 times.
- Pass the fishing line through the loop, tighten the resulting knot well, not forgetting to wet it.
Tips for a fisherman: How to properly attach a bloodworm to a jig - Let's take it step by step.
In this way you can quickly tie everything you need, even in the cold. It will be in the correct position, and thanks to the cambric, the line will not fray.
To tie these baits, you can use any of your usual fishing knots.
How to tie two baits together so that they do not get confused with each other?
Today I would like to show how you can simply and easily make the right tackle with two baits - the bottom one will be a jig, and the top one will be a hook with bait.
In the same way, you can tie two jigs at once...
First, fold the fishing line in half. Then we need to make a loop from the double fishing line and wrap the end into it several times - 3 turns will be enough.
Then we wet the knot and tighten it. The extra free tip will serve as a leash for additional bait.
And we cut off the loop at the knot itself. We tie a jig to the lower end of the fishing line, and a hook to the upper end.
To tie these baits, you can use any of your usual fishing knots.
I recommend the usual standard one with turns and threading through a loop. Or you can “Clinch” or “Improved Clinch”. The Figure Eight knot will also work.
We thread the end of the fishing line into the hole of the jig, fold it in half, forming a loop and wrap it around the fore-end, grabbing the entire fishing line at once. 3-4 turns at the end into the loop - moisten and tighten.
The same can be done with the upper garter - with a hook.
You can watch the video in more detail:
And one more option:
This connection of several baits or jigs with a hook creates a reliable condition so that the additional leash with the hook does not twist or get tangled with the main fishing line.
NHNCH (No tail, no scales) to everyone! Follow my new publications - it will be even more interesting!
Jigs made from tungsten are heavier than lead jigs. This, of course, can make it possible to lower them deeply very quickly, but it is difficult to make through holes without the presence of roughness, chips and burrs in this material. For this reason, they often fray the fishing line. A rupture occurs.
For fish without bait
HomeArticlesAll articlesArticle
Egor
Many articles have already been written about baitless ice fishing. Meanwhile, the possibilities of equipping winter gear, as well as the technique and tactics of baitless fishing, are far from being exhausted.
About artificial replants
In this material we will look at fishing with jigs and lures using new artificial baits, but first let’s go back a little to history.
For decades now, many fishermen have stopped using natural baits such as bloodworms, maggots, or burdocks in winter fishing and replaced them with glass beads, seed beads, polystyrene foam, multi-colored cambrics, or microporks. In general, such substitutes do their job well, but each of the listed artificial additives has serious disadvantages.
- Glass beads and seed beads are placed on the shank of the hook even before the jig is made and cannot be quickly replaced while fishing. To find the most successful and catchy combination of color and size of such a bait, you will have to often tie jigs with other beads in the cold, or have a solid supply of winter fishing rods with various jigs already tied. Both options take quite a lot of time on the ice to select the desired combination of size and color of the bait, and clearly do not add comfort to the entire process of experimental search.
- Foam balls on a jig hook are more convenient due to the ease of replacing them, but they are very fragile, quickly fly off the hook after catching a fish, and most importantly, they “steal” the weight of the jig. It becomes lighter due to the foam ball and sinks to the bottom much more slowly. In addition, the color of such balls is only white, which eliminates the possibility of color matching.
- Multi-colored cambrics suffer from the same ease of color selection as glass beads. They can be put quite easily on the hook of a jig, but it is no longer possible to remove them, since the barb of the hook will not allow this. To replace the cambric on a hook, you must first cut off the previously worn one with a knife and only then put on a different size or color. Agree - this is also not the best option for experimental selection of catchable bait in the cold.
- A piece of black micropork stays on the hook quite well. When saturated with water, it does not lighten the jig like a foam ball, and does not slow down the speed of the jig's descent in the water as much. In addition, the plucked piece can be of any size. These are all advantages, but, unfortunately, the black color of the microflogging cannot be changed either. However, the biggest drawback is the irregular geometric shape of such a piece. When idle hooking, or quickly lifting the jig out of the water, a piece of micro-pork causes the jig to rotate, twisting the line. If the fishing depth is more than three meters, then the twisted fishing line will definitely get tangled in the snow next to the hole and fishing will turn into torture.
I deliberately analyzed in such detail all the shortcomings of the above-mentioned artificial replants. Now it will be easier for us to formulate the requirements for an ideal artificial replant. And let's list them like this:
- The bait on the jig must be strong enough so that it can withstand the capture of several fish.
- The bait should be easily replaceable on the jig hook without the use of any tool or knife.
- The bait should have a spherical shape, since only such a neutral geometric figure on the hook will not twist the jig and twist the line when idle hooking, or when quickly removing the tackle from the water.
- The replanting should have a different color and size.
- The replanting should, if possible, imitate natural underwater inhabitants, various larvae, or insects.
- The replant should have minimal cost, be easily accessible, or easily made at home.
- In a pond, the replant should always be at hand and should not require special storage conditions.
It would seem that it would be impossible to find such material that satisfies all the listed requirements, but it has been on the shelves of all fishing stores for a long time. These are silicone twisters and vibrating tails of any colors and sizes. Low cost made them accessible to the entire army of fishermen. From these silicone fish of different colors we will make an almost ideal bait for jigs, and more.
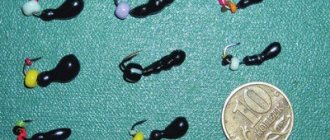
And in order to intrigue the reader, I decided to first show in Photo No. 1 variants of jigs already equipped with silicone refills of various sizes, colors and shapes. Some baits on a jig hook quite accurately imitate familiar larvae and insects. At the end of this article, we will look at the area of the most effective use of silicone baits on jigs and hanging hooks when ice fishing for various fish.
Making silicone beads
Let's start with making, or rather, “baking” silicone balls. For this we need silicone fish of different colors. Looking ahead, I’ll note that the larger the silicone fish, the more balls for replanting you can “bake” from it. Through experience, I have identified the colors of artificial baits that are most attractive to fish. I will list them:
- Transparent red is the most popular color for bloodworm larvae.
- Red is not transparent in different shades.
- Bright orange.
- Brown.
- Yellow.
- Green.
- White - the color of maggot or burdock.
- White fluorescent - glows in the dark.
- Black.
For “baking” we need a thin sewing needle, a glass of cold water and a kitchen gas stove burner. If you have an electric stove, it doesn’t matter, you can bake over it. Or you can build a special electric mini “oven” for these purposes, for which you will need a car battery, or a charger for it, as well as a piece of nichrome wire, or part of a spiral from an electric stove of the last century. A new spiral is made from it with a winding diameter of 20-25mm. Experimentally, you need to select such a length of nichrome wire so that the twisted spiral under a voltage of 12V has a crimson color.
Now everything is ready for baking and it’s time to cut blanks for future balls from silicone twisters or vibrating tails. Ultimately, our goal is to obtain small cubes with side sizes from 1 to 4 mm.
The easiest way is to cut the fish crosswise, into circles, 1 to 4 mm thick, just like we cut sausage for the holiday table. Then we cut each circle into strips with a width equal to the thickness of the circle. Now we cut the strips crosswise again to eventually get even cubes. Cubes take on a spherical shape better when heated than other, irregular shapes.
To obtain an oblong oval-shaped refill, you need to cut rectangles from strips, 4 to 7 mm long, depending on the thickness of the circle. Photo No. 2 shows circles, stripes, rectangles and cubes cut from silicone fish before baking.
Now we prick the cube onto a thin sewing needle so that the tip of the needle only protrudes slightly on the other side of the puncture. The easiest way to achieve this is to place the cubes on a wooden cutting board and insert a needle into it until it touches the board. The same Photo No. 2 shows cubes and rectangles already pinned on a needle. From cubes 1mm in size you will get balls of approximately the same diameter. The larger the cube, the larger the diameter of the ball. From my many years of practice, the most popular balls turned out to be with a diameter of 1.5 - 3 mm, although, for example, to create a small artificial caterpillar you will need one black ball with a diameter of only 0.5 mm. So bake balls of various sizes, but don’t get carried away by gigantomania.
Finally, the most important moment has arrived - baking.
Place a glass of cold water next to the stove and light the gas burner, or turn on the heating element of the electric stove almost to maximum. The gas burner should be open no more than a quarter, since we do not need a large flame. Don't forget to open the window to constantly ventilate the room.
Now we take a needle with a cube pinned with two fingers so that we can rotate it around its axis, and carefully bring the cube from below to the burner flame, as in Photo No. 3, but not close to the flame. Experimentally, you need to find such a distance between the flame and the cube that it only begins to melt, but does not ignite. Rotating the needle with your fingers, heat the cube evenly until it takes on a spherical or oval shape. Glassblowers do the same thing when they twist a tube to get a perfectly round product. Having obtained a spherical or oval shape, we lower it at the tip of the needle into water, where it instantly cools down and the ball can be safely removed from the needle. When baking balls over the heating element of an electric stove, you need to bring the cube pinned onto the tip of the needle to the very edge so that the body of the needle does not heat up, otherwise the molten silicone will slide in a drop from the hot needle onto the hot element and immediately flare up. It is for this reason that you need to constantly ventilate the room.
The first pancake will definitely turn out lumpy, but don’t despair. It is not the Gods who burn the pots, and after just a few attempts you will become a real “baker” of silicone balls. If the ball does catch fire, immediately blow out the flame and try again with a new cube.
Please note that silicone fish come in different densities. There are gelatinous ones that melt at a lower temperature, and there are denser silicones that require a higher melting point. Only personal repeated experiences will help you here. The main thing is not to despair at the first failures. If you prepare 50-60 pieces of balls of the above colors of various sizes, then you will be guaranteed to provide yourself with artificial replantings for the whole winter.
It is very convenient to store balls grouped by similar colors in a small multi-section box, which can be bought at any fishing store. Photo No. 4 shows my traveling set of silicone refills as an example. Since I mainly prefer to catch perch in winter, I have a much larger supply of red transparent balls matching the color of bloodworms than other colors.
Under no circumstances should you place balls of clearly different colors in a common compartment. Multi-colored silicone has the ability to recolor each other, and within a couple of weeks all your balls will become a single, indefinite color. The easiest way to remove small balls from the box is with small tweezers.
Fishing rod equipment
Now let's move on to equipping winter fishing rods for fishing with silicone balls.
If you have been fishing only with a reelless jig or devil for a long time, then the use of multi-colored silicone balls, and even different sizes and shapes, will greatly expand the range of operational selection of the most effective combination. I assure you that already on your first fishing trip with silicone balls you will be convinced of this.
I want to focus on a more catchy combination of reelless jig tackle. The highlight of the equipment is the hook, rigidly tied to the main line above the jig, or line.
The size of the hooks depends on the size of the fish being caught and can range from No. 16 to No. 10 according to international numbering. The distance between the hook and the jig can be from 10 to 30 cm, and the hook itself will require a little modification. After all, it should be located on the main line in exactly the same way as the jig, that is, almost horizontally, and for this you need to bend its forearm at the spatula, or the ring at an angle of 70-80 degrees.
In the schematic Fig. No. 1 on the left shows the hook before the fore-end bends, and in the center after the bend, how it will then be tied to the main fishing line.
I pay special attention to the correct choice of hooks. They must have a fairly long shank, otherwise, after bending it, the tip of the hook will be too close to the fishing line, as shown in Fig. 1 on the right. In this case, the line will clearly prevent the fish from taking the bait deeper and the hook will not always be able to reliably catch on the upper lip of the fish.
To bend the hardened hook shank without breaking it, you need to lightly anneal only the area near the spatula or the ring with a match or lighter. Now you can safely do the necessary work with small pliers. Photo No. 5 shows the most suitable hooks for bait fishing, as well as the same hooks with a curved shank.
Photo No. 6 in the bottom row shows several options for artificial baits on the hook above the jig. In fact, there can be many more variations on the theme of imitation of natural larvae and insects, you just need to strain your memory and turn on your imagination. The same photo shows the different sizes of balls and ovals of each color. The top left horizontal row consists of glow-in-the-dark balls for fishing at dusk and at night.
In Fig. No. 2 I tried to depict several possible imitations of larvae and insects on the hook above the jig.
There is an imitation of bloodworms, various small caterpillars, an ant egg and a burdock, a pair of ants, as well as other color and size combinations. In the lower right corner there is a bait that imitates a small lump of bait. Despite its unsightliness, this is the most successful bait for white fish when fishing with bread crumbs, and the fish boldly take such a bait, especially bleak.
A hook with an artificial bait arouses much more interest in the fish than a jig with a similar bait, so the ratio of the catch per hook and jig is on average 8/2.
The secret lies in the small size of the hook with the same small bait, and here's why. In winter, the biological activity of fish decreases several times, and the oxygen saturation of the water also decreases. This leads to a decrease in appetite in all inhabitants of the ice, which means that the frequency of food intake and its quantity during feeding also decrease. The fish becomes more capricious and does not respond to a large, voluminous bait, as happened in the summer. But she will definitely pay attention to the small and appetizing-looking attachment. After all, you won’t overeat with such crumbs, and you don’t want to miss the opportunity to eat a small delicacy. Please note that the silicone bait does not hang on the hook, like bloodworms or maggots, which means that if you bite very carefully, even at the tip of the bait, the fish will definitely catch on the sharp sting of the hook.
Perch prefers red baits. Roaches are more attractive in yellow and black colors, as well as their combination. Bream species prefer light colors in combination with black or red. These are the standard color preferences of the listed fish. However, there may be exceptions on every body of water, so don’t be lazy to change the colors of the balls on the hook and jig in search of a catchy combination, especially since putting on and taking off the balls is no more difficult than putting on a bloodworm or burdock. It happens that in one day of light you have to select the color of the bait several times in order to again find the desired combination and maintain the bite rate.
In the early morning hours, or at dusk, when the guard is barely visible, silicone balls made from fluorescent twisters give very good results. Before lowering the nozzle into the hole, you need to hold it in the flashlight beam for a few seconds. The glow of the balls lasts for about 3-5 minutes, and if there is no bite, then you need to remove the nozzle to recharge with light. Glowing balls also work well on gloomy cloudy days, especially at great depths, where there is not enough light in the middle of winter, as well as at night when fishing in a tent.
Since in winter fish bite on a baited hook much more often than on the jig itself, I use it only as a means of delivering bait to the bottom. That is why it is better to use relatively large tungsten jigs so that the nozzle reaches the bottom faster. This allows me to successfully fish at any depth, where the use of very small jigs is sometimes simply impossible.
Not only for jigs
The obvious success of silicone balls on jig tackle prompted me to use a similar bait when fishing for perch with a spinner in winter.
It all started with peeping into a hole for striped predators. That day the perches were clearly on strike and only a few occasionally grabbed the hook above the jig. I lay down on the ice and decided to watch him through the hole. Some perches stood motionless, others lazily moved in different directions, and none of them paid attention to either the jig or the baited hook. Then I lowered a perch spinner into the hole and began to spin, but again there were no bites. I lay down over the hole again and saw a completely different picture. All the perches gathered in a circle and carefully watched the dances of my spinner, but again not one of them even moved, although, unlike the jig with a hook, the spinner clearly interested them.
Then I re-equipped the tackle by tying a hook above the spoon on a leash, on which I put six red silicone balls and again lowered the spoon into the hole. After a few strokes of the rod, the first striped fish was caught, although I didn’t notice a bite. I lay down over the hole again to watch the process. The perches were still standing in a circle, but now they were clearly aimed at the hook with balls and took turns making short throws to the bait, and didn’t even look at the spoon. Taking a closer look, I caught several perches and understood why I didn’t see any bites. The leash turned out to be too long and with a short grip it did not transmit a signal to the guard, and the perch, having discovered the catch, managed to spit out the bait. I tied the rig, shortening the leash to one centimeter, and the process began. The bite was just like on the Black Stones, although all the fishermen around were frankly bored. A playing spoon creates an imitation of chasing a bloodworm larva, and even a well-fed perch cannot resist the temptation to intercept the prey. Since then, I often troll for perch with a hanging hook and red balls on it.
Unlike jig fishing tackle, when fishing with a spinner, you cannot attach the hook above the spinner rigidly to the main fishing line without a leash, since the attacking perch grabs the bait with a short swoop and, poking its open mouth into the fishing line, pushes the hook away from itself. As a result, there are many idle bites, and frequent gatherings occur. With a short leash this does not happen and the bite is clearly visible.
The distance from the spoon to the hook can vary from 15 to 25 cm, and the length of the leash should not exceed 1.5 cm. Depending on the size of the perches, the hook can be from No. 10 to No. 5 according to international numbering. Photo No. 7 shows three sizes of spoons and their corresponding hanging hooks with red balls. A small spoon and a small hook are designed for catching small coastal perch weighing up to 150g. A medium spoon with an enlarged hanging hook is suitable for perch up to 300g. The right heavy spoon with a tee and a large hanging hook is only suitable for trophy perch. It was just such a couple who helped me out more than once at the Rybinsk Reservoir in the dead of winter.
It should be borne in mind that fishing with a lure with a hanging hook on silicone balls is most preferable from mid-winter, when the fish are very capricious and inactive. If fish are already caught well with a spoon, then there is no point in equipping it with a hanging hook and complicating the gear.
For several years now I have been successfully using multi-colored silicone balls as artificial bait, and I have never left the ice without a catch, which is what I wish for you.
Published in the magazine “Fishing in Rus'” N2/2009 Published for the first time in the author’s version.
Tags: baitless winter fishing jig silicone balls spinners homemade
20
Register or log in to comment.
Jaster
-> Article
For fish without bait
19.12.2015 18:38:30
It turns out I'm not the only one who uses these balls!
We fasten the devil
An extremely simple way to attach a devil jig - this knot is called a Palomar. It knits quickly, is able to withstand a lot of fish, including large ones, and the loop easily passes through a very large ring of winter bait.
On the question of how to tie a palomar knot, we told you here. Make absolutely everything exactly according to the instructions, using a set of methods, and no problems should arise.
At the moment, devils are made with a hole in the body of the bait. In this case, tying it in such a way that it stays exactly vertical is not much more problematic than the jack-and-ring. It is mastered this way:
- The line is passed through the hole;
- A loop is placed along the first hook of the tee;
- The forend and the fishing line laid in a loop are wrapped 5 times;
- The unoccupied end is pulled through using the previously closed loop;
- The knot is tightened.
To make it clearer, we recommend that you look at the video material at the end of the note:
With this method, the devil is in the desired position. It is preferred in the interests of the fish by its play and, if it is tied incorrectly, then it will not perform its own task in any way.
- The braid needs to be pulled through the jig hole 2 or 3 times.
- Then you need to tie a knot such that, in the process of tightening it, a loop of small diameter is formed.
- Then simply secure the leader to the main line using a loop-to-loop connection.
Photo with an additional jig attached.
Here you can see that under the weight of the jig, the leash line has sagged, but still neither the jig nor the leash touches the main line, and a simple hook with an attachment will always be to the side.
Additional leash on the main line of the winter fishing rod
This is also very useful if you equip your winter fishing rods with additional leaders and jigs.
At the end of the article I will share equipment for catching winter bream. And in the summer, from a boat, large bream (from 3 kg and above) confidently take such equipment, and I often use it.
How to tie two jigs
Very often, fishermen have questions about how to tie two jigs. And they are completely justified. This method of equipping gear has its supporters and those who completely deny it and do not praise it. This problem can be solved and there are several ways to do this:
- jigs are tied directly to the main line at a distance of about 15-30 centimeters from each other;
- attach the jigs to the loops on the main fishing line about 5 centimeters long. On jigs, you need to tie leashes in the form of loops and fasten them to the main method, loop to loop.
The second option ensures quick replacement of the jig if it breaks, so it has clear advantages. And since winter fishing rods are equipped with thin fishing line, breaks occur relatively often.
In the cold season, the fish feeds poorly and does not show much activity, so a thick fishing line can only scare it away. To increase efficiency, anglers use small diameter fishing line with very thin leaders.
Fishing with such gear must be done very carefully, since any sudden movement can lead to the gear breaking and the loss of the trophy.
Fishermen also practice installing fluorocarbon fishing line on a winter fishing rod. Most often, leashes are made from it. The fish does not notice such a fishing line in the water, so the likelihood of being caught increases significantly. True, such material is very difficult to tie. And its strength is inferior to wicker, so it’s worth taking these factors into account.
When choosing a jig, you take into account the depth of the reservoir where you are going to fish, the speed of the water flow in it, and most importantly, what kind of fish you are going to catch.
A jig is a small piece of fishing equipment; it is a hook soldered into a piece of metal. It is made from tin, lead, and tungsten.
Tips for fisherman: How to catch roach in winter using a jig - Detailed review
There are two types of jig designs - with and without ears. The steps to attach them to the main line are completely dependent on the design of this part.
Which one to choose?
When choosing a jig, you take into account the depth of the reservoir where you are going to fish, the speed of the water flow in it, and most importantly, what kind of fish you are going to catch.
It is important for a novice fisherman to understand the truth: the greater the depth, the greater the mass of the bait, and also to take advantage of information from the arsenal of experienced fishermen:
- If the depth of the reservoir is no more than two meters, the weight of the jig is 0.3-0.5 g;
- If the depth is four to five meters, the mass of the jig is up to 1.0 g;
- At a depth of seven to eight meters, winter bait should weigh 1.2-1.5 grams.
It’s not enough to buy a jig; you also need to figure out how to tie it to the fishing line, what kind of knot to use to attach it so that it is of high quality and does not come undone. If the knot is knitted incorrectly, it will come apart, and the jig will fly into oblivion, and the fisherman’s mood will be ruined.
The design of the jig determines the method of tying the knot that should be used.
How to securely tie a jig to a winter fishing rod? This question is asked by all novice winter fishermen. Let's figure it out in order.
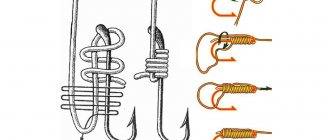
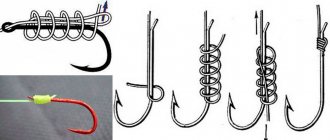
How to tie a jig without an eye
For a jig that does not have an eye, a simple and popular method among fishermen is used, the procedure is as follows:
- Thread a piece of fishing line into the hole of the jig, the end of the piece should extend beyond the edge of the hole by about 10 cm (the hook points up).
- Form the required loop near the hook.
- Press the hook of the jig with the resulting loop. Wind five turns of fishing line around the hook and loop.
- Insert the end of a piece of fishing line into this loop.
- Tighten the knot after moistening it.
- Remove excess line.
How to tie a jig to a fishing line with an eye
With an eye, a jig can be tied to a fishing line in several ways: Simple Knot, Clinch and Figure Eight. Let's look at each in more detail.
Clinch
For a bait that has an eye, the “Clinch” knot is used.
- Pass the line through the eye of the jig.
- Wrap the main piece of fishing line four or five times, making sure that the very first loop is not tight.
- Thread the end of the fishing line into the loop.
- Moisten the knot and tighten tightly.
- Trim off excess.
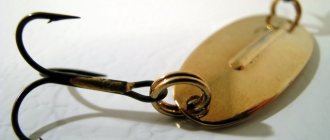
A variant of this unit for a winter jig of the “Drop” type:
- Take a jig with a hook, the tip of which points upward, and insert a fishing line into its eye.
- Roll the line into a ring.
- Wrap part of the ring with fishing line and make several turns.
- Pull the resulting winding, i.e. end of the wound fishing line and pull the rest of it to form a figure eight.
- Pass the point of the hook through each ring of the figure eight.
- Moisten the knot and tighten.
These methods of tying jigs are not suitable for tungsten products. This is a hard metal, jigs made from it (even very high-quality ones) quickly destroy it in direct contact with the fishing line.
Tungsten jig
There is a way to improve a tungsten jig so that it does not fray the fishing line.
Eight
- Take a jig with a hook, the tip of which points upward, and insert a fishing line into its eye.
- Roll the line into a ring.
- Wrap part of the ring with fishing line and make several turns.
- Pull the resulting winding, i.e. end of the wound fishing line and pull the rest of it to form a figure eight.
- Pass the point of the hook through each ring of the figure eight.
- Moisten the knot and tighten.
These methods of tying jigs are not suitable for tungsten products. This is a hard metal, jigs made from it (even very high-quality ones) quickly destroy it in direct contact with the fishing line.
Tips for a fisherman: How to tie a jig to a winter fishing rod correctly - Choosing the best
Tungsten jig
There is a way to improve a tungsten jig so that it does not fray the fishing line.
You need to do the following:
- Heat an elastic PVC cambric in boiling water, stretch it to the desired diameter size and pass it through the eye of the jig.
- Fix the casing and release it beyond the edges of the countersunk hole. This way the line will be protected from chafing.
This problem can be solved in another way. To protect the line from the sharp edges of the tackle, you need to use braid.
To do this, a loop is made from a cord and fishing line, which is threaded into the hole, while the cord should protrude beyond the edges by no more than 1 mm. The cord is attached to the tackle, and the fishing line is attached to the loop made in the form of a knot. The most famous knots for tying tungsten jigs are Palomar, Trailin, Double Clinch.
How to tie two jigs on one line
Usually, when installing such equipment, a main jig without an eye is used; it is attached from below, in the manner described above, but first you need to secure the top one.
There are 2 options for mounting the upper jig:
use a stopper in the form of cambric or beads and a second one using a lead.
Subscribe to
Rybak Rybak. Fishing Tricks , put it on