How to tie a second hook to the main line
Not every novice angler knows how to tie a second hook to the fishing line. Increasing the number of hooks can increase the number of fish caught by an order of magnitude. This method is also good because it allows you to use different types of baits and attachments at the same time. Thus, it allows you to more accurately and quickly determine the preferred attachment (bait) under current conditions.
Some experienced anglers tie more than two hooks to the main line. When fishing with gear such as a line or elastic band, you will simply need to know how to tie several leashes with hooks. When fishing with a float rod, 2 hooks are usually tied. Less often – 3.
Why knit such a tackle?
There are different opinions among fishermen. Some are inclined to believe that an extra hook never hurts. And the chances of being caught increase. Others, on the contrary, argue that such tackle is more cumbersome. The fish are afraid of extra gear. And it’s much easier to confuse such gear.
There are several methods for tying a second hook to a fishing line:
- you can use two identical leashes, which need to be attached to one main fishing line;
- there is a scheme in which an additional hook must be tied to one leash;
- Some fishermen already attach several more hooks to the attached leash at an equal distance.
How to bind in practice
Still, knowledge will never be superfluous. Therefore, it is worth learning how to knit a second hook.
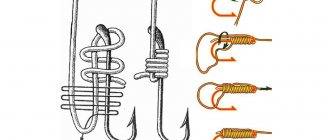
There are four main methods:
- To begin with, we mark a section of the main fishing line where the additional leash will be attached and knit an ordinary loop there.
Then we insert the hook with the leash into the resulting loop, bend it around the main line and bring it back. Then tighten the loop. At the end of the leash, you must install a rubber stopper or tie a figure eight knot so that the leash does not slip out of the loop. - The fishing line must be marked in such a way as to add 8-10 centimeters per knot to the required distance between the hooks.
Next, the first hook is knitted on the main cord using a regular knot, only the long end is not cut. It is inserted into the top loop of the knot. And further on this segment a second hook is attached. - A loop is knitted on the main cord. The free end is wrapped several times around the main one and slightly tightened. A leash is inserted into one of the holes in the resulting figure eight. Through the second it is brought out and secured with a regular knot.
- The main cord is folded in half to form a ring. Holding it by the base, wrap the top several times and thread it into the resulting weave. Then, by pulling the edges of the main cord, a loop can be formed. An additional leash is inserted into it using the “loop-to-loop” method.
When knitting all types of knotted joints, do not forget to moisten them with water. When the knot is tightened, the line may weaken or burn out due to the frictional forces that arise.
Pros and cons
Undoubtedly, every angler has his own views on this fishing method.
Let's try to look at it impartially and find out the advantages and disadvantages:
- the ability to use different types of baits (attachments) at the same time;
- easy tangling of the gear both when casting and when fishing in the current;
- with active biting there is the possibility of increased catch;
- Each knot weakens the strength of the finished tackle.
Use two hooks to determine the preferences of local fish in an unfamiliar body of water or during active biting periods. In other cases, the tackle will only cause discomfort when fishing and will not be justified.
Even if you don’t know how to properly tie two hooks to a fishing line, don’t despair. Perhaps at this stage you have not yet achieved the skill that will require this knowledge from you. Therefore, fish for your own pleasure and remember: the essence of fishing is in the fishing itself, and not in the end result.
How to tie two hooks to a float rod?
This process is not very complicated. Whether or not to add another leash to the fishing rod is up to the fisherman to decide. Technically there are no particular difficulties for this. There are a few different ways that can work for this.
Here you need to take into account that in some cases, an incorrectly tied knot can weaken the strength of the fishing line and, under heavy load, it can break because of this.
Let's talk about them in more detail:
Method No. 1
Using this method, you can simply tie one or more additional leashes with hooks to it. Note that when using this method, it is enough to make only a small loop on the main part.
We'll tell you how to tie such a knot correctly:
- on the main line in the place where we plan to attach an additional leash.
- Then we thread the leash through this loop so that it covers the main one as shown in the figure.
- at the free end of the leash and tighten it; this is necessary so that in the future it does not slip out of the loop. The “eight” is suitable as it.
It is called a driving knot made on a running basis. If you tie it correctly, the leash will be perpendicular. This will ensure that it does not become tangled with the main line while fishing.
In this article we looked at the question of how to make a diverter leash.
Method No. 2
The next method that we will talk about here is quite simple. We are not talking about a separate leash for the second hook here. Here, first one hook is tied, then, at some distance, another.
Let's tell you in more detail about how to properly bind them in this way:
- First you need to determine for yourself at what distance these hooks will be tied. After this, you need to thread the fishing line into the eyelet, leaving the corresponding section free.
- After this, the free end must be wrapped several times around the shank of the hook. It's best to do this at least five or six times.
- Then, pressing the wrapped fishing line with your finger , you need to pass the free tip through the eye.
- After this, the knot must be slightly tightened. That's it, one hook is attached to the fishing line.
- We remember that a certain section of the fishing line was left free. You will need to tie a second hook on it in the same way.
This method is well suited for those who are going to catch predatory fish with live bait. But its benefits are not limited to this. It is also effective when peaceful fish are caught with bait. One of the important features of such fishing gear is the simplicity and reliability of this method.
Method No. 3
Let's talk about another way to tie a leash. In principle, the two methods given earlier in this article are sufficient to use. In addition, they are most popular in such cases.
However, there are two more ways to tie a leash, which are also quite popular. Let's talk about them here.
For this option, it is necessary not only to make a loop on the main fishing line. You also need to wrap the free end around one of its edges. This must be done at least three times.
After this preparation, you will need to lightly pull the ends of the fishing line. This should not be done too hard, but only lightly. In this case, the loop itself will form a figure eight, its edges will lie on top of each other crosswise.
The tip of the leash line must be threaded into one part of this figure eight and brought back through the other part.
The leash needs to be secured here using the usual knot for such situations. To do this, you need to wrap the free end of the leash around the other end. You need to do this several times.
It is best to make five or six revolutions. Then the free tip of the leash must be threaded through the original loop of the leash. (Where it was passed through the eight.)
After this you need to tighten it. This should be done not in one sharp movement, but alternately by slightly tightening either the leash or the main line. The connection is now complete.
Method No. 4
To knit this knot, you first need to prepare a leash. At its end you need to tie a knot that will prevent it from slipping out. To do this, make a very ordinary loop. The free edge of the leash is wrapped around its edge at least twice. After this, the knot will need to be tightened.
A leash prepared in this way will no longer slip out while fishing.
Now we need to prepare the main line. The essence of this preparation is that you need to make a loop that will securely fasten the leash. This is done quite simply. A simple loop is formed on the main line. Another row is made and threaded into the first.
The tip of the leash is inserted into the threaded loop and the main line will now need to be carefully tightened. The process of tying this knot is shown more clearly in the attached figure.
Other nodes
The above types of fishing knots are often used and therefore widespread, however, there are other options for such knots. As an example, we can give the following option.
This knot is tied as follows.
A loop is made on the main line. To do this, you need to fold it in half, make a loop from the double thread and wrap it several times. Then thread the tip through the original loop. If you look closely, here we will see the knot with which a hook is usually tied to a fishing line.
In the same way you need to make a loop on the leash with a hook.
Now they need to be threaded through each other. This can be done in a fairly simple way. You need to thread the loop on the main line through the loop on the leash. Then pull the entire leash through the loop on the fishing line. All that remains is to tighten the knot.
How to knit, installation methods
You can tie two hooks to a fishing line in different ways: each angler chooses the more suitable one. There are only four main installation methods, we’ll call them this:
- Zhivtsova,
- basic,
- accelerated,
- stopper.
They are all somewhat similar to each other, but each of them has certain characteristics. Next we will look at another interesting method, few people know about it. He doesn't even look like everyone else.
Zhivtsova
This method was nicknamed “Zhivtsov” because of its original purpose. It is also called no knot because no knots are used to install hooks. Fishermen noted that this method is the most effective when catching predators with live bait (fry). But later people realized: it is also suitable for other fishing conditions. Here both hooks are tied to one leash.
All hooks are on the same line and go one after another. No Knot is well suited for fishing in strong currents.
This is done very simply:
- Let's take the fishing line. We thread it through the eye of the hook.
- We make nine turns around its forearm.
- The other end is also threaded through the ear hook, and the structure is tightened. Similarly, you should tie the second hook to the fishing line. Not a single node! Then we tie the resulting leash to the main cord.
The distance between them depends on the size of the bait and the preferences of the fish being caught. For example, for catfish you can make 10–15 cm, for silver carp or chub - 20 or more centimeters.
Basic
It is considered one of the most reliable. Here, each hook is tied to a separate leash. Why we called it “main”, you will see for yourself. So let's get started:
- We take a thin leader line and one hook.
- We fold the fishing line so that we get a circle with a diameter of 9–10 centimeters. We attach it to the hook and hold it.
- Insert two fingers into the resulting loop: index and middle. With one we will pull the cord along the base of the hook, and with the other we will wrap it 10-12 times.
- We grab the end of the fishing line with our teeth and pull (we try to hold the main end) until the knot is reduced to the maximum.
- After this, dip your fingers in water, and then lubricate the resulting knot with it. You won't be able to tear off or untie the hook! The second hook is attached in exactly the same way, only its leash must be tied at a certain distance from the first one so that there is no overlap.
Why "main". This instruction does not say anything about the eyelet; it does not play any role here. Only the base of the hook is used. This method saves fishing line of any quality from chafing.
The method is very suitable for mounting two hooks on a float rod, since in this case reliability is most important. This gear is often used to catch two large fish at a time, but in this case there is a high probability of the hook coming off, especially if the line frays.
Knitting pattern. The connection must be moistened with water to reduce deformation of the fishing line.
Accelerated
During active fishing, you can observe constant hooks and breaks. Hooks and leashes constantly have to be changed, and this needs to be done as quickly as possible. This method involves not only the simple installation of two hooks, but also the quick replacement of components. That's why we called this method “accelerated”.
To knit the second hook we will use the Canadian figure eight. Like this:
- We thread the end of the fishing line through the ear hook.
- We make a loop around the fore-end, and then insert the tip into the loop.
- We try to tie the knot as tightly as possible. We get a leash with a hook.
- Exactly the same for the second hook.
You can also use a “blind” or “bayonet” knot.
The diagram shows the fastest and easiest methods of tying.
The “accelerated” method allows you to attach two hooks to a float rod in a matter of seconds, even in active fishing conditions. You just need to always take spare parts with you!
Stopper
To install the second hook, it is best to use the knot described above, which is knitted without using an eye. But we attach the leash differently:
- At the empty end of the leash with a hook, we make two figure eights so that we get one massive knot.
- The main cord has a tightening loop, as in the picture.
- We insert our “double” knot into it.
- We take the main line with both hands and pull in different directions.
The knot at the end of the leash acts as a stopper. It prevents the main cord from jumping out of the loop.
How to tie a hook to a fishing line - photo and video instructions
To tie a hook, just use the proposed types of knots. Over the years of use they have earned a strong reputation among fishermen.
Two simple ways to securely tie a hook to a fishing line:
Reliable:
Watch this video on YouTube
Simple:
Watch this video on YouTube
Hook with spatula
The “step” knot is suitable for use with various types of fishing line. To tie a hook with a spatula, take the following steps:
- The tip of the fishing line must be bent and placed along the shank of the hook.
- From top to bottom, make several turns with the tip, grabbing one line and leaving the other alone. It is enough to make 2-3 turns.
- Then they make revolutions, moving downwards. But now the forend and both fishing lines are being captured. The tip is threaded through the bottom loop.
- Then the knot needs to be tightened. This figure shows the node creation process in detail:
We tie a hook with a spatula
Hook with eye
For attachment, you can use the Salmon knot. To do this, do the following:
- The tip is inserted into the eye, then two turns are made from the bottom up around the fishing line.
- The running end is inserted into the lower loop.
- The loop of the knot is lowered down so that the hook is threaded through it from the bottom up.
- The knot is carefully lowered onto the shank of the hook. After this, it is carefully tightened.
Details can be seen in this figure.
How to tie hooks to the main line without a leash - knitting video 6 reliable and best fishing knots:
Watch this video on YouTube
How to tie a hook to a winter fishing rod
For winter fishing, it is recommended to use moderate knot tightening. Too strong can lead to a break, and a weak one can come untied. One of the frequently used knots is the Canadian figure eight. It is knitted this way:
- The leash is threaded through the eye.
- Then they circle it around the forearm.
- Thread between the fishing line and the hook.
- Carry it over the fishing line and thread it through the bottom loop.
The node looks like this:
Canadian figure eight knot
How to tie a second hook to the main line on a winter fishing rod
When fishing in winter it is convenient to use two hooks. If one is left without bait, then you can count on the second. To use two leashes. You can use this method:
- Take two leashes and put them together.
- Wrap it around your finger three times.
- Thread through the loop and tighten.
This way you get a leash that has two branches. Their lengths should be different so that the hooks do not get tangled. The leash can be attached to the main line in the usual way.
How to tie a second hook to the main fishing line, schematically and clearly in the photo
How to tie two hooks on two leashes
To prevent the hooks from getting tangled, the leashes must be positioned so that the hooks are at a sufficient distance from each other. To attach the leash, you can make a temporary loop or use, for example, a Palomar knot.
Read How to fish with a spinning rod for a beginner and catch fishHow to properly tie two hooks on a fishing rod to a fishing line so they don’t get tangled
First you need to determine the distance between them. Then the tip is threaded through the eye of the hook, the shank is wrapped 5-6 times and threaded through the eye again. Now the hook is securely attached and cannot move. Another hook is attached to the tip of the fishing line.
Knots for thick and very thin fishing line
When feeder fishing, it becomes necessary to attach a shock leader to the main line. This knot will be strong even in cases where a very thin fishing line is attached to a thick one. To link a node you need to do the following:
- Two fishing lines are positioned towards each other so that the ends lie parallel.
- The end of the left fishing line is wrapped around the right one and threaded into the resulting loop. It is slightly tightened.
- The end of the fishing line on the right is wrapped back, creating a loop and placed on top of it. Then they pass under the fishing line from below, threading upward through the resulting loop.
- Then they wrap it around the fishing line an additional 3-4 times, each time threading it through the loop from the bottom up. Then the tip is pulled out of the loop parallel to the fishing line. In this case, it should be located parallel to the fishing line and look back.
- The resulting loop is slightly tightened.
- Now both lines are pulled to the side so that the loops move towards each other.
The ends of the resulting knot are carefully cut off.
Knot for lines of different thicknesses
Advantages and disadvantages
Like any method, using two hooks at once has its pros and cons. Let's start with the positive qualities, and there are many of them.
First of all, 2 hooks on a float rod allow you to double your catch - this is the main advantage. It is especially relevant when catching small and schooling fish, which are characterized by active biting
This is very important, of course, in winter, when you want to quickly catch a bucket of fish.
You can put different baits on 2 objects: on one - plant bait, on the second - animal (worm, maggot). Thus, the fish has a choice, and the likelihood that it will choose your bait increases. It should be noted that for animal baits it is better to use hooks with a long shank - this will allow them to hold on better.
Two nearby baits will definitely attract the attention of fish
This will be especially convenient in the current, because the hooks will actively move and will not go unnoticed. Choose small baits - usually fish respond better to 2 small ones rather than 1 large one. This is especially true when hunting perch: the behavior of these fish is similar to that of a cat; several baits increase their interest.
We all have unpleasant situations when the hook breaks. In this case, you have to prepare a new one, which takes a certain amount of time, and fishing stops. When using the device described, this does not turn out to be a big failure, because there is always another element. While you are making a new bait, you can attach a fishing rod and wait for a bite on the remaining bait. Everyone is used to freezing in anticipation, watching the float: whether it bites or not. Having built 2 hooks, you can determine the bite simply by nodding. This suggests that this method is more sensitive.
It becomes possible to catch fish that live in different layers of the reservoir (at the bottom, in shallow water) when using leashes of different lengths.
Naturally, there are also disadvantages. Success in using 2 hooks when fishing will depend on the experience and resourcefulness of the fisherman.
- In the manufacture of this device, knots are used. And knots, as you know, are a very weak point, so they can break during pull-ups.
- A fish migration is possible if two fish bite the bait at the same time.
- When biting, there may also be only one fish, but the second hook will remain free, and it can cling to branches and snags when you pull the fishing rod out of the water.
- The main inconvenience is that the leashes can overlap. The likelihood of this depends on the quality of the fishing line, the distance between the leads, and the placement of hooks. And if such a situation, alas, happens, you will spend a good part of the time unraveling the knots.
Two leashes on a float rod: advantages and disadvantages
Not all anglers accept such equipment. A float rig with two hooks seems like a fad. The second hook on a float rod has its pros and cons .
Advantages of a second hook
Each fisherman chooses for himself how many hooks to use. You won't increase your catch just by equipping your fishing rod with several hooks. It all depends on the experience and skill of the fisherman himself, not to mention other fishing factors that are also of significant importance. Therefore, despite the obvious advantages of this type of equipment, there is no need to quickly remake the equipment; it requires a competent approach and practice.
So, highlighting the advantages of equipping a fishing rod with several hooks , we can highlight the following:
- the ability to attach two different baits,
- stability of hooks in water due to increased weight in conjunction with sinkers,
- increasing the chances of successfully hooking fish,
- lower hook depth,
- the ability to fish at different depths.
Detailed description of all the advantages
When attaching two different baits, it is possible to determine which fish is most responsive to one or another. Sometimes when fishing, the float, along with the equipment and baits, is strongly carried away by the current, and therefore you have to constantly throw the fishing rod to the right place.
When there are several hooks on the fishing line, the total weight of the equipment increases. Thus, in addition to the fact that it is not carried away by the current, it is buried even lower.
If we talk about the third point , which characterizes this method of equipment on the positive side, then it is worth mentioning the increase in the likelihood of hooking fish. This is due to the fact that you can miss the fish when hooking (especially with a sudden movement of the hand) if it has not completely swallowed the bait. If there are two hooks on the line, the chances of catching fish increase.
If you make leashes of different lengths, you can fish at different depths. To do this, use one or more sinkers, which will be located between two leashes. This also increases the likelihood of a catch.
Disadvantages of the second hook
The advantages of the two-hook fishing method do not exclude the presence of disadvantages. Some of these disadvantages can be called situational, that is, they depend on how correctly the leashes were positioned and tied. These include:
- line hook,
- leash breakage,
- entanglement,
- reducing the possibility of “playing” with bait.
Detailed description of all the disadvantages
Now let's look at each of these disadvantages separately. It has already been said that with a double leash there is such a positive aspect in fishing: if one hook gets caught on something, be it some kind of snag or mud, then the other hook will remain with the fisherman safe and sound. But this applies to the case when The leashes on the fishing line are located at a considerable distance from each other. If they are located close enough, then the likelihood that the line will catch on something on the bottom or in the coastal area doubles. Here we can mention another disadvantage, which largely depends on how correctly the leashes are installed.
Close location
If they are placed too close, they can become tangled very easily. Then, instead of enjoying fishing, you will have to untangle the fishing line, and this, as you know, is a rather tedious and lengthy process. Sometimes when the hooks get tangled, you have to cut off part of the fishing line, which leads to the loss of the length of the entire rig. Read below to learn how to position leashes so they don't get tangled.
Nodes
The fact that a node is a weak point has already been mentioned above. Therefore, when there are two or more of them, and this is inevitable in this rigging method, then line breakage can occur more often, especially if the knots are tightly tightened.
And the last minus is the deterioration in the quality of the fisherman’s game with bait. This is due to the increase in weight because there are two leashes attached. Together with the sinkers, this will make playing with the bait somewhat difficult.
How to tie two hooks so they don't get tangled together
To do this, a meter-long fishing line is cut.
Note: This length is arbitrary, it is taken as an example. It is better to choose the length yourself based on the expected fishing conditions.
Then the fishing line is folded in half and a figure-eight knot is tied at one end, thereby forming a small loop. At a distance of about 20 cm from the loop, another figure-eight knot is made (for greater reliability, the end can be passed around the edge several times), wetted and tightened.
You should get one loop with a double fishing line, at a distance of 20 cm from which there will be a knot, and behind the knot there will be two leashes. Now one line is cut between the loop and the knot almost to the very root of the knot, leaving literally 1–2 mm. After this, the hooks are tied, and the loop itself is attached to the main fishing line. The hooks are tied in the usual way: the fishing line is wrapped around the shank several times, the free end is inserted into the eye, and the remainder is cut off.
Due to the fact that the hooks are located at a distance from each other, the likelihood of them getting tangled during the fishing process will be significantly reduced. This equipment is suitable for both float and bottom fishing.
Node binding schemes
Palomar
The Palomar knot is the simplest way to attach a hook to a fishing line, which is particularly strong and reliable.
How to tie fishing line to a hook using a Palomar knot?
- Take the fishing line and fold it in half until it forms a flat, open loop.
- Next, you need to pass the bent end into the hole of the hook.
- Make a simple knot using this bent end.
- After passing the bend of the line over the hook, bring the end around the knot.
- To finally secure the connection, wet the end of the fishing line and trim off the excess using scissors.
The main advantage of this knot is its ease of tying, as well as the resulting strength and reliability of the connection. Some say that the Palomar knot can be tied even in complete darkness.
The negative side of the Palomar knot is the difficulty in passing the line through the loop. This is not always convenient or easy to do.
Whip knot
Thanks to the whip knot, also called the leash knot, you can implement a direct connection of the leash with the hook. From the very beginning, this knot was intended to be used for a hook without eyes. Although its popularity has not decreased over time.
How is a leader knot tied?
- Take one end of the cone leader and guide it into the eyelet, and then repeat the same only in the other direction.
- Having fixed the eyelet and the edges of the fishing line with your hand, wind the loop around the forend up to ten times.
- Pull the root end, tightening the loop until it stops.
- After lubricating the ends of the line with water, tighten both ends until the knot joint is completely secured. Trim any jagged edges if necessary.
The positive side of the whip knot is the provision of the most durable and reliable connection, preserving the integrity of the fishing line itself
This is very important when the thickness of the eye is greater than the diameter of the line section
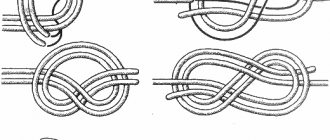
Bloody Knot
The bloody knot, or as it is also called the snake knot, has been used since ancient times to connect two lines of similar diameter. In this case, the strength characteristics of the connection are directly dependent on the number of revolutions on both sides of the center.
How to make a snake knot?
- Make an overlap of the two lines that you want to connect.
- After twisting one line around the other six times, you should pass the remaining end between the same lines.
- Then you should repeat the same manipulations, but with the other end and in the opposite direction.
- Secure the connection and trim off any protruding ends.
If you use nylon, the appearance of the knot will be slightly different than before.
Eight
The figure eight is a method of attaching a hook to a fishing line, which is very simple and there is no need to worry about the strength of the connection.
The main positive aspects of the eight
- this node will never move, even if it is influenced;
- there is no possibility of tying loops created using this method;
- You can tie a figure eight within five seconds.
How to tie a figure eight?
- Place one end of the line in such a way as to form a regular loop.
- Then place the fishing line under the main end, wrapping it carefully.
- And finally, insert the end of the fishing line into the previously created loop and tighten it.
A detailed guide to tying this knot is here.
Choosing the right fishing line
Using a leash is not enough; it must be assembled correctly. Stores sell a huge number of reels with different fishing lines, but not all of them are suitable for feeder equipment, or rather, not always. Most beginners think that expensive fishing line is the best. This is a misconception, since the fish are not interested in the cost of this or that gear. You need to look not at the price, but at the quality and parameters.
By diameter and breaking load
Such data is always present on the packaging. They are measured in millimeters and kilograms (thickness and load weight, respectively). The choice of leader line in terms of diameter and breaking load is carried out depending on the body weight of the fish. But for some reason, many people forget about some important details.
Beginning fishermen, visiting a store, think something like this: “I’m going to go fishing for bream. Where I will fish, there are fish weighing 2 kilograms. I will need the appropriate line to make the leader, but with a little extra, just in case.” As a result, they purchase reels that indicate a load weight of 3 or 3.5 kg. The thickness ranges from 0.18 to 0.21 mm.
Here's the thing. If a two-kilogram bream bites, then such a leading line will still not withstand its jerk. The laws of physics work here, and more specifically, the force formula for acceleration and mass, which is written like this: F=am. F is the jerk, m is the body mass of our bream and a is the acceleration that it will give as soon as it realizes that someone is trying to pull it out. The drag force of the fish will significantly exceed its mass.
Buying and using a thread with a higher load will also not help, since the diameter of the fishing line will increase.
The leash should not be very noticeable! The fish clearly sees the thick fishing line and tries to avoid it. The only way to effectively catch is proper fishing.
How it's done:
- the fisherman adjusts the friction brake (it is located on the reel);
- a feeder gam is installed - a special safety rubber band that absorbs the resistance of the fish (look at the diagram below);
- when biting and hooking, a right angle is maintained between the fishing line and the axis of the fishing rod (this reduces the resistance of the occupant);
- the closer to the shore the fish is hooked, the lower the rod goes;
- in response to jerks, the fisherman does not exert much effort.
Patience plays a major role here. Sometimes novice fishermen try to catch fish as quickly as possible. It is not right. Everything needs to be done gradually, forcing the aquatic resident to get tired of resisting.
And one more important rule: leashes should not be thinner than the main fishing line. For example, the main cord is braided with a thickness of 0.13 millimeters, and the lead cord is monofilament with a diameter of 0.21-0.22 mm
Both dexterity and disguise
Not only fishing will help the fisherman achieve his goal. There is an important detail - camouflaging the leash using multi-colored threads. The shelves are full of them: green, blue, red, and brown. Along with this nuance, a new misconception appears: “Colorless fishing line is most invisible to fish.” No, especially in habitats of “capricious” fish.
Multi-colored fishing lines. For example, black thread is used when fishing in reservoirs with a muddy bottom.
Shades are selected depending on the color of the water and bottom. For example, red thread is suitable for reservoirs with a high peat content. Brown - where the water is clean, but the bottom surface consists entirely of clay. When a river, pond or lake is in bloom, light green fishing line works best.
Rigidity
It is not recommended to use rigid fishing line for leashes if the bottom of the reservoir has complex terrain. When casting, the thread may stick out, and this will lead to unnatural “behavior” of the bait (sinks very quickly, as if the bait itself is made of lead). The only advantage of using fishing lines with increased rigidity is the absence of tangling. Sometimes fluorocarbon is used as the main material. Such cords are characterized by increased strength and reduced softness, but less noticeability.
Leashes made of soft threads lie perfectly on the bottom without arousing suspicion in the fish. There is also a drawback: the fishing line can get tangled at any time.
Other options
The second hook can be secured in other ways without compromising the reliability, strength and effectiveness of the gear. Some anglers use the method of crimping loops on tied leaders. Here it is impossible to quickly change the leash if it breaks. However, this method works great when catching small fish.
An additional hook can act as a sliding option - it slides from the underhang to the main sinker. Using this option, the distance between the hooks is adjusted, which also increases the fishing efficiency in large depths.
The second leash can be made of soft or hard material with any diameter. You can prevent the occurrence of overlaps by using a leader that is thinner than the main line. To reduce the tangling factor, each leash is equipped with a different weight of undercarriage. A longer leash requires a heavier leash to be attached, a shorter leash requires a smaller leash. Before going fishing, be sure to prepare several options for leashes of different lengths, with different hooks and line thicknesses.
TAGS:
Unusual mount
It is different from all the above methods. This method is used by experienced people who fish with 2 hooks on a float rod. The main difference between this installation is the complete absence of leashes. The method is also called “dragonfly” due to its external similarity.
Installation includes three options:
- horizontal arrangement of hooks (this is usually chosen);
- different direction. The point of one hook looks up, and the other - down;
- fastening at a certain angle.
In any case, there will be no confusion. You will need the following materials and tools:
- lighter or matches;
- cambric made of insulator (its length and thickness depends on the size of the hooks);
- medium sewing needle with hook;
- spherical lead sinker with a notch (5–7 millimeters in diameter);
- small pliers.
Let's get to work! Procedure:
- We insert the bases of the hooks into the cambric. They need to be inserted so that the ears of the hooks are located strictly above each other.
- We carefully take the assembled structure and burn the cambric until it “sits” securely. The hooks are fixed.
- We insert the main fishing line into the eye of the needle and pierce the insulator above the eyelets of the hooks. We get there, draw the thread further.
- We remove the needle and put it away. We move the “Dragonfly” along the main cord to the side.
- We make a knot at the end. We take the sinker and securely fix it with pliers. We lower the hooks. The tackle is ready. The finished “dragonfly” looks like this:
This was the first installation option. In the second, you need to turn over one of the hooks, as shown in the picture. To get a corner, you need to pierce not the middle of the insulator, but a little to the left or to the right.
If the sinker is at the top, above the hooks, and not at the bottom, as we described, then the float after casting will fall to one side or float up too much. Therefore, we mount the weighting material under the “dragonfly”, then the alarm will assume its normal operating position.
You can also put a silicone stopper first and then a sinker to adjust the placement of the hooks if you don't want to touch the float. The ability to change the depth is extremely important when fishing for crucian carp, bream, roach or carp.
Using two hooks on one line makes the tackle more catchable in the current - the risk of entanglement is reduced by an order of magnitude. It is better to use leashes on still water or where its vibrations are weak. In any case, they must be tied correctly and securely. Anglers with this skill are able to attach hooks in seconds!
https://fishingday.org/kak-privyazat-na-udochku-dva-kryuchka/https://fermer.blog/bok/rybovodstvo/ryby/karas/lovlya-karasya/lovlya-karasya-na-poplavok/17293- kak-privjazat-dva-krjuchka-na-poplavochnuju-udochku.htmlhttps://the-fishing.ru/kak-privyazat-dva-kryuchka-chtobyi-oni-ne-putalis/https://iarybak.ru/snasti/ kak-privyazat-dva-kryuchka-na-udochkuhttps://intellifishing.ru/snasti/kak-privyazat-vtoroy-kryuchok-leske
The third standard fishing method
I think this method of tying a second hook has occurred to any angler. Here we knit an additional hook in our favorite way, only leaving the short end of the fishing line longer than usual, and then tie the main hook.
In my case, and I knit hooks with a gripping knot, it turns out as follows:
We thread the fishing line into the ring of the hook, and wrap it around the main fishing line 5-7 times:
Now we thread the fishing line into the loop formed near the hook loop:
The next step is to tighten the knot but not completely:
After this, we take the hook in one hand, and the main fishing line in the other, and finally tighten it, after which we will have a fairly strong connection.
Now we can attach the main hook and start fishing. As a result, the equipment will look like this:
This option for installing an additional hook creates a kind of outlet that prevents the main hook from getting caught in the fishing line. This allows you to make long casts, as well as fish from the hole in winter.
How to tie hooks without eyes
This design of the equipment element is intended for cautious fish. The eye and the knot on it are more noticeable in the water than the slight thickening and neat interweaving of the thread at the end of the hook with the spatula. However, heavy active individuals will disrupt this device. You can tie 2 hooks on the main fishing line without an eye in different ways.
Stepped
The knot is difficult to tie, but the tensile strength of up to 95% is worth the effort.
Proceed as follows:
- Fold the working thread in half, attach the hook so that the fold is in the area of the sting.
- With the short free end, wrap the fishing line (one thread) around the shank twice.
- Press the main thread to the forend, use the same tip to make 3 turns, grabbing the forend and now the double thread.
- Thread the end you used to make the turns into the loop and tighten.
Stepped unit
The stepped unit is ready. It can be used on a regular donk, feeder, or spinning rod.
Spiral knot (Dumhof)
If you tie braided lines with a simple knot and without wetting, they will burst at the bend. Elements with blades require a special tying technology so that they do not fall off the line when tensioned.
Of the dozens of ways to knit fishing knots, Dumhof is the simplest variation.
Procedure:
- Wet the thread.
- Fold it in half, attach it to the fore-end and wrap the free end around it 5-6 times.
- Now pull the tip into the loop formed by the bend of the fishing line.
- Tighten the knot.
The result is a strong connection that has a tensile strength of 90-95%.
Your question to an expert
Leonid Grachev
Fisherman with a lot of knowledge and experience
Ask a Question
Two hooks on the line of a float fishing rod: disadvantages
There are quite a lot of advantages to using this gear, and many of them have already been mentioned in one way or another.
Two key positive qualities of a double hook line on a float rod are:
- In the summer, using this gear, fishing efficiency increases significantly. To do this, you need to choose a reservoir with clear and clean water and expect to catch only small or medium-sized fish, that is, without the need to use a landing net;
- In winter, it performs well at considerable depth and with a decent current.
A float fishing rod equipped with two hooks at once also has a certain number of disadvantages:
- The presence of another knot in the area of fastening the second leash with a hook significantly reduces the strength of the entire tackle, so when using it you should be as careful as possible;
- Due to the installed second hook with bait, it will no longer be able to actively and often play;
- It is not always possible to spot a bite and react quickly to it;
- If you are lucky and a large fish bites, then a second line with a hook can significantly complicate the fishing, since the hook will cling to the surrounding grass, snags and other objects in the water;
- When the leads are gradually lowered to the bottom, they can become intertwined with each other. A similar effect is observed if the fisherman makes too strong a hook.
Options for placement on a float rod
You can equip a float fishing rod with two hooks in different patterns, using all kinds of shipping options that allow the tandem of hooks to perform the required functions.
As a rule, installation begins with an ordinary connection of the hook according to a single equipment scheme, when it is attached to the end of the leash, carrying out the main shipment along the main line and thinning the installation by adding a small sub-hook to the leash. The second hook can be placed either in front of the main sinker or behind it. Its placement can be done directly on the main line or by arranging a side leash, which in its qualities can be either soft or hard. If necessary, soft additional leashes are also loaded with a paddock. A soft leash is made from single lines, similar in diameter to the first leash. The hard version is most conveniently made from fluorocarbon of small thickness. You can also make two hooks on the fishing rod by attaching them to the main cord at a single attachment point. The leashes are arranged to be proportional to each other, regulating only the additional loading of the under-grazing weights, which are different in weight. This difference successfully prevents tangling of the leader material and presents the bait to the fish in a variety of ways.
The main sinker, as in the first placement options, is placed before mounting the leashes on the main fishing line. Making 2 hooks on a float rod quickly and reliably, attaching leashes and changing their lengths and diameters if necessary, helps with the use of swivels with carabiners and small fishing fasteners that are in harmony with the dimensions of the installation.
Flaws
We will note the following details as disadvantages:
- The design of such gear loses strength and can fail at any moment.
- The risk of hooks and tangling of equipment increases both when fishing in a strong current and when casting (the wind also has a big influence).
- The rig line becomes more visible, especially in still water.
Reliability decreases by about 20% due to the large number of knots, and by 30% if the fishing line with hooks gets into the water.
Some of the disadvantages listed above can be eliminated. For example, to prevent the threads from getting tangled, lead cambrics are used and the skill of smooth casting is developed. The equipment is camouflaged using fishing lines matched to the color of the water and bottom surface. Only knowledge about the body of water can protect you from snags: where the snags are, where the bottom is, and so on. It’s better to ask local fishermen about this.
Disadvantages of the design of 2 hooks on a leash
And everything wouldn't be bad. The baits are secured securely. Nothing clings to each other. And the fish is calm and confident.
I’m not talking about summer fishing. You tear it up and that’s it.
This is one disappointment. The second one is worse.
Every fisherman had to experience a feeling of deep orgasm when the much-loved Gamakatsu or Ovner (and it doesn’t matter which manufacturer) ended up not in the fish’s mouth, but in the catcher’s finger. Removing the hook point is quite a painful undertaking.
What if the catch is still on a leash and watching with interest? Then the feeling of deep self-satisfaction generally goes off scale.
This is exactly what happened to me. I caught a large track on the end bait. I couldn't remove it carefully. As a result, both the fish and product number two were hanging on my finger.
I had to quickly tear off the prey along with a piece of fishing line, pierce my finger and remove the “happiness”.
Here are the two main reasons why I decided against using a two-hook leash. Safety when fishing is never too much.
I hope that you, Friends, will not have such “luck”.
NHNCH