Types of sliding knots and where they are used
The essence of the sliding knot is that the free end of the rope is tied around an object (weight, support, another rope). This fastening is often used in everyday life, for transporting something, in agriculture, livestock breeding, fishing, handicrafts and much more.
Main subtypes of sliding knots:
- Simple (or running loop);
- Eight;
- Bowline;
- Silk loop;
- Fisherman's Knot;
- Lynch loop;
- Fisherman's Knot;
- Double sliding;
- Lasso loop.
Let's look at a few basic ways to use the node.
Description of the sliding knot and its purpose
The slip knot is quite simple to make and is a self-tightening loop that is formed by a simple connection tied around the root end of the rope. Because the root end is free to move within the simple, the slip is used to tie rope around objects, another rope, support, or tie objects together and then wrap the root end around it.
Under load, the sliding assembly covers the object, held by the force of its friction. When you relax your efforts, it easily unravels.
Connections of this type are used for:
Advantages and disadvantages of the node
The slip knot or noose is well known to sailors and fishermen. Its main advantage is that such a loop is easy to loosen and untie after use. However, it can crawl under variable loads or on slippery cables, which are among its disadvantages.
There are several types of this design:
Node diagram
To tie the simplest slip knot, follow the diagram below:
By the way, this type of connection is often used in crocheting, when it is necessary to temporarily connect several elements (Figure 1).
Application area
The slip knot is widely used in everyday life. For example, for lifting various weights, transporting things tied together, when making jewelry, catching animals, in fishing and during tourist recreation.
It is widely used as a rescue vehicle, as well as for belaying and lifting people and equipment. The sliding type is widely used on small sailing ships and in theatre, surgery and construction. In addition, this type of connection has found wide application in the most unexpected areas: in crochet, macrame and even in the construction of sliding structures for gartering cucumbers.
Simple sliding knot: step by step diagram
This type of fastening is used to secure one end of the rope to a support. In everyday life, such a knot can even be used in crocheting.
To begin with, you should form a simple loop at the free end of the harness and secure it with the fingers of one hand. Nearby, with the other hand, we form another loop and thread it into the previous one. We place a knitting needle into the resulting gap and tighten it. In this way, you can easily fix an object of any size, thanks to the sliding structure of the knot.
Instructions: how to tie a slip knot step by step
To learn how to properly tie a slip knot, we suggest using the following step-by-step diagram:
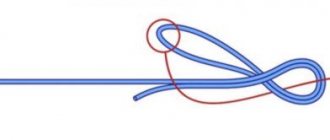
- Fold the free end of the rope into a coil;
- By passing the running end of the cord over the main one, create a loop;
- Place the running end of the rope around the main one, passing it under the loop and bypassing both ropes from below;
- Complete a simple connection by wrapping the running end around the cord and passing it into a small loop;
- Tighten the simple knot by pulling on the running end;
- Adjust the position of the simple joint at the main end, which will allow you to control the length of the sliding loop.
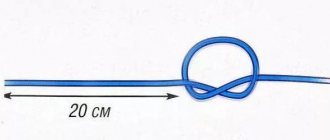
Figure 5. Step-by-step instructions for tying a slip knot
To avoid stretching a simple knot on the rope when the tension changes, it is recommended to tie the same one on the remainder of the running end (Figure 5). The latter will act as a brake and will not allow the running end to crawl through the downtime.
Bowline knot: diagram, photo
The sliding bowline is considered the king of knots. Its main difference from the previous one (simple sliding) is that it is not put on a support, but is formed around it.
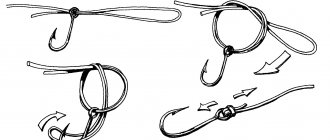
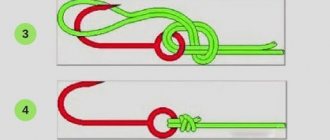
There are many types of it, consider the diagram of a simple running Bowline:
- First, a simple loop No. 1 with a long end is formed (step 1);
- The free edge is wrapped around the base of loop No. 1 in a figure-eight fashion (step 2);
- Then another loop No. 2 is formed from the remaining rope (it goes around the support), and its edge is threaded into loop No. 1 (step 3);
- Now the Bowline can be tightened (step 4).
You may also be interested in: Dissociative disorder - what is it?
Fisherman's knot
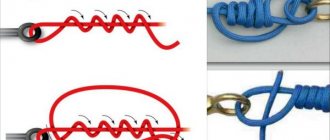
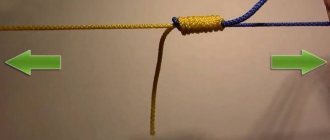
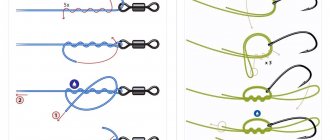
Sliding knots are used by fishermen to attach weights, hooks, leaders and lures, as well as to connect two ends of fishing line or thread.
The photo shows a simple diagram with which you can securely fasten two free edges of the thread. At the same time, the knots will remain movable and can be easily untangled if necessary.
There are a huge number of fishing knots. The simple version shown above can be complicated by adding several turns of winding on each side before tightening. This will strengthen the knot and add strength under load.
Double Slip Knot for Bracelet
In needlework, this fastening method is used for ties on a bag, bracelet and other jewelry. The double sliding knot allows you to move the ties to adjust the size of the product. At the same time, their edges are held tightly and do not move arbitrarily.
To perform such fastening, it is necessary to prepare two free ends of the thread: determine their length, and secure them at the ends with large knots. This will prevent the tips from slipping out of the finished product during further use.
To form the knot itself, you will need a separate piece of cord from the same material, or any other if desired. The size of the segment can be taken larger, since the excess will be cut off at the end.
First you need to put the ties of the product on top of each other, as in the photo. A piece of cord is applied to the ties. Thus, three threads are held under the finger: two ties and one edge of the connecting piece. The second edge of the same segment is bent in the opposite direction and wrapped in several rings around three laces under the finger. Then you need to thread the remaining edge of the cord into the resulting loops and tighten the edges. The remaining parts of the connecting element can be cut and cauterized if necessary. The resulting knot will securely hold the ties, allowing them to move when pulled.
You may also be interested: Mint and lemon balm - what are they and the differences
World of beads. How to tie a slip knot on a bracelet
Slip knots are used as an easy way to make the size of the jewelry adjustable. They are usually used in bracelets and beads made from different types of cords, such as leather or fiber.
Adjustable jewelry works best when using hemp, waxed cotton, or Chinese braided cord as the base.
It is best to use laces with a diameter greater than 1 mm, since on thinner cords the knots are too small, and this impairs their sliding, and it is also inconvenient to handle them.
There are a number of different types of knots used in making jewelry. Several square knots from the macramé technique are often used instead of a lock for bracelets, but such woven elements stretch, weaken or become untied over time.
Therefore, we suggest using a more reliable round knot, the technique of which you will learn in this lesson. It works great if you pull the ends of the bracelet through its spool as shown in the photo.
It differs from the version with an adjustable square knot, made using the macrame technique.
How to tie a slip knot on a bracelet
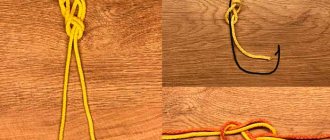
To practice tying this element, you will need two pieces of rope. The base section around which the knot will be tied (shown in black in the picture), and the section from which the knot will be tied (shown in brown in the picture).
To tie a knot, you need to take at least 10 cm of 1 mm thick cord or about 15 cm of 2 mm thick cord. This quantity is approximate, you may use a little less, but this length will definitely be enough. Too much length can make tying a knot difficult because it will be more difficult to hold during the braiding process.
Step-by-step instruction
1. Before making an adjustable slip knot as a clasp on your bracelet, place the knot piece on top of the base piece. Having placed the knot 3-5 centimeters from the end of the segment, make a loop.
Hold the loop with your index finger and thumb, pressing it simultaneously against the base piece. For the next steps you will need to use the one facing down in the picture.
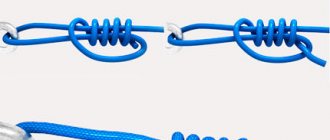
2. Wrap three loose loops. Wrap the knot section around the base and tail knots at least three times. Try to ensure that the loops come out equal and straight, without overlapping each other.
3. Insert the end of the bracelet into the loops. While holding them in place (this may be quite difficult to do), pull the end of the cord through all the loops.
This step will be much easier to complete with a stiffer cord, similar to the 2mm leather cord pictured. Using flexible cord makes it difficult to pass through the center loops. In this case, just be patient.
How to tie a scarf beautifully with a slip knot
In everyday life, sliding knots are also applicable in clothing. A boring tying of a belt, scarf or shawl can be diluted with an unusual pattern, adding elegance and freshness to your style.
To create a new look, you don’t have to spend money on new things; tying a familiar scarf is not boring enough.
To do this you will need a long stole or sling, and a minute of time:
- the ends of the scarf must be thrown behind the back, and the front loop lowered to chest level;
- then cross the edges of the sling behind the neck and bring it forward;
- twist the front loop once;
- insert both ends of the scarf into the hole formed;
- All that remains is to tighten the sliding knot to the height you need.
Similar self-tightening patterns can be made with a coat belt, a loose cape or a summer pareo.
Slipknot
To tie such a knot, you will need a little patience and a little perseverance. First, prepare a cotton cord that is not too thick, no more than 90 cm long. Put beads on it in the right order and weave a bracelet. Now - attention, let's tie a knot! Take the ends of the cord with your hand, so that there is a margin of 14 centimeters on each side, and direct them towards each other.
Then bend its right tip so that the tip is outside and placed on the edge (see picture). The resulting loop must be fixed. Make sure it is no more than 10 centimeters. Continue working with the right tip, and the knot will continue to slide along the left one.
Point the left tip from left to right, circle the loop and part of the lace several times, then carefully lay the resulting “rows” in the direction opposite to you. Make three more turns like this, holding the knot with your finger and adjusting the tension of the cord. Now pass the left and right ends through the resulting loop so that they can be pulled into a knot. Just don’t pull it too tightly, because the coils should move freely. So we made the first knot.
We proceed to the next one, doing exactly the same steps as the first time. The resulting node will be passive. Next, make a loop at the second end of the lace, to do this, wrap the free tip around it five times and tighten the knot. The result is a loop into which you need to thread the remaining end of the cord. What is left can be trimmed. For a special effect, the ends can be glued using universal glue.
Sometimes a bracelet is woven by bending the thread in half. How to tighten the knot in this case?
The ends of our thread should be two loops. These loops must be put on the right and left hands and a knot must be tied without removing the loops from the hands as follows:
With your right hand, cross the loop in the middle of the thread and hold it. At this time, you need to put on a loop with your left hand, tying a knot in such a way that our bracelet, put on your left hand, fits inside the loop. Now we pass a loop under the bracelet and pull it out from under the bracelet. We release our left hand from the loop, release the thread and pull it. It turns out to be a knot!
Another way: you need to make a loop on a thread or rope, then put it on your hand, closer to the elbow of the loop that is on your hand. You thread the loop into the hole of another loop tied on your arm and throw the resulting knot onto the thread.
These are the methods of tying knots on a bracelet that exist today. Now you know them and can use them. Good luck!
Instructions
The first thing to do is to prepare a cotton cord of medium thickness, about 90 centimeters long. Put on it the necessary decoration element: beads, other decorative elements. One large bead of a cylindrical or flattened shape will look original and unusual, especially if it is made in an ethnic style.
Take the ends of the cord in your hand so that there is a margin of about 15 centimeters on each side, and direct them towards each other. Now bend its right end so that the tail points outward and is located at the edge. Secure the resulting loop. Do not forget to make sure that its size is not more than 10 cm. Work with the right end of the cord, and the knot
.
Direct the left end of the cord from left to right, circling the loop and part of the cord several times, and then carefully lay the resulting “rows” in the opposite direction from you. Make 2-3 such turns, holding the knot
fingers and control the tension of the cord.
After this, pass the right and left ends through the resulting loop so that they can be tightened into a knot
. At the same time, you do not need to tighten it too tightly, since the turns should move freely along the cord.
Now that the first node
ok done, proceed to the second one.
The algorithm of actions will not change. The new node
will be passive (not working).
Next you need to make a loop at the second end of the cord. To do this, wrap the free end around it several times and then tighten the knot
. The remaining tip of the cord should be threaded into the resulting loop (the remaining excess can be safely trimmed off). At the end of all actions, it makes sense to glue the ends of the cord for reliability.
Sources:
- sliding knot for bracelets
The culture of Ancient Greece and Ancient Rome had a significant influence on the development of global culture, literature, and poetry. The works of ancient writers, having existed for centuries, were repeatedly translated into other languages.