What is it for?
Let's take a closer look at what benefits the user receives by installing this device on his boat?
The owner sees the instrument readings and can draw conclusions about:
- Current engine speed.
- See failures in the engine.
- Choose the ideal operating mode - economical and efficient.
- Recognize malfunctions in the engine in time and prevent its breakdown.
- If the motor is new, from the store, and the device is connected, its running-in will be absolutely correct according to the passport.
- Allows you to select the optimal type of propeller.
Types of tachometers
There are several types of meters:
- multi-purpose - for engines of any type;
- for two-stroke engines;
- for four strokes.
In addition there are tachometers:
- analog - the number of revolutions is visible on the dial indicator;
- digital - the alert is displayed.
The first tachometers can measure the number of pulses arriving from the magneto of the engine. Used on modern outboard engines.
The second tachometers read the number of pulses in the ignition system that pass from the power wire to the spark plugs. The process occurs through the insulation of the wires, without violating its integrity, using the induction method. Engine speed is read in real time. So it is not difficult to extract the engine speed. The user also has the opportunity to find out the time during which the engine has been running (motor hours). Here you need a boat universal tachometer.
Used in any engines, even low power ones. They do not require much effort to install them.
But it is necessary to take into account that there are boat engines without a signal from the generator (magneto). The way out is very simple - you need a device with a personal power source.
Types of boat tachometers
The crankshaft rotation speed determines the number of pulses entering the electrical system of the motor. Their number is counted by the tachometer. Magdino coils are generators in boat engines, and the tachometer reads information from them.
Induction tachometers for outboard motors are devices with individual power sources. They are intended for engines that do not have generator signals.
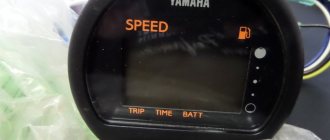
The tachometer recalculates the data and displays the number of crankshaft revolutions over a fixed period of time. Pointer-type indicators or liquid crystal displays are used to display information.
According to their purpose, tachometers are classified into the following types:
- universal (can work with engines of various types);
- two-stroke;
- four-stroke.
The data output type divides devices into two categories:
- analog, having an indicator with arrows;
- digital with a digital display.
Digital tachometers can interact with other measuring devices (hour meters).
What to buy
Buying a tachometer for any outboard motor is quite simple these days. And there is a choice. An affordable device from China or buy an expensive but branded speed meter?
Strictly speaking, both of these devices have the same properties:
- Quite clear image on the display.
- Corresponds to the engine stroke indicators.
- Easy to use.
In addition, there are tachometers that can display, in addition to engine speed, such indicators as:
- engine hours;
- temperature;
- oil pressure.
Most often, universal models are installed. There is a tachometer in the trade plus an hour meter for a marine engine, which, in addition to revolutions, also shows other useful information. This way you can monitor engine wear and prepare for repair or maintenance work on this engine.
It is clear that universal tachometers will require the installation of additional specialized sensors, the installation of which is quite complicated.
For the majority of users, the following are important:
- technical characteristics of the meter;
- ease of installation work for the selected type of device;
- tightness;
- sizes (the more compact the better);
- price.
For digital devices on a boat engine, the following is also relevant:
- speed of message updating;
- brightness and image accuracy.
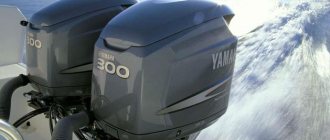
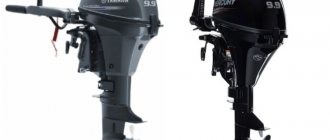
We have already said that the range of tachometers from various manufacturers is quite extensive. But if the boat has an engine from a brand, say, “Mercury,” then, obviously, it is important for the owner that devices from the same company are installed on the dashboard in order to maintain the design of the boat in the same style. In addition, original parts are a priori of higher quality and reliability, despite their high cost.
Although, it must be admitted that for suspended units the terms “original” and “non-original” are very conditional. Manufacturers of such motors, as a rule, do not have a production base for the production of measuring equipment. There are third-party partner companies for this.
For example, there is this one. It is quite well known as a manufacturer of aftermarket measuring equipment for the powerboat market. And, nevertheless, meters for Mercury engines are produced by Teleflex Marine.
So, let's summarize. It is not at all necessary to focus on an expensive brand of meter, but rather to focus on a boat device that, in appearance, most closely matches the overall design of the vessel, and not its engine. Of course, a very important factor is the price between the “original” and “non-original” device.
Installation and power
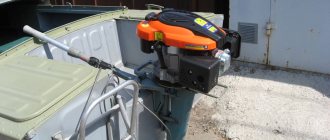
Tachometer mounted on tiller
Install this device on the engine itself or on the dashboard, connect all the wires on the idle engine. It all depends on which model you chose, a fixed-mounted one (convenient when the boat has remote steering) or a portable version (small size, no need to connect a battery, waterproof) for tiller control. If the tachometer is equipped with its own battery, its cable is connected to the spark plug wiring harness. If there are no batteries, the wire is connected to the coil terminals. The instructions for the device describe in detail the mechanism for its installation.
Price range
Now on prices for engine speed meters. Not everything is so clear here.
Let’s take, for example, an ordinary “Mercury” device for a boat motor. It will cost a little over a hundred dollars. If you have your eye on the universal “Osculati”, then its price is around 75 euros.
If it’s emblazoned on the device, it will cost 145 euros!
Although if you look at it, all three of these devices for outboard motors are made at the same factory and differ only in appearance.
As they say - marketing and nothing more...
Installation process
As a rule, this service is available in specialized studios. A good mechanic will carry out the installation process of the device in accordance with the technical documentation, both for the boat itself and for the tachometer. But there are situations when it is necessary to install the missing element in an area remote from civilization.
But there's nothing to worry about. This operation can be done with your own hands.
The most difficulties arise during installation work in a non-removable instrument panel.
Let's consider this option step by step:
- First you need to decide on the installation location. The dial should not be blocked by the steering wheel in order to be constantly in front of your eyes.
- Using a compass we draw the outline of the future installation location. It must be said that most tachometers have a diameter of 86 mm. Also in the box with the device you can find a paper template of the device on a scale of 1:1. All that remains is to cut it out and try it on the dashboard.
- Next we cut out the hole. An electric drill with a metal core cutter is suitable for this.
- Take care of the branded powerboat wiring harness. Such wires usually come with a corresponding wiring diagram, moisture-proof connectors and lugs. Such a connection will be the most competent and reliable.
- Install the tachometer in place using the original fasteners from the box.
- We connect all the wires together according to the color scheme. The instructions included with the device will help. Plug connectors will significantly speed up this procedure.
- Now all that remains is to connect the battery.
After turning the ignition key, the dial backlight will light up. But we recommend turning on the backlight on a separate toggle switch.
Installation of the device
Installing the device is not difficult; almost any user of a boat with a motor can do it. The device is mounted on the instrument panel or on the tiller motor, depending on the type of design.
Installing a tachometer includes the following series of actions:
- Choose a place to install the device.
- Decide on the length of the wires.
- When installing in the dashboard, prepare a hole of the required size (this can be specified in the instructions).
- Make or buy a wiring harness to connect the motor and the device. The wires of the proprietary harness have the appropriate connection diagram and suitable length, and are also equipped with moisture-protected connectors and cable lugs. Specialized components will simplify the installation process.
- Attach the tachometer in place using the mounting hardware.
The connection also has some features depending on the type of device design:
- For a tachometer without a power source, the cable must be connected to the magneto coils from which the pulses will be read.
- If the device has a power source, the spark plug wire is wrapped in connecting harnesses. The number of turns and the distance to the spark plugs are indicated in the instructions (usually 3-6 turns and a distance of 4 cm are sufficient). The tachometer terminals are connected to the harness.
The cable should not come into contact with moving or hot parts of the motor. Connections are made strictly according to the diagram. When the engine is properly connected and started, the device will begin to count the number of revolutions. You can adjust the displayed data using settings.
Settings
Now that the tachometer is installed, you need to make sure that its readings correspond to the actual engine speed.
There is a calibration screw on the back of the meter, but we do not recommend touching it. This means that the device has already been factory configured.
We need to choose the operating mode that matches your type of motor.
There is another graduated screw on the device. This is what you need to set it to the position that corresponds to your type of motor. For each type of motor, this mode of operation of the device is different.
At idle, set the switch mode so that your sensor shows 550–1250 rpm.
If the device was purchased based on the characteristics of your engine, then when you start it, it will most likely already show the correct speed.