Any angler can make a jig with his own hands. This will require the simplest tools, some materials and free time. Experienced fishermen have their own requirements for jigs, which jigs from the store cannot satisfy. The jigs they make with their own hands are often more effective than store-bought ones. Making jigs not only provides the fisherman with bait, but also allows him to brighten up long autumn evenings in anticipation of winter fishing. You can make a jig with your own hands in different ways, which we will discuss in our article.
Methods for making jigs
Before you decide how to make a jig, check that you have the necessary tools and materials to create the product using the chosen method. Each method allows you to make catchable bait if you approach this process creatively and with love.
You can make a jig in one of the following ways:
- simple compression with a sinker;
- fusing tin onto a hook;
- wire winding;
- lead casting in a mold;
- fusing in the shell;
- made of tungsten electrode with galvanic coating.
Of course, modern Kulibins will probably offer several more manufacturing methods that produce good homemade jigs, but for the purposes of this article we decided to limit ourselves to these six methods.
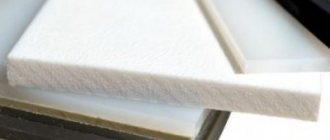
Lead for homemade jigs
The photograph shows a lead casting. This is the most common metal from which you can make jigs with your own hands using one of the simple and quick cold methods.
Here I got a lead pancake 10-11mm thick. Taking into account the re-melting of the waste, the lead lead shown in the picture is enough to provide yourself with homemade jigs for many years.
Lead scraps and cut-off terminals of old car batteries (not all) are suitable as starting materials for making jigs with your own hands. Almost any piece of soft lead can be cold forged.
You can get hold of lead for homemade jigs by removing the braid from some brands of power electrical cables. There, lead protects the wire insulation from mechanical damage.
The material for homemade products can be bulk lead weights purchased in a store. The most suitable (malleable) material for making jigs with your own hands using my cold forging method will be lead with a minimum content of impurities.
Hard lead alloys also make good, durable homemade lead jigs, but they will require longer machining.
From hook and sinker
The process of making a jig from a sinker and a hook
If you forgot your box of catchy baits at home, and lost your jig while fishing, don’t despair. If the fish are biting intensely, a simple design made from an ordinary pellet and a small hook can help you out. You need to do it in a simple way:
- From the set of sinkers we take out a pellet of the required weight.
- Select the hook size.
- We slightly widen the cut of the lead pellet with the blade of a knife.
- We put a hook there so that the ring sticks out.
- Holding the hook, we crimp the sinker with pliers.
This jig can also be used in summer fishing on a fishing rod with a side nod.
Deposition
Making a jig in this way will not be a problem for a fisherman who is more or less familiar with a soldering iron. A drop of tin is simply soldered onto the tinned hook, and then the desired shape is given with a file.
Stages of manufacturing jigs by fusing
If you need a voluminous jig, then before fusing the metal, the shank of the hook can be pre-wrapped with thin wire.
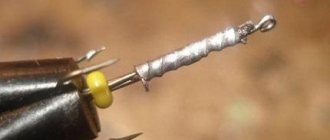
Wire
From a wire with a hook you can make a reelless jig - a wire, its second name is “lesotka”. You can wind it with copper wire, or you can also use tungsten wire if you can get it.
The process of creating a mothless lesotka looks like this:
- We release the shank of the hook on the flame of a match or lighter and bend it slightly.
- Holding the hook and the tip of the wire together, we begin winding the long end onto the fore-end from the bend to the ring.
- Having reached the ring, we go back, forming the head of the jig with three or four turns of wire on top of the first layer.
The reelless jig lesotka is ready. All that remains is to paint or polish it as needed.
Making your own jigs for roach
Let's consider this point in more detail. Making homemade jigs for winter fishing is easy and simple from a very thin brass or copper tube. It is important that it be thin-walled. A similar tube made from such materials is very easy to process and no difficulties should arise. In a couple of minutes, these materials are transformed into magnificent catchy homemade jigs for winter fishing. To do this, we saw several rings of different thicknesses. This is done using a hacksaw for metal. Next, you need to solder the prepared hooks to the made rings. There shouldn't be much difficulty in this process. For good catchability, the hook must be polished with a needle, and then treated with GOI paste. Just 30 minutes of work - and you will immediately have a small arsenal of catchy jigs in your hands. This homemade product invented by someone is a completely successful invention. But there are also jigs that have been tested by time. Analogs of these can be easily made at home.
For example, let’s take the famous “devil”. Roach is also caught very well with this type of jig. To make it at home you will need a weight, a small hook and a tee. The required tools are pliers and a file. The weight is made of lead. For example, it can be torn from the bottom rope of a Chinese net. Threesomes are a must have for every fisherman. And if they are absent, then it doesn’t matter. They are sold in any fishing tackle store and are much cheaper than the ready-made specified devices. So, to make a ring at the top of the jig, use a small hook to hook the eye of the tee. There is nothing complicated here. Next, the tee is inserted into the slot of the weight. This is done so that the ring remains on the outside. Then, using pliers, you should squeeze the jig. The hook that has come out of the resulting product must be bitten off with pliers. The bait is processed with a file. This is done to give it the correct conical shape. After this, the jig is made. If desired, it can be equipped with a cambric or bead. There is no need to paint the jig. Since it will have a leaden, dark color, excellent for catching roach.
There is also a fairly simple option for making a catchy jig for roach. To do this, a piece of cambric is initially cut off, which is equal to the length of the hook shank. Do with the ring the way that is most convenient for you. That is, it can be bent to the side or left unchanged. Next, select a wire with a thickness equal to the inner diameter of the cambric. You can also do the opposite. Namely, first find the wire, and then the cambric under it. Then you should decide what the length of your future jig will be. After this, you need to cut the cambric and wire. And then the actions are even simpler. That is, you insert a hook into the tube and firmly fix it with wire. To be on the safe side, you can apply a little glue. To obtain an original jig, it is recommended to use a composite cambric made from different colors. And also trim its corners and wire. Such a jig will “play” in an original way and bring a wonderful bite.
There is another option for a homemade device, which roaches readily bite on. To do this, take a hook with numbers 2.5-4. Then a brass or copper wire with a diameter of 0.2-0.4 mm is wound onto its fore-end in several layers. After this, the fishing line is threaded into the ring. When fishing, these homemade jigs for roach are in a vertical position. The specified individual willingly bites on this bait. However, you need to keep in mind that it is better not to use it with bloodworms. Since in this case it is recommended to put pieces of yellow, red or green insulation on the hook. You can also put a couple of beads on the hook. This will also help attract roaches.
Casting
Making jigs with your own hands by casting is carried out in two ways. The first involves a complete copy of the existing model, according to which plaster casts are made. The second option involves casting a blank with a hook, and finishing it to the desired shape is done using files, as in the famous joke.
Read specialized literature about how the casting process is organized and carried out!
The manufacturing sequence at the initial stage is approximately the same for both methods:
- A hook is inserted into the plaster mold, or two for a goat or three for a devil.
- The wire is inserted at the desired angle to form a hole in the body.
- The halves of the form are connected and fastened.
- Molten lead is poured through the sprue.
- After complete cooling, the forms are separated.
- The jig is finished with a file.
- The bait is painted or polished.
All popular models are made in this way:
- devils;
- nymphs;
- goats;
- bananas;
- uralochki;
- carnations;
- and many others.
Lead baits without casting
The next way to make a jig is simpler. It also uses lead, which is very plastic in its structure and allows you to make a jig without casting. In this way you can make a “Nymph” or “Goat” jig.
Various forms of homemade jigs
Homemade Nymph
On an anvil, you need to beat off a piece of lead with a hammer. You will make blanks from it as follows:
- Take the hook with a flame, heat the eye and use pliers to bend it inward. Clean the hook well with a file. Take the hook with pliers, apply it to the lead and cut off a piece of lead of a suitable size.
- A piece of lead must be thoroughly cleaned and a recess made for the hook.
- The hook and the recess under it are tinned with melting acid.
- Tin is used to properly solder the hook to the lead blank.
- Again, everything is cleaned with a file and fine-grained sandpaper.
- Can be painted.
Homemade Devil
The method by which you can make a “Devil” jig from lead with your own hands is simple and uncomplicated.
The “Devil” bait implies the presence of 3 hooks. First, a tee is made. To do this, select three identical hooks. You need to bite off the ears of two hooks. In order to connect them motionlessly, we put a bead on them. We wrap the hooks with copper wire. This entire structure is connected by soldering with tin.
Two identical blanks are cut from lead strips to the size of the future jig. A cut is made inside each workpiece for hooks. A tee is laid and soldered to one and the other in turn. The resulting structure is processed with a needle file to the desired shape. "Devil" is ready.
In a shell
Homemade jigs are also made on the basis of shells made of thin sheet metal: brass or copper. In this case proceed as follows:
- A blank is cut out of metal foil with scissors.
- Using a mandrel and a wooden block, a certain shape of the future bait is extruded from the metal.
- Now you need to properly solder the hook; to do this, you need to tin the hook and the workpiece before soldering.
- Now, using a soldering iron, fill the internal space of the workpiece with tin.
- We grind and polish the workpiece.
Made from tungsten
Tungsten jigs are the most difficult to make with your own hands. The fact is that this metal is difficult to process and impossible to solder at home. But there are still craftsmen for whom making winter baits for catching roach, bream and pike perch from this metal is not difficult.
- We get scraps of tungsten electrodes from a welder who welds with argon.
- We clamp the wire into the drill chuck and use a file to give the workpiece the desired shape.
- We cut a groove for the hook in the body.
- To solder the hook, you need to coat the tungsten body with copper. This can be done using a gas torch or using electroforming.
Unfortunately, the course on galvanoplasty did not fit into the size of the article, so also read about it in specialized literature.
- You can already solder a hook to the copper coating of the tungsten blank, which is what we do, not forgetting to release the ring outside the body of the jig.
The best DIY jigs
Any novice fisherman who owns a soldering iron or plumbing tools can make a simple jig. This work does not require special equipment and can be done at home.
Tungsten jigs
They are a sinker made of high strength metal with a soldered hook. The advantage is the small size combined with heavy weight. This allows you to use the bait at great depths with fast currents.
These jigs for winter fishing are made independently. Some fishermen have already achieved such perfection that their products are caught by industrial designs. Such production requires durable, hard metal and the patience of the performer. Such materials are poorly processed. Lures made from them have one drawback: when fishing for fish, the line is damaged by the edges of the hole. To eliminate this, insert a plastic tube into the hole.
Jigs with bait
There are jigs:
- with attachment (bait);
- nozzleless.
The purpose of baited lures is to deliver that bait to the fish on the bottom. Fishing rods are taken standard with a nod. The jig has one hook on which the “treat” is placed. To make it attractive, the hooks are decorated with different colored threads and cambrics.
The most common type is the “pellet”. It is made from lead. Usually they are made with a loop and a through hole for fastening.
Bloodworms, maggots, and burdocks are used as bait. In case of a bad bite, 2-4 larvae are placed on the hook, which cover the entire hook. The remaining bait is taken home, stored in the refrigerator until the next fishing trip.
Special mention must be made of the burdock moth larva. They are found in burdock cones. They look like miniature cockchafer larvae. They are a super bait for any fish, and perches especially love them. This larva can stir up the fish even on days without biting. They simply throw it into the hole. Suitable for complementary feeding at a depth of up to 2 m.
Homemade winter baits can be easily adapted to use small animal baits.
Read: Homemade gear for winter fishing
Reelless or attachment jig
As with bait fishing, a winter fishing rod should be light and comfortable. Also, winding up the line and unwinding it must be quick, since when fishing with a reelless fish, you often have to change fishing spots.
Among the most popular factory-made baits for mothless baits are “uralka”, “ant”, “banana”. But well-made homemade jigs can be many times better than store-bought jigs.
The most common colors are silver and black. You need to choose a little more of it than when fishing with bait. The main thing is that the jig quickly reaches the bottom, and the nod is constantly loaded.
Sometimes even a catchy bait made by yourself does not produce the desired catch. Then you have to change holes often, because when fishing without bait you have to search for fish intensively.
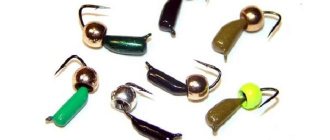
Tuning
If not all fishermen made jigs, then many were involved in modifying and decorating them. Equipping with various additional elements is especially important for mothless ones. And this is correct, because in order to tempt a fish to bite on a bare piece of iron, it is not at all easy.
To increase the number of bites use:
- Cambrics, they most often point the fish to the point of attack.
- The chains create a noise and wave effect.
- Round beads, painted with bright colors, become baits such as cat's, perch's or other vigorous eyes. Placed on a lead post, they turn into a popular jig - a nail ball.
- A plastic cube, by analogy with the previous decoration, produces a nail cube bait in symbiosis with a carnation.
- By tying various hairs to jigs we get furry jigs that imitate various insects and their caterpillars.