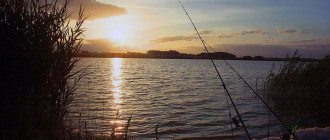
Installing a fishing rod with the simplest and most universal equipment, a symmetrical loop for a feeder, will take a lot of time and effort from the angler, but will delight you with the result. This type of classic rig is perfect for fishing in still water.
Fishing with a feeder is the most interesting, simple, but labor-intensive. Symmetrical equipment for it is considered the best for catching peaceful medium-sized fish. It perfectly holds the bait on the bottom and transmits the bite perfectly.
Classic symmetry is used not only by professionals. The equipment is also popular among novice anglers, since self-hooking prey increases the catch result.
Equipment features symmetrical hinge
English bottom fishing tackle has long won the hearts of professional and beginner feeders. Mother Europe did not release her donka into the world without four classic rigs. They are the ones who rule fishing - they treated it negligently, there was no result. Did the installation competently, with pleasure - please the family with the catch.
These types of equipment include:
- equipment with a sliding feeder;
- classic Paternoster;
- symmetrical loop;
- asymmetrical loop.
Symmetry is one of the best types of equipment for fishing short distances and shallow waters. It is very popular among fishermen.
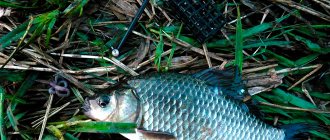
Classic symmetry is highly effective when bottom fishing from a dirt bank. Here it has no competitors, fishing will be a success - carp, bream, crucian carp will always be on your table with a symmetrical loop rig. The versatility of this type lies in the ability to tie it at home and quickly change it at a pond, since there are no problems with installation.
The advantages of a symmetrical loop over other types are:
- Bite sensitivity is excellent.
- Effective equipment for fishing in closed reservoirs.
- High percentage of self-cutting prey.
- You can fish with light feeders.
- Repeated use of the device.
The main disadvantage of symmetry is that it is not suitable for catching large specimens.
It is important for lovers of fishing to remember that by giving preference to this type of classic equipment, you will always be with your catch. It is especially suitable for picker fishing with the lightest and most delicate bottom. And the sporting interest of getting a trophy is not always productive.
Node selection rules
Before tying a knot for the feeder, you need to choose it correctly:
- for example, the paternoster is considered a universal tackle, it is easy to tie on the shore, but it is not always catchy;
- options with a sliding feeder are great for strong and active fish;
- the symmetrical loop is highly sensitive, suitable for active fish;
- asymmetrical is most often used when catching slow-moving, cautious fish.
Expert opinion
Knipovich Nikolai Mikhailovich
Zoologist, hydrobiologist. I am interested in fishing at a professional level.
When choosing a knot, take into account your ability to throw the tackle so that it does not twist in the air and when lowered into the water. If you have little experience in this regard, it is advisable to use a special tube - an anti-twist tube.
However, experienced fishermen treat it coolly. Not only does such tackle make more noise when casting, scaring away the fish, it is also noticeable in the water. A cautious large fish simply won’t approach an unfamiliar object on the bottom that suddenly appeared out of nowhere.
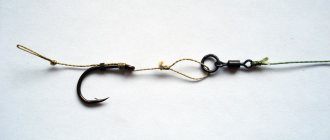
We knit a symmetrical loop ourselves
Making basic equipment for a symmetrical loop feeder does not take a lot of time and patience. Since it is knitted on a separate segment of fishing line, it can be used many times.
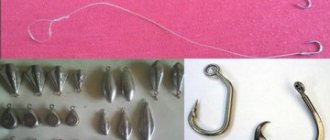
To connect this type of classic equipment, arm yourself with the following elements:
- a hook with one point, which is perfect for catching peaceful fish;
- two swivels with an American clasp - the most popular and reliable type of design;
- fishing line to choose from - monofilament or fluorocarbon;
- light feeder. - mesh, spiral, frame.
The fishing line for installation should be rigid and resistant to abrasion. Therefore, fluorocarbon filament is an excellent choice for the main core.
A high-quality swivel does not have protrusions, which can often cause the line to get tangled.
Having prepared all the elements, we begin the manufacturing process:
- We prepare an eyelet for the leash from a segment of fishing line folded in half.
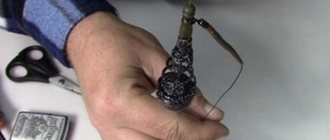
- We twist one end of the core to 20 cm and tie a knot. The fixed eye is designed to connect the hook to the leash. The hook is attached using a loop-to-loop method for reliability and durability.
- We put a swivel on the free end of the core. Make sure it rotates easily and fastens securely as it connects the feeder to the tackle.
- Having retreated 20 cm, we connect the ends of the fishing line and knit a knot.
- We perform the “core twisting” procedure again. At the edge we form an eye with which we connect to the main core. Many professionals advise putting a second swivel here for a stronger connection to the main cord. It is, of course, up to the hunter to choose.
- The fishing device is ready for use.
Fasteners allow you to change the types of feeders depending on the weight, and allow you to remove and re-attach the equipment to other feeders. It’s easy and simple to stock up on such an installation, making it before going fishing. The number of loops is minimal, but the result is maximum.
The more active the fish, the shorter the length of the leader. The most important thing about this type of underwater gear is that it allows you to use ultra-thin fishing lines and the lightest loads.
orybalke.com
What is symmetrical equipment
I'll start with where it can be most useful. I, like many anglers, believe that it is best to use this design in still water. Moreover, if the reservoir has hard soil, then it will outperform Paternoster. Some fishermen use it for the so-called sensitive “picker fishing”, not very large fish such as crucian carp, bream and small carp.
In recent years, a symmetrical design for a feeder can be found much less frequently on a reservoir, since it is partially replaced by modernized equipment. It is generally accepted that its sensitivity is still less than that of the same asymmetry, but there are different opinions on this matter.
To make symmetrical feeder equipment with your own hands, we will need to stock up on the following materials and elements:
- a pair of swivels with clasps;
- feeder load;
- main line;
- leash (can be made of fluorocarbon);
- crochet
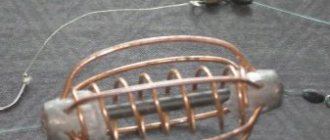
Manufacturing of feeder equipment “symmetrical loop”
We will need:
- main line (monofilament)
- 2 swivels with clasp
- feeder weight
- fluorocarbon leader line
- hook
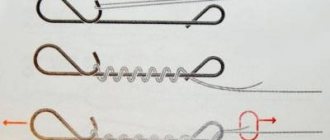
The knitting process is very simple:
- you need to fold the main line in half and start twisting by rotating both ends of the line in one direction;
- achieve 5-10 cm of tight twist and make a knot (the right twist in the picture is ready);
- then insert a swivel into one of the fishing lines, we will hook the feeder to it and step back 20 cm (this will be our main loop);
- make a knot;
- and again we make a twist, and at the end either a loop or attach another swivel, then you get 3 swivels per tackle;
- to this last loop (or swivel) we tie a 30-100 cm leash;
- Attach a hook to the end of the leash;
The gear is ready, all that remains is to attach the feeder to the swivel, which is located inside a large symmetrical loop, and the main fishing line will be attached to the very first swivel (in the picture on the right). It can be inserted into a loop using the loop-to-loop method.
How to properly tie an asymmetrical loop for a feeder, what is its advantage and why bream hooks itself when fishing with this equipment.
Feeder rigs - a guide to all popular feeder rigs, their advantages and disadvantages.Fishing for crucian carp on a feeder - what bait and bait to use, where to look for crucian carp in spring, summer and autumn.
primanki.com
Features of the Gardner loop
The Gardner loop is a feeder rig invented by the English floater Steve Gardner. Today it is one of the most popular feeder equipment.
Technically, the Gardner loop is one of the paternoster variants. The paternoster, in turn, is one of the basic equipment in bottom fishing. It is an installation of fishing tackle in which a leash is attached to the main line above the sinker or feeder.
Due to its ease of installation and efficiency, the popularity of the Gardner loop was so great that it practically became synonymous with the paternoster. In the classic version, the main feature of this equipment is the free sliding of the feeder in the loop. Thus, the standard Gardner loop for the feeder could be structurally classified as loop equipment, along with a symmetrical and asymmetrical loop. But since the feeder does not move along the loop of the fishing line when biting, it can be fixed to the equipment using the loop-to-loop method.
The Gardner loop is one of the most popular equipment among athletes and amateurs
General concept
First, let's take a closer look at what this trick is. The asymmetrical loop for the feeder is an independent equipment, attached using a swivel with a latch to the main fishing line. Such equipment obviously prevents the tackle from twisting. It is also aimed at not spooking cautious fish.
In addition, a certain installation length helps to hook the fish on its own. As you can see, the asymmetrical loop has quite a lot of advantages, but what kind of “beast” is it?
How to equip a feeder rod with a reel and equipment
Coil
To equip the feeder, specially produced reels are used, but if one is not found, a regular spinning reel will do. Below are the recommended parameters that your reel should have:
Reels are divided into high-speed and power types, according to gear ratios. We need something in between. A reel with a gear ratio up to 4.6 is a power reel, and a reel with a gear ratio above 5.5 is a high-speed one. Reels with gear ratios ranging from 4.6 to 5.5 are just right for us.
Let's move on to the bobbin. Usually the universal size is 3000. For us, from 2500 to 4000 is suitable. By the way, when choosing a reel, inquire about the presence of a spare spool in the kit; if it is not there, ask which models are on sale separately and buy it, believe me, it will come in handy.
When fishing with a feeder, the probability of a sharp jerk is very high, and, accordingly, the line will break. We don’t need this, so we make sure that our reel is equipped with a friction brake. The clutches are front and rear. The rear clutch is less sensitive and is easier to use in feeder fishing, while the front clutch is more often installed on spinning reels. There is not much difference - who is more comfortable working with what.
The reels use ball bearings, some models can have up to fifteen of them. There is no need to chase quantity - those with 5-6 bearings are quite suitable for us, but no less, because the device has at least 5 elements that are very susceptible to abrasion.
We can recommend the following models:
- Shimano BAITRUNNER 4000 D up to 5000 rub.
- Okuma LONGBOW BAITFEEDER 50 to 2000 rub.
Okuma LONGBOW BAITFEEDER 50 with baitrunner - budget quality reel
Let's move on to the issue of choosing fishing line
The debate about which is better - monofilament or braided line - still continues. Let's look at the advantages and disadvantages:
- Braid has an advantage that there is no point in arguing with: it is very sensitive, tapping the bottom to determine the location of future fishing, transmitting a bite - in this it is better. But since very often fishing occurs in places where shells accumulate, on the edges, the likelihood that the line will be “cut” increases greatly. And just the braid has a much greater chance of being cut off. But good fishing lines have abrasion protection, for example, Salmo Elite Braid 0.13, we recommend.
- Monoline - It may not be as sensitive, but it is less susceptible to the chance of being cut off by barnacles or anything else. Plus, stretching plays an important role if you catch large and strong fish. Good fishing lines are produced by Salmo; they have a Feeder line.
If you haven’t decided on your own which fishing line to choose, take monofilament if you don’t catch crucian carp. Braid is still better for him because of his very weak touch to the bait. Choose a monofilament line with the lowest stretch and preferably a dark color (this is used by carp fishermen for good reason, it is not visible at the bottom).
For leashes, use high-quality fluorocarbon fishing line that is invisible in the water.
Equipment is the heart of the feeder
The simplest equipment with which to start studying a feeder is a paternoster. It consists of a loop into which the feeder is threaded and a leash on which the hook is attached.
The equipment is made as follows:
- We take the main fishing line and tie a loop for the leash at the tip.
- Next, place your palm along the length of the first loop and knit a second loop at the end of the palm. The size of the second loop should be such that the feeder fits into it.
- We attach the feeder - we pull a large loop through the swivel and throw it on the feeder itself. We fix the line on the swivel itself. Using the “loop-to-loop” knitting method, we attach a leash with a hook to the second small loop.
- "Paternoster" is ready.
Video for clarity:
Now let's talk about feeder rigs for catching bream in the current, carp and crucian carp.
Loop Properties
The peculiarity of using such a loop is that the equipment must be constantly in tension. Then, when bitten, even the most timid fish will be able to try the bait offered to it an infinite number of times, and the feeder will walk freely along this loop, scaring it away.
For a novice fisherman, it is not always clear when to hook. When the fish has confidently swallowed the bait, it will begin to tug at the feeder, and it will rest against the upper edge of the asymmetrical loop, and the top of the feeder will begin to tremble noticeably - it is at this moment that you should hook. To reduce the number of false bites, you can slightly increase the length of the leash, then the fish will be able to taste the proposed bait well and, most likely, will try to swallow it.
How to knit?
To understand how to knit an asymmetrical loop for a feeder, you should have a good understanding of it and understand what exactly it serves:
- Take a piece of rigid monofilament fishing line about a meter and a half long.
«>
- Fold it so that one side is approximately 10-15 cm longer and make a loop for the hook with a double knot.
- Twist the double line to a length of 10 cm and make a double knot at the end to secure the leash. The tendency to asymmetry depends on a correctly made lead leash. When casting a feeder rig with an asymmetrical loop, such a leash will prevent the rig from getting tangled and will move it to the side, while the feeder will fly clearly forward.
- Through the larger end of the line, thread a snap swivel, which will be used to attach the feeder.
- Measure the required size of the loop and tighten it with the knot of your choice - the average asymmetry size is 50 cm.
That's it, the installation of the asymmetrical loop can be considered complete.
Equipment is the main component of feeder fishing
There are several types of equipment. Each has its own distinctive features and characteristics. But the general principle of the design of all equipment for feeder fishing is simple: a feeder and a leash with a hook. The significant difference lies in the attachment of the components to the base of the rod.
Paternoster
This type of equipment is the simplest and is well suited for beginners. It is recommended to be used by anglers who decide to start mastering the basics of feeder fishing. The equipment includes two loops. A leash with a hook and a feeder are attached to them. It is recommended to tie a rig exclusively before starting fishing.
The paternoster is considered a universal equipment that can be used on various bodies of water. But it performs best when hunting fish with excessive activity. The peculiarity of this type of equipment is self-hooking of fish.
The loop for the leash is made at the end of the fishing line. After that, the distance from the loop is measured, approximately 20-25 cm, and a second loop is made, into which the feeder with a swivel should go. The feeder is attached using the “loop-to-loop” method. The paternoster is often called Gardner's loop. The principle of both equipment is identical, but there is a significant difference.
Symmetrical loop
This type of equipment is also very simple, has high sensitivity, and its design does not cause any particular difficulties. A symmetrical loop is knitted on the main line. First you need to measure a fishing line 0.5 m long, then fold it in half. Then a small loop is knitted at the end, in the shape of a figure eight knot. The loop will be used for a leash, the length of which is no more than 3 cm. After this, a swivel with a carabiner is placed on the free end. In the process of preparing the equipment, a feeder is attached to the swivel.
When making equipment of the “symmetrical loop” type, one nuance should be taken into account. When using high-mass feeders, it is necessary to place a rubber bead under the swivel, which has shock-absorbing properties. To do this, you need to fold the end on which the swivel is placed with the fishing line, then make a knot. Next, the cormak is fastened to the carabiner, after which the leash is attached to the small loop.
Experienced fishermen recommend that beginners make such equipment from a rigid fishing line separately from the main one in order to avoid twisting when casting.
Asymmetrical loop
This species is used when hunting fish that are not particularly active. First, the fish tries the bait, and only then the tip of the rod receives a bite signal. Take the end of the fishing line to which the swivel is attached. After this, a loop is knitted, the length of which should be 50 cm. Then the feeder is fastened. The resulting structure is raised.
At a distance from the feeder, a smaller loop is made on the resulting loop. It must be knitted using the double knot principle. A leash with a hook is placed on the loop, after which a swivel with a carabiner is attached to the free end to attach it to the main fishing line.
To make this type of equipment, avid fishermen recommend using a stiff fishing line to avoid the leader crossing.
Equipment with anti-twist
Experienced fishermen use this equipment extremely rarely. This species is recommended for beginners in feeder fishing.
A swivel is attached to a 50 cm long fishing line, onto which a bead is attached for better fixation. Then the resulting section is passed into the anti-twist tube. A swivel with a carabiner is attached to the other end, onto which a leash is finally attached.
This type has several significant disadvantages. The anti-twist is unreliable and fragile, and often breaks during use. The second disadvantage is the excessive positioning of the leash in relation to the feeder - it is located too far away.
Equipment with sliding feeder
The device is simple and affordable. It is recommended to use it exclusively when hunting fish that are very active. In addition, the use of such equipment is only possible in still waters.
A loop is knitted on a piece of monofilament, on which a bead is placed. She is followed by a carbine. It is worth considering that for this type of equipment there is a special carbine that can be purchased in the store. Place the second bead behind the carabiner. Finally, we knit a loop. Stiff monofilament should be used.
General Tips
The most convenient way to twist a leash is to use a pencil, twisting it until you get the required length of the braid.
«>
The length of the leash can vary and reach up to one meter, but the most optimal leash is still 50-60 centimeters.
Remember that an incorrectly assembled asymmetrical rig will resemble fishing with a paternoster rig. And if you don’t feel any difference, you won’t bother with knitting an asymmetrical loop in the future. The effectiveness of fishing also depends on the correct use of equipment - constant tension of the fishing line, the location of the feeder when casting at the bottom of the loop near the leash.
Materials for production
The fishing line for an asymmetrical loop is used rigid, monofilament or fluorocarbon, with a diameter of up to 0.4 mm. Checking whether it is suitable for making a loop is quite simple - make a few turns of the fishing line around your finger and sharply release it; the one that is suitable in terms of rigidity will immediately straighten out.
Remember that the entire result of feeder fishing depends on the correctly selected fishing line.
«>
A properly made leash will not only protect the main line from breaking, but will also prevent the loss of other parts of the installation. There are several general rules for choosing fishing line for a leash:
- It must be durable in order to withstand not only the jerks of the fish being fished out, but also cope with all kinds of hooks, within reason, of course. But its strength should not exceed the strength of the main fishing line, so that if something happens, all the equipment is not lost.
- It should be resistant to mechanical stress - simply put, it should not fray during the first casts on the rocky bottom.
- It should be as little noticeable as possible to the fish. In some reservoirs, due to the characteristics of the bottom topography and the color of the water, it will be more advisable to choose colored or even black fishing line.
- When fishing in a strong current, the line for the leash should be of negative buoyancy so that the leash quickly sinks to the bottom following the feeder, and does not “bubble” with the current.
When going fishing, it is better to have with you a number of ready-made equipment with leashes of different lengths and stiffness, so that you can not only quickly repair broken tackle, but also experiment with casting. The main rule of the feeder: the worse the fish bites, the longer the leash needs to be made. This is, in principle, true, but you shouldn’t rush to extremes - a meter-long leash will be enough. Its large length will cause overlaps and tangling of the entire equipment.
Paternoster
The most common installation is the “paternoster”, or as it is also called the “Gardner loop”. In fact, Steve Gardner did not create this equipment, he just came up with the idea of making a bend in the form of a loop. It is for this reason that the paternoster is called so, but in reality the “Gardner loop” installation does not exist.
Paternoster can be knitted either on a separate piece of fishing line or on a shock leader. Both cases have their pros and cons. If you tie a paternoster on a separate fishing line, if it breaks, you will not lose the fishing spot, but you will lose time when collecting the gear.
When tying on a shock leader, you save time for your next fishing trips, because it is not necessary to untie this rig, and when collecting gear you can reel it on the reel. The downside is that if the line breaks, you may lose your fishing spot (for example, if it breaks above the loop).
How to knit a paternoster
First we make a loop for the leash:
All loops in feeder installations are knitted exactly this way; we will not dwell further on these details.
Now you need to retreat such a distance that the hanging feeder does not reach the leash loop by 2-5 centimeters:
And we tie a large loop into which the feeder will fit:
Then it all depends on where you tie the rig. If it is on a shock leader, then the paternoster is ready; if it is on a separate piece of fishing line, then you need to tie a loop to connect it to the main fishing line. It is knitted in exactly the same way as for a leash.
The length of the entire installation is selected individually, for example, I always make a meter, and measure from the right shoulder to the end of the outstretched left arm. As a result, we get this paternoster:
Characteristics
Under this heading I will provide a list of characteristics for each installation, so that you understand where and how to use them.
- Fishing efficiency: current/still water 80%/80% (universal)
- Risk of overlap: 5%(out of 100 casts, 5 will definitely get tangled)
- Self-hooking: 30% (3 fish out of 10 are hooked themselves)
- Ease of installation: 100% (minimum time)
- For bottom fish: 60% (when catching bream, 4 fish out of 10 will not be bream)
So, what do these numbers come from? Yes, from my own experience, and some theory. For example, here is a diagram of the paternoster’s behavior in water:
As you can see, when a fish bites, it senses the feeder, and self-hooking rarely happens. Since the leash does not lie entirely on the bottom, and when the current increases, it moves, the chances of catching a bream are about 60%.
Types of loops
There is also an asymmetrical Gardner loop, which is still significantly inferior compared to a regular loop. The main disadvantage of the Gardner rig is that it is tied directly onto the main line, which often leads to tangling and overlaps.
The classic version involves attaching a piece of fishing line to the main fishing line at a distance of approximately 20-30 cm from each other. The feeder is attached to this loop. When attaching additional fishing line for a loop, a so-called surgical knot is usually used without the use of swivels. That's all the installation required for such a loop.
Gardner equipment is used both in reservoirs with strong currents and in standing waters.
«>
There is also a symmetrical loop, which is a loop with equal arm lengths. This equipment is ideal for fishing in reservoirs with standing water, because when fishing in the current, the sensitivity of the equipment for which this equipment was designed will significantly decrease.
Other methods of installing feeder equipment
In addition to the above methods, the following methods of installing feeder gear are used.
Helicopter and two knots
Using this method, you can quickly make feeder equipment both at home and on a pond.
Knitting instructions.
- Measure 40 cm from the lower end of the fishing line and fold the thread in half.
- On a double line, measure 15 cm and tie a loop.
- Step back 20 mm from the knot and make another one.
- Attach the feeder to the large loop in a loop-to-loop manner.
- Attach the leash to the small loop with a cape. It will rotate between the nodes.
This type of equipment is perfect for fishing in a body of water with a strong current. See the diagram and video that describes this technology.
"Inline" or Running Feeder Rig
Using this technology, feeder equipment is made in three ways. They are characterized by the following general features.
- The main part of the line passes through the feeder or its outlet.
- The movement of the feeder along the main line is limited on both sides by beads.
- A leash with a hook is attached to the end of the main line using a loop or swivel.
Mounting options are as follows.
- The line passes through a swivel tied to the feeder outlet. The equipment is suitable for fishing on water with current.
- The line is pulled through a swivel, to which the feeder is attached tightly. The equipment is suitable for fishing in still or slow flowing water.
- The line runs directly inside the feeder. The scope of application of such equipment is only standing water.
If you have questions, watch the video that talks about online technology.
Methods for beginners: installation with anti-twist and combine
The anti-twist is a plastic curved tube. There is a carabiner on the bend for attaching the feeder.
For installation:
- Thread the line through the tube.
- Put on stoppers.
- Make a knot for insurance.
- Back off 50 mm and form a small loop for tying the feeder leash.
The equipment is ready. This simple and effective installation method minimizes the likelihood of tangling gear and twisting the main line.
Harvester
Installation takes place using the same technology. The difference is that a special anti-twist is used, to which the feeder is not attached closely, but on a small outlet.
Controversies and myths about the asymmetrical loop
There is still debate among anglers about which is better: an asymmetrical loop or a Gardner loop. Each fishing method has its supporters. Of course, if you have a large fish like carp or carp at the other end of the rod, the difference will be little noticeable. And at this moment you won’t look for the difference - the main thing for you will be to hold the rod and not lose the fish. But when biting small fish, for example, roach weighing 50-70 g, this difference will already become noticeable. It will be much easier for her to move the feeder on an asymmetrical hinge, on which she will not feel much resistance. So we can draw the only correct conclusion - when going fishing, always choose equipment for the specific type of fish you are going to catch, and don’t overthink it with the gear.
How to choose fishing line
Important! This equipment works most effectively when used as a basis for tying lines with no memory and a high coefficient of rigidity.
Fluorocarbon representatives with a diameter of 0.25-0.30 mm are an ideal option . Modern fishing lines of this series have a high degree of transparency and excellent abrasion resistance characteristics, which meets the necessary requirements for feeder fishing. After all, shell rock, coarse sand and pebbles of various fractions at the bottom of a reservoir are not uncommon, and, in principle, a favorite feeding place for fish.
Also an important factor in the use of these fishing lines is the ability to maintain high strength in places where knots are tied, which is not always the case with conventional monofilament fishing line of the same diameter. Installation from such a cut of fishing line will be durable, invisible in the water and have the least shock-absorbing properties.
Symmetrical and asymmetrical loops
These types of loops belong to figured snap-ins. Lately, feeder fishing has been very popular due to the special structure of the feeder rod. As a rule, such rods are very sensitive and you can very easily detect a bite without special tools. At first glance, these loops are quite complex if you compare them with Gardner's paternoster. To dispel first impressions, you just need to take and knit a few loops to make sure of their simplicity.
How to knit symmetrical and asymmetrical loops? These types of rigs involve a double line with a loop along one of which the feeder floats. On the same line, behind the loop, there are leashes with hooks. The only difference between them is that the arms of the loops are not the same: for a symmetrical loop they are the same, but for an asymmetrical loop they are different. According to anglers, an asymmetrical loop is more sensitive to bites. Moreover, a feeder that slides over a larger shoulder is less alarming to the fish, which means that such equipment is more attractive to it.
The Gardner paternoster is knitted directly on the main line, and the symmetrical and asymmetrical loops are prepared separately. You can prepare several of them and store them on reels, and when fishing, attach them to the main fishing line. This can be attributed to the advantage of these types of equipment, since in case of snags and gusts they can be very easily replaced. For their production, monofilament fishing line with a diameter of 0.22-0.28 mm is used. It may seem that it is a bit thick, but, as experience shows, because of this fishing line the equipment does not lose sensitivity, and when casting it practically does not get tangled. The color of the fishing line does not play a special role. The main thing is that it holds the knot well and is not very stiff. Leashes, naturally, are made from thinner fishing line, somewhere in the range of 0.12-0.15mm. Any hooks can also be used, depending on the fishing conditions, as well as the type of bait used.
Symmetrical loop
This type of equipment can be used both for fishing without a feeder with a picker or sinker, and with a feeder. It works great in still water, but in the current it gives a lot of empty bites. To install such a loop, you need to take 100-150cm of monofilament and fold it in half. Using a “surgical loop”, tie a small loop at a short distance from the bend of the fishing line (5-10cm). After this, you get two free ends of the fishing line. After the loop, a twist is made from the two free ends of the fishing line. The length of this twist is about 8-10 cm and is intended for the rigidity of the equipment. This twist will minimize the possibility of overlapping when casting. The end of the twist must be secured with another “surgical” knot. Having measured about 30 cm from this knot, another knot is knitted. The result is a 30-centimeter loop with equal shoulders. After this knot, there are also two free ends of the fishing line about 15-20 cm long, one of which is cut closer to the loop, and a swivel with a carabiner is tied to the other. Using a carabiner, this equipment will be attached to the main fishing line, and the swivel will prevent it from twisting in the water. The other end also has a loop to which you can attach leashes with loop-to-loop hooks. Thus, the “symmetrical loop” type equipment is ready for use.
Asymmetrical loop
The manufacturing technology is the same as the previous one. The only difference is that when standardizing a 30-centimeter loop, one arm should be 10 cm longer than the other. The rest is the same: one knot, then a twist, then a loop and a knot. In this setup, the feeder is attached to a longer arm. For fastening, you can use a swivel with a clasp, having previously installed it when forming the loop. This mount will make it possible to change feeders depending on fishing conditions. The asymmetrical loop is effective both in still water and in high currents. In addition, it prevents tangling when casting. The fact is that the load always flies in front and due to the fact that the length of this part of the fishing line is greater, the load will be in front of the entire equipment. Due to this effect, it is more sensitive compared to a symmetrical loop. When cutting the fishing line, you need to make sure that there are no burrs left, that is, you need to cut as close to the loop as possible.
Gardner's loop is a type of paternoster
- The feeder equipment is a Gardner loop in terms of the mechanics of its operation - the same as a paternoster, or in our opinion - a blind feeder at the end of the fishing line and a retractable leash. It’s just that, unlike the bottom outlets we are used to, this equipment is more effective. A hook is made to the leash from a thick fishing line, the same one that is used as the main one.
- The length of the branch exceeds the length of the fishing line to the feeder and ends with a loop into which the leash is attached. In general, the leash together with the outlet turns out to be much longer than the distance from the point of its attachment to the base to the feeder. But, thanks to the thick, rigid and long lead, it does not get tangled when casting or reeling in the feeder.
- The Gardner paternoster for the feeder differs from the classic one only in that the outlet to the feeder is made on a loop. In the classic form, this shoulder is made from a weaker and thinner fishing line - specifically so that when hooked, the feeder comes off, and not the leash with the fish.
- According to legend, the famous fisherman Steve Gardner from England came up with this rig when he watched his wife while fishing for a long time could not tie a regular installation on a tap. In England, this editing is simply called “Loop”, which means “loop”. And already in our country this type of paternoster is called the Gardner loop.
Gardner's paternoster
Which is better, a Gardner's loop or a classic paternoster? In terms of operation, these are absolutely identical installations. The Gardner rig is easier to knit - one knot to form a loop. At the remaining end there is a loop for a leash. We don't need the function of tearing off the feeders. On the contrary, it’s better to let the fish come off when hooked than to tear off an expensive feeder. It’s just that the classic paternoster comes from England, from a time when feeders were not yet used, and losing a cheap sinker instead of a fish was considered normal there. Read more about paternoster feeder equipment.
Regular paternoster
Gardner's Paternoster
This type of feeder equipment is the simplest, as it is knitted on the main fishing line and consists of two loops. Paternoster is used when using mainly braids. Due to its simplicity and sensitivity, this type of equipment has great catchability. Thanks to the high sensitivity on such equipment, the fish hooks itself, so it’s not scary if the bite is missed. It is good for fishing both in still water and in the current. She feels good on both hard and soft bottoms. The only drawback is that when hooked, the main line may break and, on the spot, you will have to do “knitting” again. This is especially “pleasant” when the bite is in full swing, but the fishing rod is not functioning. It is clear that as a result of such fishing, negative emotions will prevail.
Feeder tackle and installation
3
Do-it-yourself feeder equipment is made using the following components:
The biggest differences exist in the equipment - this is the element of the tackle, which is located closer to the end of the fishing line, intended for attaching a leash with a hook and a feeder.
She feels good on both hard and soft bottoms.
The installation methods are different; the symmetrical loop for the feeder has been improved due to its shortcomings. A symmetrical loop has 2 equal ends. Due to its size, the bait is more noticeable to fish and creates vibrations that scare away fish. Making a feeder with a symmetrical loop is an inconvenient procedure; tying a knot directly on a pond can be difficult.
Thanks to the reduction in the size of one arm, the tackle has become more sensitive and almost invisible to the fish; there are no vibrations that could alert the individual. This is how an asymmetrical loop on the feeder appeared. Both varieties are equipped with weights and anti-twisting devices.