Advantages
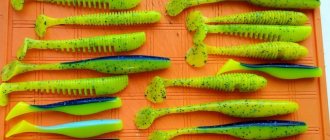
There are a number of positive aspects in installing silicone baits on Cheburashkas that give them advantages over jig heads.
- Firstly, this design has greater mobility, which increases the amplitude and realism of the play of silicone baits, and, accordingly, the efficiency of catching passive fish.
- Secondly, such an installation allows you to quickly change the weight of the bait without removing it from the hook, which becomes especially important if the catchable bait is the last one left in the angler’s arsenal, and others show worse results.
- Thirdly, the use of Cheburashkas allows you to make “locomotives” out of sinkers - hook them one after another to reduce the thickness of the load, while increasing its length. This method is rarely used, but it can be quite effective, especially when fishing for various kinds of silicone worms, which should not have a large head.
- Equipping baits with Cheburashkas allows you to use any hooks. It is often difficult to find a small jig head with a large hook, or, for example, molded on a hook of a certain shape. In addition, it is convenient to attach double or even triple hooks to eared sinkers, if the angler so desires, but finding such a jig head will not be easy.
The use of an offset hook with a Cheburashka allows you to make more effective non-snaking hooks than from simple jig heads, due to the free movement of the hook and the absence of a lever with a sinker
Collapsible "Cheburashka" Eared sinker
Date: February 24, 2015 | 078
Speaking about modern jig and microjig installation, one cannot ignore such an element as a collapsible eared sinker. Due to their shape, as if with two ears, these sinkers are called “Cheburashkas”. Collapsible Cheburashkas are used very widely and it makes sense to talk about their features and use.
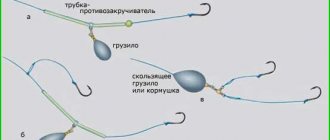
This element of editing has evolved quite a lot. More recently, non-separable Cheburashkas were used. In such sinkers, the wire ears were molded tightly into the weight. The hook had to be secured using various additional links: winding rings, wire strays. The strong point of a hinged rig with an eared sinker is the freedom of the bait relative to the weight. However, everything is good in moderation. Extra links in installation are bad. Excessive mobility, for example, greatly increased the hook’s grip on obstacles in the water. With a collapsible sinker, on the one hand, you get a sufficient degree of freedom for the bait, but on the other hand, mobility is still limited.
The collapsible eared sinker is very simple. This is a lead ball (sometimes tungsten) in which there is a flat through groove. A specially bent wire bracket is inserted into the groove.
We take out the bracket, put a hook on it and put the weight back together. That's all - the hinged installation is ready. Everything is ingenious and simple.
The lead ball is also in Africa. There can be no particular complaints or questions about him. It’s good when it is cast with high quality, without voids, and the lead sagging is well trimmed. It is important that the weight is marked - it indicates how many grams it weighs. Actually, 100% of the collapsible eared ones that I have ever dealt with were like that. There are more questions about the wire bracket. It is important that, on the one hand, it is easily inserted into the weight, on the other, it does not fall out, and on the third, it is removed with force, but not excessive, without any tools. To prevent the bracket from getting stuck in the crack or sticking, it is made of stainless steel wire. This is a rule of good form for high-quality collapsible eared ears. The wire should be springy. This is what ensures easy assembly and disassembly of the weight, as well as reliable fixation of the bracket in the weight.
Looking at the collapsible eared ear, it is clear that it is designed according to the eccentric principle. If you draw a conditional axis through the place of attachment to the tackle and through the hook with the bait extending further, you can see its departure from the center of gravity of the ball. This makes it possible to avoid rotating the bait, which is completely inappropriate. The weight will move, say, along the bottom in a step, and the angler will clearly understand the position of his bait.
The weight range of collapsible eared sinkers is very wide. It starts with 1g and extends to 30-40g or more. A micro jig is considered to be in the range from 1g to 5g. Moreover, in this light segment there is a gradation of half a gram. Those. not only whole weights are in demand: 1g, 3g, 4g, but also: 1.5g, 2.5g, 3.5g. Sometimes, the difference of these half a gram is very significant and it is important to choose exactly the ideal weight.
A variety of hooks and even combinations of them can be used with a collapsible eared “Cheburashka” weight. Single, offset, double, triple hooks and rigs with several hooks are used. In microjigging, the most popular is the use of single hooks with an increased diameter of the ring and offset hooks.
The collapsible sinker allows you to very quickly change the installation layout. Change the weight of the weight, change the hook size and type of bait. Speed in fishing and speed in maintaining gear are especially valuable for spinning athletes, where in competitions every second is important and precious. It was from sports jig-spinning that this innovation came and now collapsible eared baits are actively used by amateurs who also appreciate their advantages.
I advise all anglers who practice fishing with small silicone baits to pay attention to hinged mounts with such collapsible weights. They are very convenient and effective!
Share with your friends:
Categories: Montages Tags: Sinkers, Microjig, Montage
Varieties
There are many types of Cheburashkas that can be found in fishing stores today. There are several main characteristics that distinguish them from each other.
Form
Despite the name, there are not only spherical Cheburashkas. The ball is considered the best shape for a sinker due to the fact that it can have maximum weight with a minimum diameter. In addition, this shape promotes long casting, increases snag resistance and is the easiest to manufacture.
However, in addition to the classic round ones, there are Cheburashkas, the shape of which is called field. These are elongated sinkers designed for fishing in snags and uneven bottom terrain. The third type of eared weights is the “fish head”, beloved by many anglers, the name of which speaks for itself. But the latter type of sinker, as a rule, costs a little more, without demonstrating any special advantages, which is why it is used infrequently. Due to the lower aerodynamic qualities of the field, the most popular today are the spherical sinkers familiar to most anglers.
Material
How to catch pike with a jig
The classic option on the market is lead Cheburashkas. This metal is heavy, inexpensive, and very easy to work with, which makes it an undisputed leader for fishermen. At the same time, it is a proven fact that it is harmful to the environment, and remembering how many dangling sinkers rest on the bottom of reservoirs, the scale of the problem becomes obvious.
A more expensive, but also more environmentally friendly option is to use tungsten Cheburashkas. Of course, they are cast not from pure tungsten, but from alloys, but they nevertheless have better strength indicators, which is why they can last longer than lead ones. However, given that in 99% of cases the service life of a sinker is measured by the time it takes before it breaks, and not before it deforms, this advantage is not considered important among anglers.
Also, tungsten Cheburashkas are heavier than their lead counterparts, which is why, with the same mass, they have a smaller size, which reduces air resistance and facilitates longer casting. In addition, it is believed that tungsten weights create an additional noise effect when hitting stones during wiring, which cannot be said about soft lead.
Relatively recently, Cheburashkas painted in different colors began to appear in stores. However, so far fishermen have not noticed any special differences and the demand for them is not too great
Rings
There are several options for placing the rings on the body of the sinker. The first, which was the most popular earlier, gave the popular name to such loads. In this arrangement, two rings are located on both sides of the sinker and oriented in one direction, which makes them similar to the ears of a famous cartoon character on a large head. This arrangement option is not very convenient when fastening through one winding ring or clasp, since the ears of most hooks are directed with the hole towards the tip, which is why with this method of installation the hook is directed with its tip not upward, but to the side. This increases the likelihood of a hook and somewhat worsens the animation of the bait.
The ears of the second type of Cheburashka are in the same places, but are directed at an angle of 90 degrees to each other, which, when attached through one winding ring, contributes to the correct positioning of the hook.
The third, most popular type at the moment, are collapsible Cheburashkas. In such rings, the rings are not soldered, but inserted inside the lead body and represent a single wire structure of a special shape, vaguely reminiscent of a paper clip. Such products allow you to remove the rings from the sinker and thread them into the eye of the hook, thus increasing the reliability of the structure and eliminating an unnecessary element from it.
There are also Cheburashkas with soldered fasteners, but in terms of reliability they are much inferior to collapsible ones, which have approximately the same functionality, which is why they are not in great demand
Self-production
Currently, a fairly large number of spinning anglers cast sinkers for fishing themselves, receiving impressive savings. Today, making dismountable Cheburashkas with your own hands is at the peak of popularity. Such weights are a little more difficult to cast, but they are much more practical than conventional non-dismountable ones.
The Cheburashka sinker can be made in two ways, and, as always, one of them is simpler, and the second is cheaper. If you plan to cast a lot of weights, it makes sense to purchase a special casting mold for this - this will make the process much faster. To save money, it is quite possible to make the mold yourself. For this you need:
- Two matchboxes.
- A sinker whose size needs to be repeated.
- Thin metal plate.
- Vegetable oil.
- Gypsum.
- Water.
- Empty jar.
- Drill.
- Wire.
- Wire cutters.
To create a mold for making sinkers you need:
- Remove the ear from the finished Cheburashka.
- Cut a piece of the plate the width of the hole and 5-6 centimeters long and insert it into the sinker instead of the eye.
- Dilute plaster of Paris with water in a 1:1 ratio.
- Stir until the consistency of sour cream.
- Wait for it to thicken and place the plaster in a matchbox, filling it to the brim.
- Tap the box on the table to avoid the formation of bubbles and voids.
- Lubricate the sinker with oil.
- Holding the plate, place the weight on the plaster so that it disappears into it exactly to the middle.
- Make 4 holes with a drill approximately 5 millimeters from the corners.
- Mark a cone-shaped hole for the sprue on the wide side of the box.
- Leave the half to dry for a day.
- Repeat steps 3-6 in the same way with the second box.
- Make holes in the second box similar to the first one and mark the sprue.
- Grease the dried first half of the mold with the weight inserted into it with oil.
- Carefully place the first half on the second half and squeeze them slightly.
- Let the form dry.
- Separate the halves, remove the sinker and use a knife to cut through the sprue and thin air ducts on the sides of the Cheburashka imprint.
- Insert pieces of wire, nails or pins into the drilled holes so that the halves of the form fit exactly against each other.
By and large, there is no difference whether the fisherman has a metal mold or a homemade plaster mold; the principle of making sinkers is approximately the same:
- Grease the halves of the mold with oil or a piece of lard to easily remove the cast Cheburashka.
- Insert the oiled plate across the mold into the specially made recess.
- Connect the halves using pins and squeeze if they are not held tightly enough. It is not recommended to hold the mold in your hands during casting; it is better to hold it in a vice; in extreme cases, you can use thick fireproof gloves.
- Melt lead in a prepared container. It is advisable that the container have a spout so that the hot metal can be poured out conveniently.
- Pour lead into the sprue in a thin stream.
- Wait until it cools down.
- In parallel with cooling, bend the ears from the steel wire, using as an example the eye of the factory Cheburashka from which the mold was cast.
- Separate the halves of the mold and remove the resulting load.
- Remove the plate and remove excess lead using wire cutters.
- Insert eyelet.
If excess lead appears on the joint line between the halves of the mold, it can be cut off quite easily with a sharp knife
At this point, the production of a collapsible Cheburashka can be considered complete.
LiveInternetLiveInternet
Let's sew crocodile Gena, Cheburashka and Shapoklyak
CROCODILE GENA
Material: artificial leather (pavinol on a knitted base) in yellow and green colors, red cloth.
From green leather we cut out the torso exactly along the contour and two parts of the paws (upper and lower). We cut out two more parts for the paws and the abdomen from yellow leather. Between the two parts of the body, we sew into the head the frontal part, made up of carefully joined pieces of leather of two colors. so that the marked lines align and the yellow edge falls on the chin and neck. After that, we sew in the belly, sew the tail and the back line, leaving a hole for stuffing. The line of the mouth, marked on the head with a dotted line, must be sewn through so that a bulge is formed along the front side. All sewing is also done on the front side using a buttonhole stitch.
The paws, sewn in pairs from leather of yellow and green colors, are stuffed through the holes with cotton wool. We sew the soles to the lower paws, having previously glued the insoles to them.
We combine the eyes with white and black buttons in the marked places. When the figure is ready, use a rope hinge to sew on the lower legs and put on the jacket. We thread the upper paws into the sewn sleeves and sew them together to the jacket with an invisible seam.
We cut the jacket according to patterns from thick cloth, drape or red felt, the tone is dark. We sew from the inside with a seam “over the edge”, along the lines shown in the diagram. We disguise the fastener by gluing “buttons” made of foil.
For the hat, we cut out the crown and brim and, after sewing them together, put them on the toy.
CHEBURASHKA
Material: artificial short-pile fur or plush, drape, vorsolan; for the muzzle and chest - orange crimplene, silicone.
We sew the cut out parts of the head, having first sewn up the dart from the inside. We collect the muzzle with a thread over the edge and tighten it slightly by inserting a flat ball of cotton wool inside, and then with the same thread we imperceptibly sew it to the head in the indicated place.
We put a breast on one half of the body and sew it with a loop seam, after which we sew up the darts from the inside with an “over the edge” seam and sew the body together, leaving a hole at the neck. We stuff the body with cotton wool, and the head with scraps of foam rubber or woolen yarn, but so that it is not heavy. Then we connect the torso with the head.
After we sew up the darts, we also sew the ears in pairs, turn them inside out, put inside the ends of thin copper wire, coated with glue and bent to the shape of the ear, and sew them to the head.
We fold the arm part in half along the fold line, sew it from the inside out, loosely stuff it with cotton wool through the hole at the bottom, then put a brush cut out of felt into it and sew up the hole, and sew the arms to the body.
We sew the paw part to the sole, leave a hole where we put insoles and cotton wool, sew up the hole, and attach the paws to the body.
We design the face as shown in the figure. We make the eyes from black and white oilcloth, draw the mouth with a fountain pen.
To make the toy more attractive, you can make a bang from a narrow strip of fur and sew or glue it into the upper part of the forehead.
Shapoklyak
Material: crimplen, knitwear in orange, black, blue and yellow colors, blue felt, for stuffing - wool tow, foam rubber.
On the tailored parts of the head we sew up the tucks, then we sew both halves so that the points of the chin and nose are aligned, and we sew them from the inside with a line stitch or by machine. We turn the mold inside out and stuff it with floss or foam rubber. We also make the hands, leaving a hole at point O. Then, along the dotted lines, we carefully stitch the face to reveal the bulges of the cheeks, the deepening of the mouth and wings of the nose, and to identify wrinkles. In place of the eyes we make puffs, where we will then place the beady eyes.
After this we prepare the frame. To make it you need 36 cm of copper wire for the body and legs and 15 for the arms.
We put blue tights sewn from thin sports jersey onto the frame, securing them to the waistband, and insert the upper loop of the frame into the neck hole and, using a needle and thread, fasten the head to the frame.
We sew the dress on the sides, bending it in half along line AB so that points B and D are aligned; We put it on the frame through the legs. We fasten the hands to the frame and sew the bottom of the sleeves to them.
and over the seam we attach the cuffs sewn and gathered along a short line onto a thread. We also put the collar on a thread and attach it around the neck, and sew a ruffle folded into the folds to the bottom of the dress.
We sew the wig onto the head, tie it in a knot at the back and secure it with glue or thread.
The diagram shows the technique for making pariVka. The sequence of work is as follows: onto a strip of fabric or braid of the same color as the head, we attach strands of woolen yarn or artificial hair of silver or gray color, imitating gray hair. The length of the strands is 20-25 cm. We sew them to the braid in the middle of the strand using a machine seam. After this, we glue the braid to the head with PVA glue or sew it inconspicuously.
We put shoes on our feet, to which the sole is glued so that the foot is slightly curved and under the heel you can glue a heel made of small squares of cardboard.
We decorate the head with a hat made of a circle of felt, pre-moistened with water and pulled onto a glass stack. Having tied it around with strong twine, let it dry, then use scissors to straighten the edges and attach it to the hair with a pin with a colored head.
You can give a handbag made of paper or cardboard.
source: https://mirdetey.by/
Hugo Pugo
Adviсe
There are several life hacks about casting sinkers, discovered by experienced spinning anglers. These include the following tips:
- To produce different weights of Cheburashkas, it is necessary to purchase or produce a large number of casting molds. However, this problem can be solved by adding tin to lead - they will mix easily, but due to its lower density, tin will make the sinker lighter. By experimenting with ratios, you can cast a fairly large number of weights of different weights in one mold.
- To compress the mold in the absence of a vice, you can use an ordinary office clip.
- A container for melting lead can be made from an ordinary tin can by bending its edge with pliers so as to form a spout for casting.
- The simpler the mold is to manufacture, the faster it fails. Therefore, if you plan to cast hundreds of Cheburashkas, it makes sense to purchase or make a good metal mold, since plaster molds will have to be made again quite often.
A good shape is distinguished not only by a long service life, but also by performance. There are models with up to 10 casting cells
