Do-it-yourself “Finnish board” for stretching nets and hauling lines under the ice
“A handy fisherman showed and checked himself how to stretch a cord under the ice using a homemade device.
As the fisherman says, his “Mechanism” is not new - there are others that have been invented for a long time, but he was wondering whether what he made with his own hands would work.
This type of “device” is used to install slings and nets where permitted. The fisherman says that it is forbidden to fish with nets.
In my previous publications, I have already touched on the topic of pulling a cord under ice in one of the simplest and fastest ways - using a pole assembled from several boards (you can look here).
Today there is another option and this method came to us from Finnish fishermen. The device is called a “Finnish board”.
Take a wide wooden board and screw a couple of corners to it. The corners play the role of runners, like a sled.
On the reverse side there was foam plastic attached, which acts as a float.
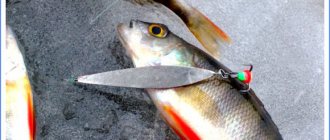
A slot is made in the board at one edge into which a steel wire bent into an arc is inserted - its role is to push the board further under the ice instead of a spring. And at the other end there is a cord attached.
The fisherman called this cunning design a “net broaching mechanism”...
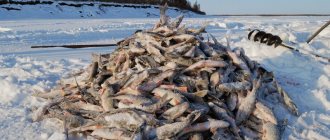
He conducted tests with this miracle device on the Karapchansky Bay in the Istrovsky Reservoir. I made a lane in the ice measuring 30 by 50 cm and pushed a “Finnish board” under the ice.
Then he begins to pull the rope, the wire pin rests on the ice and, like a spring, pushes the board forward. We pull and release - the board goes further and further.
You can watch a video of the operation of such a cunning fishing “Mechanism” here:
Whatever the private people can come up with in order to get fish in winter. The “Finnish board” is effective for pulling cords, and subsequently nets and slings. Maybe this “device” will suit someone.
NHNCH (No tail, no scales) to everyone! Follow my new publications - it will be even more interesting!
source
Do-it-yourself lightweight Torpedo spinner
This article will describe in detail and show in photographs the process of making the “Torpedka” spinner for winter fishing for perch. The spoon will be made from aluminum material, which means that it will be very light. Also, the article will talk about the possibility of painting the crown of the spinner.
For a long time, the Torpedo spinner was forgotten. Only recently have athletes, fishermen and winter fishing enthusiasts remembered its existence. Now they use the Torpedka spinner very often. The question arises, why is it so good? Everything is quite simple, such a spinner can change the nature of the game, it can descend vertically to the bottom, or twist during a dive, and it can also go crookedly under the ice.
Nowadays, stores have a huge selection of Torpedka spinners. But the price, quality and limited modifications sometimes make you wonder whether they are worth buying in a store. It would be best to make a Torpedo spinner with your own hands, it will be of better quality and a minimum of money will be spent on its production. It is recommended to use it for ice fishing.
To make a Torpedo spinner with your own hands, you will need the following materials: – Winding rings. - Small carabiners. - Threesomes. - Solder. - Swivels. – Flux for soldering. – Aluminum can. - Delay.
So, it's time to start making.
Stage 1.
On paper you need to draw an approximate appearance of the future spinner. In this homemade product, a length of 40mm will be used. This length is very suitable for a lightweight spinner.
Stage 2.
Now you need to mark the contours of the spinner on a small piece of metal. For some DIY beginners, it will be difficult to find the necessary aluminum plates. Therefore, this example will show how to make “Torpedo” glitter from a strip of aluminum can.
Stage 3.
It is necessary to cut the workpiece along the drawn contour.
Stage 4.
Now, with a small file you need to finish the edges and corners. In this case, you must ensure that the head is rounded.
Stage 5.
You need to make an even fold in the center of this workpiece.
Stage 6.
Now you can start rolling out the head of the future spinner, this is necessary so that it can look up. So, you need to put this workpiece on a spoon, as shown in the photo, heat it and press it firmly with a metal object. For example, with a small hammer.
Stage 7.
Now you need to attach loops to the workpiece for the hook and fishing line. Before doing this, you need to make a reinforced fastening system. To do this, you can connect 2 swivels together with wire. You can use any wire; in this case, an old guitar string was used.
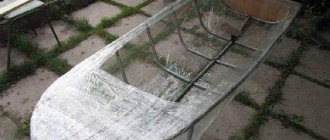
Board for installing nets under ice drawings
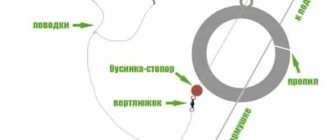
A design with which you can pass a fishing net of various lengths through two ice holes
A - wooden slats 2000 mm long, 50 mm wide, 15 mm thick. B - wooden slats 400 mm long, 50 mm wide, 15 mm thick. B - brass bushings. D - self-tapping screws screwed in from below, so that the tip of the screws extends outward by 5-6 mm (to engage the ice). D - a square made of foam plastic 400x400 mm and 150 mm thick, glued to a plywood or board square. E - plywood or board square 400x400 mm and 10-20 mm thick. F - holes for tying cords. Z - metal loop for tying a cord for pulling a fishing net. And - a cord.
Depending on the thickness of the ice, you need to cut a rectangular hole, approximately 80x100 cm. Insert an oilcloth into the cut hole (one end of the oilcloth should go under the ice, and the other end should lie on top of the ice).
This is necessary to prevent the cords from rubbing on the sharp edges of the ice.
We tie the end of the cord intended for pulling the net to a metal loop “Z” (the length of this cord must be no less than the length of the fishing net). Then we tie both ends of the other cord to the “F” holes (it is better to paint this cord with marks every meter so that you know how much of it went under the ice). If the length of the fishing net is 50 meters, then this cord should be twice as long, i.e. 100 meters.
Then we insert this “walking structure” into the hole under the ice so that the tips of the screws point in your direction (that is, you need to screw in the screws at an angle for better grip with the ice.
Next, by lightly tugging the “W” cords (left-right, left-right, etc.), you move this “walking structure” under the ice in the chosen direction.
When the specified length of the cord has completely gone under the ice, we visually check the direction and measure the length of the driven cord (length of the net) along the ice. We cut the same hole as the first one and pull the structure onto the ice. Then we pull the cord tied to the “Z” loop and thereby stretch the net under the ice. (see pictures).
Method of using the device
In order to use the torpedo to install nets under the ice, you need to unscrew the back cover of the device. Then place large batteries into the opened cavity. After which you need to check that the device is ready for operation, which can be easily done by lightly pulling the rope:
- If you pull once, it will turn on the engine and the light will come on.
- Pulling a second time, the fisherman turns off the engine, one light goes off, but another one immediately lights up. This is necessary in order to easily find the device under the ice.
- If you pull the cord a third time, the device will stop working.
After making sure that the torpedo is in working order, you can go out onto the ice. Directly on the spot, the fisherman cuts a hole into which the device will be lowered. Then a cord is tied to the twine, with the help of which the net will be stretched. The torpedo is lowered under the ice, into a hole, and directed in the desired direction. A slight tug on the rope sets it in motion. Due to the fact that the device rubs against the ice with its wheels, the fisherman hears this grinding sound and also sees a glowing light bulb.
After the device floats as long as necessary, the cord is lightly tugged again and the engine is turned off. Having retreated a little from this place, the fisherman cuts a second hole, removes the apparatus from the water and secures the cord. All that remains is to stretch the network along it and install it in the right place.
Some fishermen will improve the device with their own hands in every possible way. For example, you can attach a metal clamp in the area of the wheels, touching it will make more noise. This can be useful if the ice becomes thicker and the light from the bulb is not visible. Others make homemade bright lamps by soldering additional LEDs into them, after which the resulting cavity is filled with autosealant, and the plus LED is fixed to the central contact.
There are also craftsmen who attach a piece of foam plastic to the bottom of the torpedo. This is done so that the device fits more tightly to the ice. In general, each fisherman modifies the device in his own way, making the device even more convenient and efficient.
Do-it-yourself “Finnish board” for stretching nets and hauling lines under the ice
“A handy fisherman showed and checked himself how to stretch a cord under the ice using a homemade device.
As the fisherman says, his “Mechanism” is not new - there are others that have been invented for a long time, but he was wondering whether what he made with his own hands would work.
This type of “device” is used to install slings and nets where permitted. The fisherman says that it is forbidden to fish with nets.
In my previous publications, I have already touched on the topic of pulling a cord under ice in one of the simplest and fastest ways - using a pole assembled from several boards (you can look here).
Today there is another option and this method came to us from Finnish fishermen. The device is called a “Finnish board”.
Take a wide wooden board and screw a couple of corners to it. The corners play the role of runners, like a sled.
On the reverse side there was foam plastic attached, which acts as a float.
A slot is made in the board at one edge into which a steel wire bent into an arc is inserted - its role is to push the board further under the ice instead of a spring. And at the other end there is a cord attached.
The fisherman called this cunning design a “net broaching mechanism”...
He conducted tests with this miracle device on the Karapchansky Bay in the Istrovsky Reservoir. I made a lane in the ice measuring 30 by 50 cm and pushed a “Finnish board” under the ice.
Then he begins to pull the rope, the wire pin rests on the ice and, like a spring, pushes the board forward. We pull and release - the board goes further and further.
You can watch a video of the operation of such a cunning fishing “Mechanism” here:
Whatever the private people can come up with in order to get fish in winter. The “Finnish board” is effective for pulling cords, and subsequently nets and slings. Maybe this “device” will suit someone.
source
DIY making
Some specialists can make a torpedo tackle themselves. To do this, make a float from wood about 15 cm long and weighing about 100 g. A lead plate is attached to the bottom, the weight of which should lower the product to a depth of 10 cm. A leash is made from a monofilament fishing line with a diameter of 0.2 mm. It is tied to the main line, but just below the float. A fly 30 cm long and 0.2 mm in diameter must be attached to the leash. Then the side floats are fixed (length 9 cm, width 0.2 mm) at a distance of 30 cm from each other.
This device also quite effectively helps fishermen in their work. But, of course, to make it, you need to have certain skills and abilities.
Preparation for placing nets under ice
Preparation is pre-prepared equipment for setting up nets, as well as choosing a place for drilling holes.
The application of knowledge in practice turns out to be a very complex process in many cases. When going on ice, you should once again familiarize yourself with the rules for such setting. Feedback from people who have experienced difficulties and can tell you what to do or not do will be very helpful.
How to choose a place?
The choice of location must be approached responsibly.
And for this you need:
- Know the body of water well;
- Be located closer to the center of the reservoir;
- When drilling holes under the ice, there should be no snags, algae or other obstacles to avoid damage to the nets.
Cutting holes for the network
- First, it is recommended to clear the selected area of snow;
- Using a drill or chainsaw, cut 2 holes next to each other (the dimensions should be about 0.5 meters by 1 meter);
- The edges of the holes are beveled at an acute angle to allow the nets to slide under the ice;
- Between the main holes (lanes), several more are cut, but of a smaller size (in order to control the process).
The process of installing a network under ice
There are several types of installation. Each type has its own special characteristics. Such rules are mandatory, since without following them with independent actions, there is a possibility of going home with nothing.
Standard method
- In the very first lane, a net attached to the top is driven through;
- A special weight is attached to the bottom, and the stick should move towards the second lane;
- The process is controlled using additional holes to avoid network jamming;
- In the second lane there should be a run (a wooden stick up to 10 meters in size);
- The entire rope stretches under the ice until the gear is completely gone;
- To prevent the mesh from freezing, lower it down slightly.
Installation of nets under ice
Fishing with nets is equated to poaching, but not always and not everywhere. In winter, you can fish in large quantities, but only after obtaining permission for this activity from the relevant authority - Rosrybolovstvo.
You can obtain a fishing permit for some water bodies of the North, Siberia and the Far East. In these regions, fishing with nets in winter is even encouraged, because this reduces the fish population in places where there is an overabundance of fish. But these are legal components. Let's move on to the process of catching fish with a net in winter.
Fishing in winter with nets. Installation of nets under ice
Our country has developed a negative attitude towards fishing with nets and poaching, and rightly so. But winter fishing with nets can also be legal, otherwise, where would bream, crucian carp and other river fish appear on the shelves of our stores? In the North of Russia, net fishing in winter is a long-standing tradition and a way to provide oneself with food.
Moreover, in many reservoirs of the North, fishing with nets is welcomed and even encouraged. This is due to the need to thin out the fish stock in reservoirs where there is an excess of fish. It turns out that there are still such places in our country.
The benefits of winter net fishing
Net fishing becomes a good source of fish in winter. Traditional fishing methods require the fisherman to have a lot of free time and even waste, which cannot be said about nets.
Thanks to winter fishing, the number of fish is regulated. The cut-out ice holes become a source of oxygen for all inhabitants of the reservoir. For nature, such fishing in harsh winter becomes an even greater advantage, because at this time there is even less oxygen in the water.
How to properly place nets under ice
In winter, setting up gear is extremely problematic. It is best if several people do this.
Installation location
Not every body of water is suitable for installing gear. The best options are deep rivers and deep lakes. Small ponds are also suitable, but with reservations - there are no big fish there, the depth of the pond should be at least 3-4 meters, and you will need small-sized tackle.
Already when choosing an installation location, the behavior of the fish and the bottom topography are taken into account. With the onset of cold weather and the formation of ice, the vegetation near the banks freezes. To find food and not die, the fish goes to depth. That is why you need to look for places with the maximum possible number of fish, at depth. This way, fishing with nets in winter will be more successful.
But we must not forget about the bottom topography, snags, fallen trees and other unwanted obstacles. Otherwise, you can ruin the tackle, but before that it’s good to tinker with pulling the net out of the water. It is best to spot the optimal areas before the temperature drops in the first days of winter.