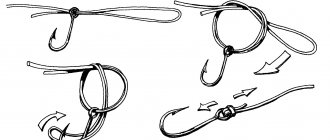
The page shows examples of tying horizontal and vertical lures with the most popular fishing knots.
Any lure plays better if it is not rigidly tied to the fishing line of the tackle. Therefore, fishermen often use special fishing knots to tie spinners, devons and balancers.
I am used to fastening my lures, both in summer and winter fishing, with the fishing knot shown at the bottom of the page. Thanks to this, it takes literally seconds of precious fishing time to replace the bait.
How to tie a lure with a fishing knot
The page presents fishing knots that can be used to securely tie a lure to a fishing line or braided tackle.
A “tight loop” fishing knot can be used to tie to a fishing line, in addition to spoons, wobblers, fly fishing flies, streamers and other baits.
The sequence of tying a spinner or wobbler with a non-tightening knot is shown in the figure.
In order for the lures not to lose their playing properties, the baits must be given maximum freedom when moving in the water. Therefore, for free retrieving, we tie the lure with a fishing knot called a “tight loop” directly to the fishing line.
To do this, we form a simple knot and thread the fishing line through the ring of the spinner “a”.
We bring the end of the fishing line through the fishing knot “b” tied to the main fishing line, tighten it near the soldered end loop of the tied spinner “c”.
Tie another safety fishing knot “g” nearby. Tighten it "d". The result: your lure will be securely attached to the fishing line.
Free loop knot. How to tie a winter jig with a free loop knot
The page shows examples of tying horizontal and vertical lures with the most popular fishing knots.
Any lure plays better if it is not rigidly tied to the fishing line of the tackle. Therefore, fishermen often use special fishing knots to tie spinners, devons and balancers.
I am used to fastening my lures, both in summer and winter fishing, with the fishing knot shown at the bottom of the page. Thanks to this, it takes literally seconds of precious fishing time to replace the bait.
How to tie a lure with a fishing knot
The page presents fishing knots that can be used to securely tie a lure to a fishing line or braided tackle.
A “tight loop” fishing knot can be used to tie to a fishing line, in addition to spoons, wobblers, fly fishing flies, streamers and other baits.
The sequence of tying a spinner or wobbler with a non-tightening knot is shown in the figure.
In order for the lures not to lose their playing properties, the baits must be given maximum freedom when moving in the water. Therefore, for free retrieving, we tie the lure with a fishing knot called a “tight loop” directly to the fishing line.
Fishing knot for free spinner play
Shown here is the sequence of forming a fishing non-tightening knot for free play on the fishing line of a spinner, wobbler, or fly.
Form a simple fishing knot in the form of an “a” loop on the root line.
Pull the end of the fishing line through the loop of the attached spoon and the tied fishing knot “b”.
In the opposite direction, wrap the fishing line around the tied loop “c” and pass between the two loops “d”.
Position “d” shows the appearance of a tightened fishing knot, with the help of which your lure will be securely tied to the fishing line and which will not interfere with its free play when retrieving.
Methods for gartering tomatoes
The design features of the supports for the garter depend on the height of the tomatoes grown and their quantity. If we are talking about just a few bushes in the garden, then tying them to pegs would be the best option.
Peg supports for open ground
As a support you can use:
- wooden slats, stakes;
- fiberglass reinforcement;
- durable sticks;
- metal rods and fittings.
Photo gallery: gartering tomatoes on pegs
Before using fiberglass reinforcement, it is recommended to sand it with fine sandpaper.
The ends of wooden slats driven into the ground are treated with an antiseptic, bitumen, waste oil, or simply charred
Gartering tomatoes on thick sticks is the cheapest option
Of all the proposed materials, metal rods are the most expensive, but also durable.
Video: using metal tubes as supports
Pegs made of any material (the length of which must be no less than the expected height of the plant) are driven next to the bush to a depth of 20–30 cm. Tying up the bush usually begins 2–3 weeks after planting it in open ground. It is better to use synthetic material for the garter. Unlike cotton, it is more durable, and there is less chance of introducing any infection to the bush through it.
The knot on the stem should not be pulled tight, it should be loose to leave room for the plant to grow. A knot called a “free loop” is very easy to use.
Photo gallery: how to make a “loose loop” for a garter
The short end of the rope is placed over the long end The short end of the rope is passed under the large loop A small loop is made from the rope The small loop is moved along the long end of the rope and tightened in the right place
Before tying, you need to remove the stepsons from the tomatoes.
Video: how to make a “loose loop” for tomatoes
Well, those who don’t want to bother with knots and strings can use special reusable clips.
Clips are convenient, but a little expensive compared to twine
Trellis - the most suitable method for warm regions
It’s easier for owners of greenhouses and greenhouses: their design itself can be easily adapted for gartering tomatoes. For open ground, there are several options for organizing trellises, but at least two supports located at the ends of the tomato bed remain unchanged. Their design can be different, as well as the material itself. The main condition is rigid embedment in the ground. If the bed is long, intermediate supports are organized, usually at intervals of about two meters.
Recent Entries
Lilac perennials that are beautiful, compact and do not crowd out other plants Why when buying seedlings you should not take the sellers’ word for it and how to determine the age of the plant using 3 signs Tomato seedlings have turned purple or whitish: why the color has changed and how to save the plants
Trellis are more convenient to use in beds in regions with a warm climate, where it is not necessary to cover tomatoes at night.
Vertical trellises
The main idea of this method is to tie tomatoes to ropes that hang over each bush and are attached at the top to rigid or flexible horizontal elements located between the supports. This could be, for example, a wooden block or a rope stretched between supports.
For a vertical trellis with a rigid support for ropes, a horizontal beam is used, and for a trellis with a flexible support, the ropes for tying are attached to a stretched cord
Tying does not necessarily imply nodal attachment of the stem to the support. Vertical trellises often involve simply twisting a string around the main stem of the tomato plant.
Video: tying tomatoes to a vertical trellis
In the 80s of the last century, an amateur gardener near Moscow, I.M. Maslov, proposed a new method of growing tomatoes, which also included an original method of attaching them to a trellis. Its essence is that loops are arranged on a vertical flexible support, to which tomatoes are tied through rubber rings and metal loops as they grow.
Using this method, it is convenient to cope with a large harvest, when bunches of fruit can be attached to the same loops through mesh bags.
A hook with a rubber ring is attached to a vertical support (rope), to which the tomatoes are tied
To prevent the branches of tomatoes from breaking off under the weight of the harvest, they need support - for low-growing tomatoes this can be a rod stand for a bunch. In the case of tying fruit to a trellis, it is necessary to provide a sufficient supporting surface for the garter under the branch with fruit so that it does not cut into the stem - old nylon stockings are often used for this purpose.
Horizontal trellises
Their feature is a horizontally stretched rope between the trellis supports. There can be several of these ropes in height, depending on the size of the bushes; tomato stems are tied to them.
Tomatoes are tied to horizontal ropes
Mesh trellises
A wide variety of modern materials for the construction and arrangement of a summer cottage have given rise to new options for gartering tomatoes, among them quite exotic cages and caps for tomatoes. Here we will also mention more practical mesh trellises.
It can be simply a metal mesh, or with a polymer coating, or purely polymer with cells of at least 50x50 mm. The mesh is located between the supports and attached to them, and tomatoes are already tied to it.
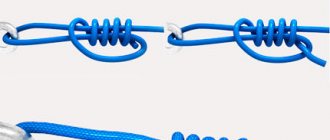
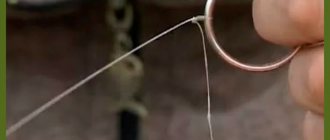
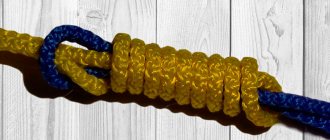
California fishing knot for spinners
The image shows a strong "California knot" for tying a fishing lure, formed from double fishing line.
In addition to a spoon with vertical or horizontal wiring using a California knot, you can attach a wobbler, sinker, swivel, clasp, hook to the fishing line of the tackle.
To tie a spinner, fold the running end of the fishing line in half and pass it through the ring of the spinner “a”.
Then a simple knot “b” is knitted. The folded loop should not be short, since the next step will be to pass the attached spoon through it.
ATTENTION! In position “b”, the loop is first bent to the left behind the spoon, then the bait is passed through the loop (in the direction of the arrow). The folded fishing line is thrown over the tied fishing knot “b”.
Finally, the formed knot is moistened with water or saliva and tightened in several stages. A view of a Californian fishing knot fully tightened on a tied spoon is shown in position “d”.
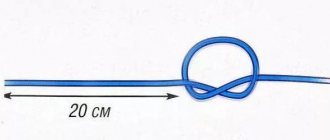
What is the Loop knot used for?
The perfect loop is a seafaring and fishing knot. Typically, the knot and its modifications are used to create a loop that will not tighten at the end of a cable, rope or rope.
Many areas of human activity use the excellent qualities of the loop. For example, marine vessels, agriculture, industry and even in everyday life. But basically, as mentioned above, the loop is used by sailors and fishermen for various purposes. Boaters can use the knot to tie a tug, and fishermen can use it for anything, such as tying hooks to line or leader, tying main line and leader, tying up a boat, and much more.
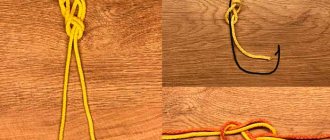
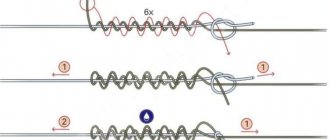
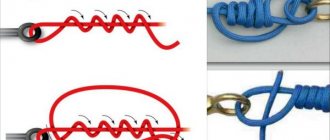
Non-tightening knot for tying a spinner
A fishing knot for tying a spoon called a “non-tightening loop” is shown in the picture.
Tie a straight slip knot on the line and pass the line through the spinner ring or swivel. In reverse, pass through loop “a”.
Twist the running end around the root line several times and thread it into loop “b”. Tighten the fishing knot "in". A knot that does not tighten will have minimal impact on the performance of the attached lure.
The number of twists in the fishing knot depends on the rigidity and thickness of the fishing line to which the lure is tied. The thicker and stiffer the fishing line, the fewer turns of twist there can be in the formed knot.
Non-tightening loop. fishing knots
In the three previous issues, starting with number 14, we talked about several loose loops that are knitted using a simple knot, and we continue the same topic in this issue. The question arises: why so many nodes of the same type? The fact is that they are similar only in their purpose - they allow you to make a fixed end loop, but the fishing line itself can feel, and therefore behave - maintain tensile strength - in these knots differently.
In the three previous issues, starting with number 14, we talked about several loose loops that are knitted using a simple knot, and we continue the same topic in this issue. The question arises: why so many nodes of the same type? The fact is that they are similar only in their purpose - they allow you to make a fixed end loop, but the fishing line itself can “feel”, and therefore behave - maintain tensile strength - in these knots differently. One loop is better suited for thick and soft fishing line, the other for hard line, and the third will be preferable for thin line.
This is a general rule: there is no one best knot for tying hooks, another for wobblers, and a third for tying fishing lines or tying leashes. We will provide various knots that serve the same purposes, giving anglers the opportunity to make their own choice depending on the type of fishing line used or the convenience of the tying method.
The proposed loop is knitted a little easier than the Rapal loop, with fewer bends in the line. They start with a straight sliding knot, and not an oblique one, as in the Rapala loop. Then the running end is carried around the main end several times, bent back and passed into the lumen of the sliding unit from the same side on which it came out of it in the extending loop. How many times should you wrap the running end around the main one when tying this and similar knots? It is believed that a thick line requires fewer runs than a thin line. For example, for lines with a breaking load of more than 27 kg (60 lbs) 2 runs are sufficient, from 22 to 27 kg (50 - 60 lbs) - 3 runs, but for lines with a breaking load of less than 4.5 kg (10 lbs) it is possible You will have to make 7 cuts to make the knot as strong as possible.
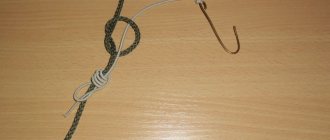
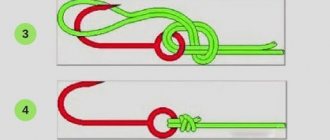
Fishing units for quick replacement of lures
The figure shows three fishing knots used to quickly replace spinners and other gear attributes.
And, to be more precise, the spoon is not even tied, but is simply fixed in a pre-tied fishing knot.
If a fisherman often replaces spoons in the process of catching predatory fish, then for him such fishing knots in the form of end loops can save a lot of sometimes very expensive fishing time.
Let’s say that for many years I have been using the simplest and most reliable fishing unit to quickly replace spinners, which I have tinted scarlet in the image for this occasion.
And I don’t remember a single case where a knot in the form of a simple single loop came undone when hooked or jerked by a predatory fish.
A fishing knot in the form of an end loop is convenient because when you quickly replace the spinner with bait for different purposes and build it, you don’t have to constantly cut it and tie a new knot.
Let’s say that a vertical perch spoon can be quickly replaced with a devil or a bolda during winter fishing. Read the next article for details.
Fastening the spinner with a knot for quick replacement
The sequence of tying a spinner in the loop of a fishing knot, designed for quickly changing bait, is shown in three positions in the picture. We quickly and securely attach the bait as follows:
Fold the loop in half and pass it through the ring of the spinner.
Next, we give the loop an oval shape and draw it around the end hook of the bait.
At the third stage of fastening, we tighten the fishing line on the tail ring of the spinner (devil, bulldozer). As a result: the spoon will be quickly mounted into the loop of the fishing knot.
The process of attaching or removing the spoon takes literally seconds, however, there is one “but”. The loop of a fishing knot can be short only if the knot tied on it passes freely through the ring of the lure being tied.
If the ring on the spinner is small, then the loop folded in half must be longer than the bait, otherwise the spinner simply cannot be passed through the loop.
Just the second case of quickly attaching a spinner in a loop tied from a thick fishing line with a massive fishing knot is demonstrated in the pictures.