Leave a comment / Treatment
Why are knee pads needed?
Knee pads protect your joints from the cold ground and are much more comfortable to work with on hard ground or surfaces. At the same time, the knee pad will protect your clothes from dust or dirt.
The knee pads themselves can be divided into 3 types:
- Knee pads for the garden.
- Knee pads for repair (construction).
- Children's knee pads.
Construction knee pads
- In the construction industry, knee pads are needed for tiling (especially if you have very large volumes).
- They protect the knee from hypothermia and reduce the load on it.
- Of course, you don’t have to worry about sewing knee pads yourself and just buy ready-made ones, but... many purchased knee pads have a drawback - a plastic insert in the center (numbers 1, 2 in the picture).
- Such inserts are extremely unstable supports, and in addition they raise the knee (due to the thickness of the insert) and this makes it impossible to stay on the floor for a long time (the legs get tired from constant balancing).
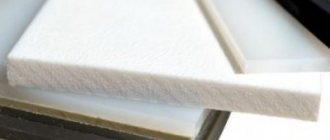
There is an option without plastic inserts (number 3 in the picture), made of rubber (or caoutchouc). Yes, this option is more convenient, but... it does not heat and lets in the cold from the tiles.
So, it turns out that there are no comfortable and protective purchased knee pads (with rare exceptions). How to be? – Purchased knee pads can be upgraded to make them more comfortable.
- Modernization of knee pads with plastic insert
- Option 1
- The easiest way to upgrade knee pads is the first type (number 1) since it is fixed with Velcro.
- First of all, remove the plastic inserts.
- Then we take a stationery knife and cut through the lining (from the inside) and insert 2 strips of extruded polystyrene foam approximately 2.5-3 cm thick.
- Why not 1 single strip? One strip will quickly break, and two, which will be secured with reinforced tape, will last many times longer.
READ ALSO: Fighting resumed in the south of the Syrian province of Idlib
Option 2
- We also remove the plastic inserts.
- We cut the lining.
- Take a piece of thick polystyrene foam.
- We grind it in accordance with the size of the knee pad itself and make a small “cone”
- It is important to make a small depression under the knee.
Video about upgrading knee pads
DIY knee pads for gardening
If you need an option for the garden, then you can simply make your own knee pads (rather than buy and upgrade them).
Good knee pads help you work in beds and flower beds (when you cultivate the soil or plant seeds).
With their help, it is much more convenient (and better for health) to work on cold, wet ground, with or without stones. Such knee pads can also be used for winter fishing (but with a stronger emphasis on heat protection).
Of course, if you need “pseudo knee pads” for once or twice, then you can simply take pieces of foam and place them under your knees.
Most often, knee pads are made using travel mats (several layers are glued or stitched, and fasteners are secured between the layers).
- If you need knee pads with a “comfort” function, that is, to be able to stand softly on the ground even with pebbles, knee pads made from travel mats are just right.
- But if you want the knee pads to better support the “warmth” function, that is, if you are preparing them for work in the spring, when the ground is still damp and cold, then the second option:
- Required:
- Waterproof fabric;
- Insulation (for pipes);
- Filled insulation (optional);
- Wide elastic band for fastening to the legs;
- Velcro.
Sequencing:
- First straighten the insulation (if it was rolled up)
- We measure the size of your knee and the future knee pad (for example, mine is 200 mm wide and 350 mm long).
- From the insulation we cut out 2 blanks multiplied by 3 of these sizes (600 mm and 1050 mm).
- We fold the insulation into 3 layers (better thermal insulation and softer standing)
- If you find this not enough, you can make another layer of insulation between the insulation and the leg.
- Now we sew a cover where we will insert this insulation (the insulation should not dangle inside).
- To attach to the leg, you can use a wide tape (7-10 cm) with Velcro.
- For convenience, the insulation can be sewn to the fabric itself.
READ ALSO: Water station malfunction
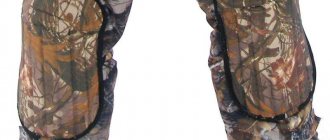
DIY knee pads for children
For children's knee pads, the main function is protection. After all, a child often falls not only on the ground, but also on the asphalt.
By the way, if you want additional safety on the site for your child, read the article about rubber coating of paths, link here.
How to protect the child in this case? Many people simply dress the child as best they can - jeans, leggings, and so on, but in the summer this is not very good, and there is no convenience.
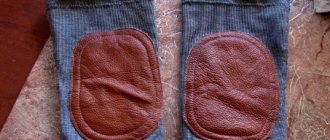
- You can make protective knee pads from... ordinary socks (not children's), you can't even always say that they were really socks (if you choose socks with a large pattern, you get the impression that these are special purchased knee pads).
- To do this, you need to purchase 2 pairs of socks (necessarily with elastic bands).
- Then we cut it as shown in the drawing (1 pair to the heel, cut off only 2-3 centimeters from the second with an elastic band).
- After this, we sew these two parts together (it is advisable to turn the edges together).
- As a result, we get knee pads with two elastic bands (one at the top, the other sewn at the bottom).
- If this does not suit you, you can additionally make “pockets” at knee level with felt, cotton wool or any other softening material.
- In general, what and how to make knee pads from must first of all be based on the functions that they should perform: this can be protection from hard soil or asphalt (as in the case of children’s knee pads), or construction knee pads, and heat protection for working in unheated conditions. land (and for winter fishing).
- The level of safety and choice of materials also depends on you, we only provide you with ideas.
Pattern of knee pads. Making knee pads for winter fishing
For winter fishing, fishermen need additional equipment: tackle, hooks, fishing rods and special items of clothing in which a person can go hunting. Knee pads for winter fishing are a useful piece of equipment.
Today they are sold in most specialty stores. If a fisherman has a small amount of time and does not want to waste money, then it is not difficult to build a pair of comfortable winter knee pads for fishing with your own hands.
Equipment for winter fishing
Every experienced angler knows how much the process differs from what is usual at other times of the year. And it's not just about weather conditions. Fishing rods, fishing line, clothes and equipment - winter makes its own adjustments to everything. You will even need a tent in cold weather.
Advantages and disadvantages of fishing from the knees
- Protection from bruises and cold ice.
- The knee pads do not take up much space and fit easily into your bag.
- It's more convenient to fish. The speed and efficiency of fishing increases, as the fisherman is closer to the hole.
- The influence of wind on the nod is reduced.
- It's easier to do the wiring.
- It's easier to remove the catch from the hook. Simply lift the fish and remove it from the fishing rod.
- Feeding and cleaning the hole is simplified.
- There is no need to carry a box with you to go between holes.
- This type of fishing is not suitable for people with back or lower back pain, as these parts of the body will be constantly tense.
- It is necessary to take breaks and move around periodically. There is a risk of breaking your back when constantly fishing on your knees.
- If the knee pads are not thick enough, there may be a feeling of coldness in the knees. There is a risk of catching a cold in the joint.
- In the spring, when there is water on the ice, you can get your knees wet and cold.
If, after weighing all the advantages and disadvantages, the fisherman concludes that fishing from the knees is still for him, it is worth considering the possibility of creating knee pads with your own hands.
How to make knee pads for ice fishing with your own hands
Often manufacturing companies make products from non-waterproof materials. Therefore, many fishermen make their own knee pads.
Patterns
Before making knee pads for winter fishing, you should decide how much material you will need. You need to make a kind of pattern for the knee pad.
To do this, it is recommended to use a measuring tape to measure the parameters of the knee completely, then separately in width and height those areas that should be covered with knee pads.
The material will have to be folded several times, so you need to multiply the width of the knee by 3 so as not to cut off too small a piece. After measuring the parameters, you can draw a sample of the knee pad on a piece of cardboard and use the pattern as a template for cutting out the insulation.
Materials and tools
Materials you will need:
- Waterproof fabric. Suitable material from a hammock, an old tent, a raincoat or a sports jacket.
- A piece of insulation that will serve as a heat insulator.
- Wide elastic band or reinforced tape. If desired, you can replace it with electrical tape.
- Velcro.
- Foil.
Manufacturing process
Pipe insulation is often sold rolled up, so it must first be flattened. To do this, the material is spread over the entire area, a heavy object is placed on top as a press and left in this form for several days.
The insulation will level out literally within 2 days and will no longer curl. If it is not possible to store the thermal insulation material unfolded, then to straighten it you can simply twist it inside out with a tube.
Having prepared the insulation, the piece needed for the knee pad is cut out of it. This is easy to do using a pattern or by eye. Then the canvas is folded 3 times. If desired, foil is placed between the layers of insulation for thermal insulation and protection from ice. Another layer of foil is placed over the surface of the product.
The next stage is the manufacture of a case into which the workpiece is placed. It is necessary to sew the cover so that the insulation fits tightly into it. A pattern with dimensions will again help with this. However, it is worth additionally taking into account the width of the insulating material.
Having inserted the foil and insulation into the cover, stitch them from the knee side to secure the fabric. You should act carefully so as not to further damage the surface of the knee pad.
For convenience, a wide elastic band is sewn to the knee pads. It will hold the equipment tightly in place without squeezing the leg. For this purpose, electrical tape or reinforced tape is used, but a simple rubber band is most convenient to use.
If you decide to use reinforced tape, do not forget about Velcro. They need to be sewn on before the insulation is inserted. It will be difficult to do this later.
This concludes the production of knee pads. Each angler can add features to the design, improving the equipment depending on their needs.
How to make knee pads at home. How to make your own knee pads for the garden
Knee pads for working in the garden can be made from various materials. There are many options for disposable and reusable knee pads. Making disposable devices with your own hands takes only 5-10 minutes.
You can use pieces of foam simply by tying them to your knees. But this option is not the most convenient, since this accessory will be needed every day, and polystyrene foam is a very brittle material.
Therefore, it is much better to sew good reusable knee pads with your own hands. It's quite simple, the main thing is to follow the recommendations exactly.
- Materials for production. To sew warm and comfortable knee pads you will need: water-repellent fabric, Velcro, wide elastic, some pipe insulation and, if desired, foil insulation.
- First you need to take measurements of the knee to cut the materials to size. For example, let's take a width of 20 cm and a length of 35 cm. These parameters are suitable for people of average height.
- You need to cut 2 blanks from a piece of insulation, first multiplying the size by 3. That is, the size of each blank will be 60 cm by 105 cm. Then the insulation needs to be folded in three. Three layers will provide reliable thermal insulation of the joint and protect it from the penetration of cold. If desired, you can add another layer of insulation, then the original size is multiplied by 4.
- Sewing a cover. Then, according to the dimensions, you need to sew a rectangular cover, adding 1.5–2 cm to the pattern on each side. You need to insert the insulation into the finished case and straighten it there. To prevent it from crumpling and getting lost, you can sew it along the edges manually along with the cover.
- Installation of fasteners. It is convenient to use Velcro tape as fastenings. The tape should be wide enough, Velcro is sewn to it, and then everything is sewn together with the knee pad. In order for the knee pad to fit well on the leg, it is best to use two fasteners that are sewn at the top and bottom of the knee pad.
How to make knee pads for the garden. How to make knee pads with your own hands for the garden, photos and videos
Knee pads are a very useful and popular item. This accessory is used by athletes, builders and dancers. Knee pads can also be very useful for gardeners. And although they are all very similar to each other, they still have some differences.
For example, knee pads for athletes are designed to protect the knee joint from bruises and scratches, dancers need reliable support, and summer residents need softness and warmth. Therefore, it will be very difficult to buy a suitable model, especially since you can make them yourself much faster and cheaper. Such an accessory will meet all the requirements and will definitely fit the owner.
Knee pads for the dacha and garden are designed to make work in the garden beds easier - weeding, sowing seeds, loosening. Since such work requires standing all the time, bending over or squatting. Such positions are very uncomfortable, and are often contraindicated for older people. Knee pads for the garden must meet the following requirements:
- be soft so that the pebbles on the ground do not cause inconvenience;
- waterproof, since you often have to work on wet soil;
- match the size of the knee joint;
- warm to prevent hypothermia of the knee joints during spring sowing, as this entails inflammation and swelling.
How to choose in a store
When choosing warm knee pads in a fishing store, the angler should keep in mind the following criteria:
- size. Knee pads need to be tried on, and the thickness of the pant leg of the winter suit must be taken into account;
- thickness of the heat-insulating layer and quality of the heat-insulating material;
- degree of water resistance of the outer layer. There is no need for a membrane here, the fabric simply should not allow water to pass through;
- convenience. This refers to how the knee brace is attached to the leg. It can be Velcro or rubber bands - the main thing is that everything works properly;
- appearance.
How to make knee pads for the garden with your own hands: choosing the material - About the garden and vegetable garden
Knee pads are a very useful and popular item. This accessory is used by athletes, builders and dancers. Knee pads can also be very useful for gardeners. And although they are all very similar to each other, they still have some differences.
For example, knee pads for athletes are designed to protect the knee joint from bruises and scratches, dancers need reliable support, and summer residents need softness and warmth. Therefore, it will be very difficult to buy a suitable model, especially since you can make them yourself much faster and cheaper. Such an accessory will meet all the requirements and will definitely fit the owner.
Knee pads for the dacha and garden are designed to make work in the garden beds easier - weeding, sowing seeds, loosening. Since such work requires standing all the time, bending over or squatting. Such positions are very uncomfortable, and are often contraindicated for older people. Knee pads for the garden must meet the following requirements:
- be soft so that the pebbles on the ground do not cause inconvenience;
- waterproof, since you often have to work on wet soil;
- match the size of the knee joint;
- warm to prevent hypothermia of the knee joints during spring sowing, as this entails inflammation and swelling.
How to make your own knee pads for the garden
Knee pads for working in the garden can be made from various materials. There are many options for disposable and reusable knee pads. Making disposable devices with your own hands takes only 5-10 minutes.
You can use pieces of foam simply by tying them to your knees. But this option is not the most convenient, since this accessory will be needed every day, and polystyrene foam is a very brittle material.
Therefore, it is much better to sew good reusable knee pads with your own hands. It's quite simple, the main thing is to follow the recommendations exactly.
- Materials for production. To sew warm and comfortable knee pads you will need: water-repellent fabric, Velcro, wide elastic, some pipe insulation and, if desired, foil insulation.
- First you need to take measurements of the knee to cut the materials to size. For example, let's take a width of 20 cm and a length of 35 cm. These parameters are suitable for people of average height.
- You need to cut 2 blanks from a piece of insulation, first multiplying the size by 3. That is, the size of each blank will be 60 cm by 105 cm. Then the insulation needs to be folded in three. Three layers will provide reliable thermal insulation of the joint and protect it from the penetration of cold. If desired, you can add another layer of insulation, then the original size is multiplied by 4.
- Sewing a cover. Then, according to the dimensions, you need to sew a rectangular cover, adding 1.5–2 cm to the pattern on each side. You need to insert the insulation into the finished case and straighten it there. To prevent it from crumpling and getting lost, you can sew it along the edges manually along with the cover.
- Installation of fasteners. It is convenient to use Velcro tape as fastenings. The tape should be wide enough, Velcro is sewn to it, and then everything is sewn together with the knee pad. In order for the knee pad to fit well on the leg, it is best to use two fasteners that are sewn at the top and bottom of the knee pad.
You can make good knee pads with your own hands from travel rugs. They do not allow cold and water to pass through. To do this, you need to cut out an oval-shaped pattern from cardboard. Then, according to the pattern, 5-6 blanks from the tourist rug are cut out. The blanks are glued together using superglue or stitched. In the middle between the layers, fastenings from belts are inserted.
Knee pads for infants - buy or make yourself?
Knee pads for infants are a new and multifunctional item. It was invented not so long ago, but it is already in demand among mothers. This device has several functions, which we will talk about in our publication today.
Knee pads for infants are made from different materials. It can be soft textiles, wool, padding polyester, Bologna fabric, velor and even soft plastic (for older children). In addition to the main fabric, attractive stripes, patterns and appliqués are welcome on fixtures. They not only decorate the accessory and arouse the interest of inquisitive kids, but also serve as an additional seal.
We make garden knee pads with our own hands
Home page » Orthopedic products » We make garden knee pads with our own hands
For work on the ground, special knee pads are often used to protect against damage, as well as dust and dirt. These devices come in three types: garden, construction, children's.
Often homemade shields are used for dachas, which should be made from special protective materials. Do-it-yourself knee pads are an excellent solution for protection from moisture, hard ground, and stones.
They are indispensable when planting seeds or cultivating the soil.
Manufacturing Features
Leg guards should fit snugly on your knees and not fall off during operation. To do this, they are secured using a plastic fastener or elastic band. In addition, you should choose a size that matches the size of your knee joint.
Beginner gardeners often have a question: how to make knee pads at home? First, you need to decide on the long-term durability of protective devices. There are both disposable and reusable shields. For one time, instead of special products, you can use polystyrene foam, placing it under your knees, it will provide short-term armor.
One of the common materials for making shields are travel rugs, which need to be glued or stitched in several layers.
For a more complex manufacturing method, waterproof fabric, pipe insulation, foil insulation and Velcro are used. Knee pads are often made from high-strength polyethylene foam.
Such products relieve stress on the joints, help warm up in any weather and eliminate the possibility of pain in the knees.
It is also possible to make knee protection for children who like to spend time in the garden with adults. They are made from regular hosiery with an elastic band that will adjust the size. To do this, you need to cut off part of the socks up to the heel and sew both parts together.
Necessary materials
Making protection for knee joints that will last a long time is quite simple if you take into account important recommendations when choosing materials. In order to sew knee pads using a simple and minimally costly method, you will need:
- Plastic bottles. Due to the lightness of plastic, such shields will not take up much space and are convenient to carry.
- Strong glue.
- A piece of loose fabric. Used to soften the wearing of plastic devices.
- An awl or large pin for making the necessary holes.
- Wide elastic bands. They will secure the knee pads to the joints, so it is important to choose large elastic bands that can be easily adjusted to any width of legs.
- Patterns.
Step-by-step instruction
- The first step is to cut a rectangle-shaped piece from a plastic bottle. The length and width are selected individually; as a rule, the size is 15 by 15 centimeters, counting from the kneecap. Due to the use of such a pattern, the shield will not interfere with the normal functioning of muscles and joints, and will not dig into the skin.
- The next step is to secure a piece of soft fabric to the inside of the plastic using long lasting glue. This is important so that the canvas holds tightly inside the protective shield and does not fly out, thereby interfering with work. You can also sew fabric to plastic by making small holes in it for threads to pass through.
- Using an awl or a large pin, you need to make holes on the sides of the plastic. There should be two such holes for each knee pad.
- The final stage of making the shin guards is to create holders that will secure the knee pads to the legs.
To do this, you need to insert wide elastic bands into the holes made so that you can easily select the size to fit your foot. Any elastic bands or special plastic fasteners that need to be securely attached to the product will do.
Such protective knee guards will remain indispensable in the garden for a long time, protecting joints and skin from various damages. In addition, with them you don’t have to worry about clothes getting damaged or stains that are difficult to remove.
Loading …
Video “Do-it-yourself knee pads”
From this video you will learn how to make garden knee pads yourself.
Do you have any questions? Specialists and readers of the site will help you. Support the project - share the link, thank you! Rate this article: Loading...
Knee pads made from plastic bottles. Plastic bottles - in action
Plastic bottles in action
Clean, beautiful, comfortable - everything will come in handy in the garden.
Cut off the bottom and neck of the bottle. Cut the cylinder lengthwise. The resulting rectangle must be straightened. This is easy to do if you put several layers of these plastic rectangles in a bowl of hot water and press them down with a weight on top - for example, a jar of water.
When the water has cooled, consider that the plastic has straightened.
Now it is easy to assemble any structure from these elements.
You can make a long ribbon, which is used as a border for fencing beds and flower beds. Rectangles of plastic are sequentially fastened with a construction stapler or soldered with a soldering iron.
The roof is made of plastic rectangles, the gazebo is made of plastic bottles:
Since bottles come in different colors, the borders will turn out to be transparent or brown to match the color of the earth, or green to match the lawn.
Dontse will also come into play
The tops of the bottles can also come in handy
Entire panels can be assembled in the same way. Rectangles are used to make ribbons, and ribbons are used to make panels. The panels are the walls of greenhouses. For greenhouses, the seams must be soldered. Try it, it turns out to be a very strong and durable design.
If necessary, you can even make improvised slippers)
Some people weed the beds on their knees, but their clothes naturally get dirty.
But you can protect your knees by making knee pads from plastic bottles. Cut a rectangular piece from the bottle, as shown in the figure, and lay soft fabric on the inside. The fabric can be fixed using Moment glue or PVA.
Punch a couple of holes on the sides and insert elastic bands into them, try on and adjust the elastic bands to the size of your feet. With such knee pads you can work even in wet weather.