Building a canoe
You experience real pleasure when moving through the water in a light boat, obedient to the slightest movement of the oar. Anyone with time and some woodworking skills can build such a boat. The keen interest of readers in the canoe, drawings and descriptions of which can be viewed here, forced us to continue this topic.
The interest is justified. After all, in terms of carrying capacity, a canoe is unrivaled in comparison with other rowing boats, and in terms of weight, it is comparable only to a kayak. Symmetrical contours fore and aft from the midsection, sheer sides and their inward slope at the top, a flat bottom and a large elongation give the canoe hull good performance, stability and controllability. The rowers sitting on the stern and bow banks jokingly turn the boat in place around a vertical axis.
The canoe that we offer you to build this time has improved lines and a different hull manufacturing technology.
The contours differ, first of all, in the displacement of the greatest width of the hull aft from the midsection, which, when sailing alone, reduces the trim to the stern and makes it easier for the rower to control the boat.
|
| Table of plaza ordinates according to the external dimensions of the form-building frame of the canoe hull | |||||||
| Theoretical drawing line | Numbers of structural frames | ||||||
| 1 | 2 | 3 | 4 | 5 | 6 | 7 | |
| Half-latitudes from DP | |||||||
| Side line - LB | 230 | 360 | 400 | 420 | 380 | 290 | 150 |
| Line of greatest width of the hull - LNSh | 270 | 380 | 440 | 450 | 430 | 370 | 230 |
| Heights from OP | |||||||
| Side line - LB | 430 | 390 | 380 | 370 | 380 | 410 | 470 |
| Keel line - LC | 30 | 20 | 10 | 10 | 20 | 30 | |
As for the technology, the body is glued onto a longitudinal set - a matrix. Easily bendable strips of thin waterproof plywood are laid diagonally on epoxy glue in two or more layers. In this way, you can build narrow hulls with complex rounded contours (even with the previously mentioned tilting of the sides inward) and obtain a strong monolithic skin. The strength of the skin in the most loaded areas can be increased by increasing the number of layers of material. For example, the middle part of a long canoe hull can be covered with an additional layer of veneer.
Experience shows that the construction of this boat will require at least 120-140 hours (depending on the skills and dexterity of the craftsman). All this time the hull must be on the slipway. Therefore, the work room should not only be spacious, but also heated during the cold season.
For the construction of a slipway, unplaned pine boards with a thickness of 30-40 mm are suitable. The remaining parts of the slipway set (transverse frames-patterns, exactly corresponding to the theoretical drawing of the hull contours, and longitudinal stringers) are made from ordinary construction plywood and planed pine slats of different sections. The cutting of the slipway parts along the length is carried out taking into account the selected dimensions of the boat. During assembly, they are connected with long screws. The quality of the future case depends on the accuracy of assembly.
Using a level, carefully check the horizontalness of the slipway. Its supports (goats) are securely attached to the floor so that they do not accidentally move out of place when covering the set and allow the shell of the body to be planed and sanded from the outside.
It is very important to accurately transfer the shape of the frames from the drawing to the plywood and cut them along the contours. The internal technological cutout in the frames is made so that the latter can be put on the beams of the slipway. After placement, they are verified in height and longitudinal axis, guided by a string (steel wire) stretched tightly along the slipway above the intersection line of the main and diametrical planes of the theoretical drawing. You also need to make sure that the planes of the frame patterns are strictly parallel. They are then attached with screws to the beams of the slipway.
|
The front and rear stems are also precisely drawn and cut out (but from waterproof plywood 15-20 mm thick). They are installed in place and connected to the middle beam of the slipway using two wooden plates. The connection is best made using dowels, which can later be cut off when removed from the body of the matrix set.
The pre-made keel is adjusted to the stems and temporarily secured with dowels in the middle cutouts of the template frames. The internal fenders of the left and right sides are also laid out along the frames.
Having made sure that the keel and both fenders have a smooth bend, are symmetrical relative to the center plane and fit well to the frame templates, they are finally secured with brass screws to the stems, having previously coated the joints with epoxy glue.
The slats (they are the stringers of the frame on which the “shell” of the hull can be glued) are secured with dowels in the cutouts of the frames. They are connected to the stems with twisted wire. When removing the glued body from the frame, the wire is cut with wire cutters.
After installing all the elements, the canoe frame is processed with a belt sander, removing the protruding edges of the stringers and bevelling the keel on the sides. The processing is periodically controlled by placing a strip of plywood or veneer (2.5 mm thick) of the future sheathing on the frame at an angle of 45° from the keel to the fender.
If the strip fits well to the frame and forms a smooth shape around the contours of the body, then you can begin the main part of the work - gluing the body.
Theoretical standard drawing of a canoe hull
Here OL means the main line of the drawing, which runs parallel to the bottom of the boat. DP is a diametrical plane that conventionally divides the body area lengthwise into two completely symmetrical parts. VL1 means one of the lines that is formed by the edge between the wet and dry sides when the canoe is installed in the water. GWA is the main waterline, LB is the side line, B1, B2 are buttocks, 1, 2, 3, 4, 5, 6 are frames that create the shape of the transverse contours. Since the hull of the canoe from frame 6 is completely symmetrical, only half the length of the boat is shown in the drawing.
It is more convenient to assemble such a model, the covering of which is boards or slats, using transverse patterns with a shape similar to the shape of the frames. They can be rigidly mounted once on a slipway and then assembled as many canoe hulls of the same type as desired.
First, all control points are transferred from the drawing to the patterns. They represent the marks of the DP line, the main hull line, the waterline and the sheer line. Then the frame patterns, made in full accordance with the drawings, are attached to the slipway. After this, a steel wire string is pulled through the upper edge of the DP, which is necessary to make DP marks on the patterns. All patterns should lie parallel to each other.
The sternpost and stem are installed on the outer patterns. The result is a hull skeleton with a contour similar to the contours of the future canoe. If you lay a thin strip along the patterns along this frame, it will come into contact with each pattern at only one point. This means that you need to remove the crayons from their edges. After this, several fish slats are temporarily glued from the stern to the stem.
Then the material for cladding is prepared from slats or boards, carefully processing their edges. The sheathing itself is done smooth or cut. When sheathing overlapping, the thinned roofs are applied to the body so that the thickness of their overlap is no less than the thickness of two boards.
The sheathing begins to be laid from the bottom board. It is placed along the DP and connected to the stems using glue and screws. The boards are attached to the patterns with nails, which are nailed to pieces of plywood. Along the edges along the body they are connected with nails or small screws. To ensure that the connections are airtight, a fiberglass tape impregnated with epoxy resin is laid across the overlap.
After the plating is completed, all temporary fasteners are removed, the canoe hull is removed from the patterns and installed on the keel blocks. After this, frame slats are inserted every 15-30 centimeters (depending on the size of the canoe). They are made from oak or ash. The slats are pressed tightly against the sheathing and then riveted to it with rivets and nails.
Then fenders are installed along the upper edges of the sides of the boat inside the hull. They give rigidity to the sides and are attached with screws and epoxy resin. The fenders are firmly fastened to the upper edges of the frames. If you plan to assemble a decked boat, the fenders will become a support for the deck beams. If there is no deck, the side of the canoe is covered with a gunwale, the edges of which protrude slightly outward, and several spacers are installed across the hull. Their number depends on the length of the boat.
After such construction, the result is a canoe with a light, strong and sealed hull. Its skin is a rigid continuous shell, the elements of which do not move relative to each other under any circumstances. This ensures the case is completely waterproof. The main thing is that it consists of high-quality wood that does not have knots or depressions.
Photo of the canoe - construction process:
| To make a canoe on your own, you need to have a dry, heated room with an area sufficient to assemble a frame of the dimensions you have chosen, a drawing of the boat and materials for the slipway, casting and hull plating. | Using the table of plaza ordinates, it is necessary to draw the frames-patterns and stems in full size. Using carbon paper placed under the drawing, their contours are transferred to 15 mm thick plywood. The drawing and carbon copy are attached to the plywood with small nails. |
| The frames are cut along the contour using a jigsaw. Frames of the same shape are drawn using the first one as a template. | Inside the pattern frames, plywood is cut out so that the frames can be tightly placed on the load-bearing beams of the slipway, where they are precisely positioned in place and fixed with wooden plates on nails or screws. |
| To finalize the outer contours of frames of the same shape, they are fastened together with dowels and in this position pressed against the workbench. Traces from a jigsaw file are removed with a belt sander. | The stems are installed in the desired position, checking the drawing, and attached to the slipway with strong plywood pads with screws. The keel and both fender beams are laid out in the cutouts of the frames and cut to the required length, without connecting them to the stems and transverse frame. |
Materials and tools
Scale drawing of the canoe frame parts being cut out: A - stems; B - sections along frames.
When making a canoe with your own hands, the main thing is to purchase high-quality materials and tools. The main material here is plywood. The material chosen is moisture-resistant, and the plywood sheets need to be selected in large sizes to make it easier to connect them. The thickness of the material must be at least 6 mm, and it must consist of several layers.
In addition to plywood, you will also need boards well impregnated with special antiseptics, as well as a wooden beam with a cross-section of approximately 1 x 0.5 cm. The humidity of all wood should be 12%. In this case, the surface itself should not have cracks or severe damage. In addition to materials, you will need the following tools for work:
- jigsaw (preferably with blades);
- flat and Phillips screwdrivers;
- nails;
- hammer;
- chisel;
- drill;
- epoxy glue of the highest quality;
- thick film;
- scissors;
- a simple pencil for markings;
- silicone;
- wood varnish and brush;
- metal plates and corners;
- self-tapping screws
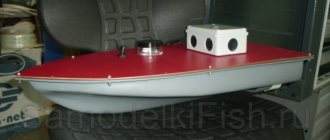
Do-it-yourself canoe using CC technology
Boat length 4.2 m, width 97 cm at midsection, height at midsection 37 cm
And then came the standard work for CC technology:
in the cut-out blanks, holes are drilled along the contour at equal distances and the blanks are sewn together with plastic cable ties
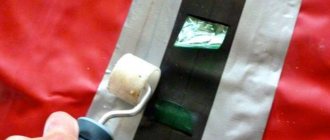
then I pulled out all the ties, formed a fillet on all the seams and taped all the seams with two layers of fiberglass. I soaked everything in hot epoxy.
Turned the boat over. putty the seams, sanded the surface
Then the boat was covered with fiberglass; boxes with epoxy are clearly visible in the background