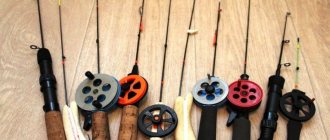
Float body
The material for the body of the floats will be construction extruded polystyrene foam; balsa can also be used.
We take pieces such that there is a margin of at least about 3 mm in size. Depending on the required load-carrying capacity, we use a knife to give the workpieces the specified thickness (from 6 to 12 mm) - use sawing movements.
On the prepared panels we outline the outline of the future float. You need to prepare a paper template in advance (I draw outlines on paper directly on the monitor, then cut them out). Ideally, you need to have originals of the floats, but there are also life-size drawings online.
We cut the workpiece with a knife, leaving an allowance of a couple of millimeters.
Using fine sandpaper, we grind the blanks along the contour and give the body of the float the desired shape.
For our “bolo” this is a kind of wing in the form of a medieval shield, for “bubble” it is a complex drop (we have two different thicknesses).
It is not necessary to completely repeat the original; understand the meaning of the float and take into account the main points in its structure.
Do-it-yourself flat floats for fishing in currents
Those of us whose passion is float fishing know how difficult it can sometimes be to fish in currents. Especially if it is strong, and you want the hook with the nozzle to be at the bottom. This problem can be solved by purchasing or making a flat float.
The price of branded products, comparable to a wobbler, deters many who want to try this intricate contraption. Others, having purchased a single element of gear that is new to them for testing, and not receiving the expected result, send it to a box with New Year's decorations and lose all interest in such experiments.
But in vain. Perhaps, in these fishing conditions, some parameters of this element simply did not work. Purchasing or manufacturing a series of similar elements with different characteristics (for different fishing conditions) facilitates their mastery during the fishing process. The design of the flat float was developed by E. Gutkevich and is currently produced by a wide range of manufacturers. The float has a disk shape and a narrow elongated cross-section, for which it received the nickname “lollipop” from fans of fishing with a plug.
Such floats “cut” the water, providing little resistance to the flow, and at the same time allow you to make the tackle more sensitive, in comparison with the use of a conventional spindle-shaped float, to perform wiring with a rigid hold or even stop the tackle. Hold the bait in the fish feeding area for as long as possible.
Many people prefer to make floats themselves; in this article I will tell you how to make a flat float. Firstly, there is a problem with the choice of material. We need a light, durable, easy-to-work “in the kitchen” material. It should not take on water if damaged.
Must be chemically resistant to nitro varnishes and paints. And finally, it must be cheap. Such material was found - it is polypropylene foam. On the construction market you can find so-called “plaster trowels”. By purchasing one of these, you will fully provide yourself with the necessary supply of floats. This will cost approximately 150–200 rubles. You will also need a quick-drying nitro varnish - there is no point in stretching out the production for months.
You will also need steel wire for the keels and antenna and “Moment” glue. The tools we will use are a hacksaw, a knife, a thin drill (1–1.2 mm), fine-grained emery cloth, and pliers.
Selecting size and shape
Practice has shown that a finished float with a diameter of 65 mm and a maximum thickness of 6 mm has a load capacity of about 9 g. By increasing the thickness to 8 mm and slightly changing the shape of the body, you can get a load capacity of about 15 g! Now about the form. In the horizontal cross section we should get a symmetrical wing with a wide front part and a narrow tail. And with increasing load capacity, this cross-section becomes wider.
Primary processing of the workpiece
Using a metal hacksaw, we cut a square from the grater with a side 2 mm larger than the diameter of the future float. Use a knife to give it a shape close to the required one. We retreat 2–3 mm from the edge of the float and make notches with a knife along the entire perimeter of the workpiece. The fact is that when making a grater, the surface layers turn out to be very hard and unsuitable for our purposes. Carefully, little by little, cut off the excess material with a knife.
Finishing
Place the workpiece on sandpaper and grind the side surfaces in a circular motion to the required thickness. First one, then the second. Pay attention to the parallelism of the planes - this will subsequently affect the symmetry of the float. We also process the workpiece around the perimeter.
Then, using a simple pencil, draw a midline along the perimeter - this will be a guideline when finishing the body to the shape of a wing. Subsequent processing with sandpaper is the most painstaking process. It will require patience, an eye and accuracy. However, it's not that difficult. After rounding the edges in the front part, we drill holes for the keel and antenna. The angle between them should be 30–40º.
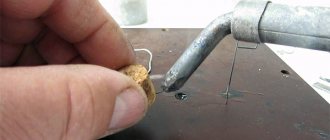
A steel wire with a diameter of 0.8–1.2 mm is suitable as a keel. Preferably stainless steel. We insert a piece of wire 35–40 cm long into the hole and bend it as shown in the photo. The shoulder obtained in this way is necessary for more reliable fixation in the body of the float.
And at the same time we form the upper point of attachment of the float to the fishing line - a loop or pin (as you like). We drill a hole in the telefloat and strengthen the shoulder. Then we glue the keel in those places where it comes into contact with the body. We also glue in the antenna. We put a silicone cambric on the upper cleat of the keel and another one on top - to fix the fishing line between them.
It was experimentally established that after covering the body with varnish in several layers, the load of the float increases by 0.6–0.7 g (this is most likely due to the fact that air bubbles remain in the pores of the material that are not varnished, which increase the load capacity). We take a piece of fishing line, silicone cambrics, and lead pellets of known weight. And measure the resulting load in the flask. At the same time, remember that such floats are placed in the middle of the antenna!
Flat float keel
The keel needs a long one - 150-200 mm. I suggest using bamboo as a material, which is characterized by high strength, good flexibility and elasticity. The original uses wire, you can take it (diameter 0.7-1 mm). I used an old “mat”, the sticks of which were sanded and matched in thickness to the rubber nipple.
For ultra-light floats I use incense sticks, from which the coating can be easily removed after moistening.
I prefer to make both the keel and the antenna from a single bamboo stick; it seems to me that this is more reliable.
However, it is possible to separate these elements, for example, to make the antenna replaceable (the rod must be inserted at least 20 mm) or positioned at an angle to the keel.
We pierce the body dry. Then we glue the rod to the body. I like to use a glue gun in this case.
At the polystyrene outlets, the melt can be formed into a cone with your own hands.
production of flat floats of various designs for fishing in currents
For a year now I have been observing the development of the topic of fishing in the current with flat floats, but unfortunately they are not delivered to stores in our region and, let’s say, there is no experience in fishing with them. Based on this, an attempt was made to make floats from available materials at hand. It should be immediately determined that these floats made by me are not for sale and are made only for personal use. The manufactured floats have not yet been tested on the water, so the summer will show what positive and negative sides these floats have. 3 types of floats were manufactured with a carrying capacity from 1.5 grams to 10 grams with shipping at the lower point of the antenna.
To make the floats, we used very dense white foam, fine-grained, I can’t imagine any characteristics of this material (I was given a piece of foam from the airfield a long time ago, there it was in the form of blocks that were used as stands for repair work on fuel tanks - at least for me so they said). For cutting foam plastic, a simple device was made from a 220 to 12 volt transformer with a power of 250 watts, a piece of nichrome wire from a spiral for an open-type electric stove, and an old large DVD drive from some imported music center. To do this, two stands with 2mm diameter holes were placed on the case with the disk installation platform at a height of 20mm from the top of the disk installation site, then one end of the nichrome wire was tightly fixed to one stand through the hole, and the wire was pulled through the hole in the second stand, a spring was installed and the wire is secured with a clamp behind the spring. Thus, we have a nichrome thread that is constantly tensioned by a spring. On the table we place a flat wooden block 18 mm thick on which our piece of foam plastic for cutting will lie. Next, we connect the 12-volt winding of the step-down transformer to the nichrome thread and place the workpiece on the device’s table, after which we turn on the transformer and smoothly move the table in the direction of the thread, holding the workpiece with our hand, and cut off the bottom of the plate exactly (the cut turns out to be perfectly even, although there is no need to rush when feeding). Then we install another wooden block, say 10 mm, lay the foam on top with the cut side down to the bottom and, turning on the machine again, we trim the workpiece, so as a result of cutting we get perfectly cut foam on both sides for sanding with a thickness of 10 mm. If you operate with different thicknesses of wooden blocks, you can obtain foam plates of a given thickness. It is not necessary to look for a DVD drive, all this can be mounted on a piece of board, but at the same time it is necessary to ensure good sliding without jerking of the workpiece on the board, you need to at least put a metal plate under it and remember that the thread is heated to red and you can get burned, so be careful. Now how to adjust the temperature of the filament - to one end of the filament where your clamp is, attach a 10 centimeter nichrome spiral, it will serve as a rheostat, and by alternately reducing the length of the spiral, achieve stable and clean cutting of foam plastic (you should not immediately connect your filament without a spiral; it will simply burn out immediately). And in general, first practice on waste foam. You can, of course, make floats from balsa, but we simply don’t have it on sale.
Next is a photo (sorry for the quality, but I don’t have a digital camera) - a cutting device - at the beginning of cutting and at the end
Rheostat connection
Foam plastic before and after processing
Now let's start making the float blanks. Here we will look at three types of floats with different carrying capacities.
1. float - disk. There are no problems in making this float; it is the simplest type. Take a foam plate with a thickness of 5 to 10 mm and use a compass to draw a circle with a diameter of 35 mm to 40 mm (more is possible) depending on the expected load capacity. Next, cut out the disk with a cutter and sandpaper no. 60 for this type of foam, clean the end of the circle, then divide the end of the disk with a marker into two parts along the entire length of the circle, again with a compass, draw a circle on each side 5 - 10 mm less than the diameter of your workpiece, then mark for the antenna sockets, lower and upper carinae. For the antenna sockets, a PVC tube with an outer diameter of 3 mm was used, for the keels, based on the existing stainless steel wire with a diameter of 1.0 mm and less up to 0.6 mm with sufficient bending strength (I unfortunately found only 1.2 mm). Next, carefully pierce the holes for drilling with a thin awl to a depth of 10-15mm and drill holes for the sockets in this case - antenna 3mm, keels 1.8mm
Cut pieces of the tube for the antenna and keels 10 - 15 mm long for use as nests. I glue the sockets under the antenna and keels with TITAN glue, for which I take a 20mm medical syringe with a cut 1.5mm needle (15mm long) from the system and pour glue into it up to half the syringe and insert the piston. At the same time, the glue does not dry, making it convenient to glue small parts. To install the nest, I take a tube corresponding to the diameter, insert an antenna or keel and coat the tube with glue, while using a syringe with a needle we feed the glue into the hole. Next, we insert the tube into the body of the future float and, after turning the tube several times in the hole, remove (holding the tube) the antenna or keel from the tube. Now we leave it for a day for high-quality gluing of the tubes. Next, using a blade, we cut off the protruding ends of the tubes to the body of the float and proceed to forming the geometry of the float body, for which we use a cutter to carefully cut the foam at an angle along the circumference on both sides according to the second circles we have drawn. In the places where the tubes are glued, we make smooth transitions by cutting off a minimum of polystyrene foam; this work must be done slowly and very carefully so that your future disk is correctly formed and does not later fall on one of the sides. After trimming, take sandpaper (HP. 60,100,200) and process the cut areas until smooth transitions are obtained, after which we sand with fine sandpaper and wash the float from dust. Next, insert bamboo toothpicks into the holes and varnish the float. I use water-soluble colorless latex varnish for the first layer, then water-soluble acrylic paint for the second layer (after drying, at this stage we install the antenna and keels and adding weights determine the load capacity), then marking the shipping number with acrylic paint using a medical syringe with a regular cut needle and finally The last layer is again colorless water-soluble latex varnish. Drying time between coats is at least 6 hours. Then we take out the plugs and install the antenna and keels with silicone tubes.
What happened was -1.5grm. (dia. 35mm, thickness 4mm), 4.0g. (dia. 35mm thickness 8mm), 4.5g. (diameter 38mm thickness 7mm). The floats use 4 types of antennas; their design will be discussed at the end.
Next is the production of floats with a sphere concave inward and convex on both sides outward of a special shape.
Continuation
To make floats with a concave sphere, let's call them type 1, we need to make templates.
When making templates to simplify the markings, I proceeded from a certain value of the quantity (a) specified purely conditionally. Let's say if I took the value a = 15 mm, then the maximum width of the float will be 30 mm, height 15 mm, width of the top shelf 15 mm, length of the float 15 + 15x1.4 = 36 mm. Using smooth transitions, we outline the contour and make a template from a dense material (in this case, millimeter plastic) according to this sample. So we made float templates, let's call it type 1 number 1 and number 2.
Let's draw a conditional axis on the float template and denote it at the top in the wide part with the letter A (antenna) and at the bottom with the letter K (keel). Next, we cut out plates with a thickness of 8-12 mm from foam plastic (more is possible if you plan to make a float with a carrying capacity of more than 10 grams) and, placing the template on the plate, outline the contours of the future float with a marker, after which we cut out the workpiece with a cutter. We clean the workpiece with sandpaper from the end and mark the axis along the perimeter of the end of the workpiece (we conditionally divide the workpiece from the end into two parts). Now on the end center line at the bottom we put a mark for the socket of the future keel, and at the top a mark for the antenna socket and two sockets for installing the right or left keels at a distance of 5-7 mm from the center of the antenna, depending on the size of the float. Now, using the method described above, we manufacture, glue and trim the nests. It is assumed that after testing the floats, selecting keels and antennas, the keels and antennas will be permanently glued into the sockets and will not be removed, so don’t be embarrassed by the fact that they turn in your sockets. Although, if you want, you can immediately glue them into the nests. After installing the float nests, we begin processing the surfaces; for this type of float this is a very tedious task. We draw the same contour on both sides, only reduced by 5-7mm from the edges of the float and begin to make a recess starting from the edges of the second conditional contour to the middle of the float. To remove the foam, I use half a blade bent in a U shape and inserted into a wooden stick. With this simple device, I slowly and slowly remove pieces of foam under a uniform inner sphere to a depth of 2mm to 4mm, depending on the size of the float. Now we take a strip of sandpaper 10-15mm wide, no. 100-150, and using circular movements we align the foam sections to more or less symmetry of the recess, while controlling the size of each half.
You cannot rub in one place for a long time because the sandpaper and the foam heat up and the foam begins to melt, and also use high-quality sandpaper in which the abrasive grains are well glued, otherwise the flying grains will deeply scratch your workpiece. Next, we turn it over to the other side and, using a cutter at an angle, we evenly cut the foam from the conditional line of the second contour to the edge, after which we process the entire float with sandpaper until smooth, symmetrical mating transitions are obtained; in the places where the nests are glued in, cutting and processing are carried out to a minimum. Further, the processes of priming, calibration and painting as given above are similar. This is what happened.
Next, what we got is that the diameter of all keels is 1.2mm (stainless steel)
1. Template no. 1 - with a load capacity of 2.5 g. own weight 2g. thickness 7mm, recess depth 2.5mm, keel length 85mm, length 36mm, width 30mm.
2. Template no. 1 - with a load capacity of 3 g. own weight 3g. thickness 7mm, recess depth 2.0mm, keel length 85mm, length 38mm, width 30mm.
3. Template no. 1 - with a load capacity of 6.5 g. own weight 3g. thickness 12mm, recess depth 4.0mm, keel length 85mm, length 38mm, width 31mm.
4. Template no. 2 - with a load capacity of 10 g. own weight 4g. thickness 11 mm, recess depth 3.0 mm, keel length 85 mm, length 48 mm, width 38 mm.
Continuation
Now let's begin to consider the features of the float, let's call it type 2, the manufacture of which is simpler than the previous one; many operations have already been described above. These are templates for this type of float.
Here is the ratio of sizes, to make your own template based on the accepted conditional value of a, for this we divide the circle into 12 sectors of 30 degrees and number them clockwise, taking the center of the circle as 0. 0 -1 =1.1a 0 -2 =1.3 a 0 -3 = 2a 0 -4 =1.76a 0 -5 =1.7a 0 -7 =1.43a 0 -8 =1.11a 0 -9 a 0 – 10 = 0.9a 0 – 11 = 0.9a 0 – 12 = 0.9a
Further, the manufacturing method is no different from that previously described.
Now let's see what happened after production.
Now we present the data of these type 2 floats to compare sizes and load capacity.
Next, what we got is that the diameter of all keels is 1.2mm (stainless steel), the length of the keels is 90mm
1. Template no. 1 - with a load capacity of 2.5 g. own weight 2g. thickness 8 mm
2. Template no. 1 - with a load capacity of 3 g. own weight 3g. thickness 8.5 mm
3. Template no. 1 - with a load capacity of 5.5 g. own weight 3g. thickness 14 mm
4. Template no. 2 - with a load capacity of 4 g. own weight 3g. thickness 8 mm
5. Template no. 3 - with a load capacity of 9 g. own weight 4g. thickness 10 mm
6. Template no. 3 - with a load capacity of 10 g. own weight 4g. thickness 11 mm
ANTENNAS
Now let's start making antennas for floats; here it should be noted that all antennas are interchangeable, since floats of different designs used mounting sockets for antennas of the same size.
These antennas are made from waste painted PVC length=55mm, width=7mm, thickness 0.9-1.4mm, antenna's own weight 0.35-0.45 grams, load capacity 0 grams.
The material is the middle of a Chinese television cable, white, with a copper-clad steel core (it is a fine-grained synthetic foam lightweight material similar to polystyrene foam, but very durable). This piece of cable without an outer sheath and an elongated copper core is melted on one side and a hole is drilled in it on the other side. 2mm in diameter and a piece of bamboo is glued in (toothpicks can be used) All antennas listed here are painted with materials for floats. The weight of the antenna was 0.25 grams, and the load capacity was 1.2 grams. It is worth considering using this material for the manufacture of thin floats of small carrying capacity.
The following antenna is made of bamboo with a piece of cable on top - antenna weight 0.35 grams, load capacity 0.3 grams
This antenna is made of a plastic tube with a melted end, one of which is glued into a piece of cable that is also melted at the top. Bamboo is glued into the other end of the tube. Antenna weight 0.33 grams, load capacity 0.5 grams. Such a variety of antennas with different parameters were made for more complete testing of floats.
I wanted to make three more types of floats, but unfortunately I ran out of dense foam and will not have it any time soon.
The continuation will not be soon, but the test report will be in July.
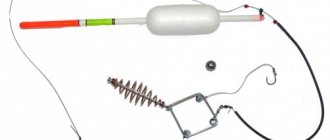
Second attachment point
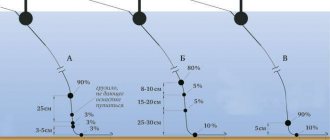
An additional attachment point for large floats of this type is required. In a bolo, a thin wire outlet is located at an angle of 45 degrees relative to the plane of the float.
So, when the fishing line is pulled, the float turns to a certain position (in our case, the float is made for the current coming from the right side). “Bubble” is simpler: a wire 15-20 mm long extends clearly along the axis, perpendicular to the keel.
Material: paper clip. We glue it with hot glue.
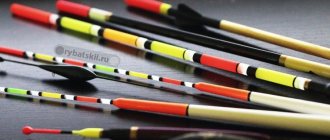
Painting the float
In fact, this procedure is completely optional, since these floats are loaded so that only the antenna, or even only a small part of it, sticks out above the water. But for the sake of decoration it can be done. I used automotive polyurethane enamel in a can that I had on hand. Sprayed it several times. I sealed all the “ends” with masking tape.
Can be painted by dipping. It is advisable to sand the body between layers. I know that some craftsmen also prime such floats with their own hands with “superglue” or coat them with highly diluted varnishes.
DIY current floats
It is not difficult to make a float for the current yourself. To do this you will need:
- A small piece of foam.
- Wire or stainless steel.
- Any plastic bottle (you can also use regular plastic).
- Special varnish for processing.
- Knife, file.
Manufacturing stages:
- Cut out a small disc-shaped piece of foam.
- Process its edges and surface with a knife and file.
- Coat the resulting flat disk with a special varnish (sold in a fishing store). Important advice: it is better to do this in several layers, ideally at least five.
- Take stainless steel or strong wire and make keels from them. The optimal thickness is 0.9 - 1 millimeter.
- Cut antennas from a plastic bottle.
- Attach an antenna to the upper part of the disk, and to the lower keel.
The approximate weight of such a float will average from five to fifteen grams. Important advice: it is better to make several of these floats so that at the time of fishing there is an opportunity to replace it if necessary.
Homemade flat floats for river fishing in the current are ready
Basically, that's all. Now you can try to load the finished float, mark its working weight on it and place it in a protective tube.
Turishchev Anton, Ukraine, Slavyansk - Specially for the Samodelki FISH website
- Uniformly loaded float with balancer
- DIY match float