A sliding float is quite often used in fishing with float rigs at long distances. The technique of this method allows you to catch cautious fish in deep areas of reservoirs. The principle of forming this kind of equipment requires the fisherman to be able to use stoppers that affect the length of free movement of the float along the main thread. Currently, rubber or silicone restraints can be purchased at a fishing store, or you can learn how to knit stopper knots yourself by mastering a number of simple and quickly memorized patterns.
In the article presented to the reader, the secrets of self-knitting three options for the most common types of locking knots will be revealed. In addition to the tying technology, the fisherman will be explained the principles of operation of this, albeit small, but quite important element of equipment, which affects the performance of the installation with the presence of a sliding float in its composition.
Purpose and types of stoppers for the float
The main purpose of the locking unit for a sliding float is to limit the travel of the signaling device necessary to lower the equipment to the required fishing depth.
Important! The fixing device must move along the line with a certain force, but at the same time not allow the float to move above the point marked on the thread on its own.
In addition, the limiter must pass freely through the access rings of the gear, preventing a decrease in casting range. Regarding the types of stoppers, it can be noted that today there are rubber, silicone and thread stoppers. These types of clamps can be prepared independently, or you can purchase them already prepared and mounted on devices that simplify their installation on a fishing line in fishing stores. We will be more interested in thread stoppers, which, using a special knitting technique, can be formed at home or directly knitted on the shore of a reservoir as needed and depending on the occurrence of various types of conditions.
Float stopper
6 minutes Author: Valentin Porokhnya 6
- Advantages of sliding equipment for float fishing
- Basic requirements for stoppers
- Magazine stops
- Features of using locking units
- Convenient way to store finished locking units
- Video on the topic
Long-cast fishing with float tackle often requires the use of sliding rigs, which allow you to cast the rig further and set the desired fishing depth. Both in the case of Bolognese gear and match gear, such gear allows you to fish at any depth at the maximum accessible distance, which is impossible when using blind rigs, the depth of which is limited by the length of the rod.
The sliding option for mounting float equipment has a number of advantages compared to the blind option:
Float fishing
In fishing float directions it is impossible to do without fishing stops. They are relevant in the classic swing, Bolognese rod, plug, match. Used when fishing with wire from the shore and boat. With their help you can:
- fix the float or limit its movement along the fishing line;
- secure the weight or limit the sliding of olives and other weights with an axial hole;
- maintain the integrity of the equipment elements by using stoppers as a shock absorber.
Select a stopper according to the diameter of the fishing line. They use silicone, thread, and nodal.
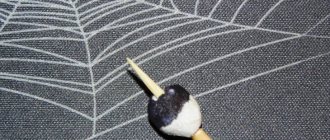
Photo 3. Stoppers and float in live bait gear.
In jig fishing, when using rigs on an offset hook, stoppers are useful, which additionally secure the bait, preventing it from sliding along the fore-end when casting, retrieving and biting a predator. There are two main options:
Cambric
This group also includes plastic cambrics, which are sold in stores, and a piece of simple elastic (nipple). Nipple stoppers have been used for a long time, but have a number of disadvantages. For example, they slip off the fishing line.
Here are examples of stop knots:
Thread
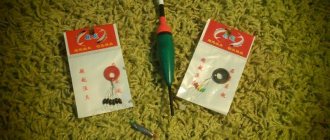
This factory-made stopper is formed from thread and is sold complete with beads. You can fix it and put it on the fishing line using a plastic tube through which the fishing line is inserted. After tightening such a knot, the ends of the thread should not be completely cut off, leaving a little.
You can knit stopper knots from any fishing line, but preference is given to braided or thick woolen thread. On a monofilament fishing line, braided knots will be more reliable and will also be better visible.
Stopping units for sliding floats
A sliding float requires a stopper. When rigging the tackle, locking knots are tied. Fishermen use two types of stop knots. They are knitted from a fragment of fishing line up to 300 mm long and with a diameter the same or slightly larger than the main fishing line.
Single knot:
- bend a piece of fishing line to create ends of different lengths;
- a short end is placed on the main fishing line, and the long end of the fragment is made 5 turns around two fishing lines, then it is returned to the loop;
- tighten the knot;
- cut off the ends.
Double knot (Kremkus):
- form a loop from a fragment of fishing line, and then press it with your finger to the main fishing line;
- use either end of a piece of fishing line to wrap the bottom of the loop and the main fishing line 5 times;
- tighten the knot;
- cut off the ends.
Experienced fishermen prepare such knots at home using the tip of a ballpoint pen, and when fishing they are moved to the fishing line.
Important!
Before tightening, the knot is wetted so that the line does not become brittle. The ends of locking knots are not cut very short, since the ends of medium length do not cling to the guide rings. Leave 20 mm ends to tighten the loose knot.
Fishing tackle with a sliding float is mounted in the following order:
Types of stoppers
Float fishing is the most common and popular method of fishing.
Traditionally, a fishing rod with a float can be used to catch predatory and peaceful fish. It all depends on the place of hunting, the practice of the fisherman and, most importantly, on the correctly assembled equipment.
Stoppers on the fishing rod help to hold the buoy during casting and at the same time limit the immersion of the equipment to depth. When securing the buoy to the fishing line, fasteners are attached to allow it to slide. The stopper on the fishing line must correctly set the fishing depth, not come loose and sit securely.
- silicone stopper – perfect for match fishing, bright colors and various shapes, has good elasticity and density. The clamps can be double or triple. This type of limiter is easy to use and can be easily mounted on a fishing line. Disadvantage: frequent slippage;
- thread clamp – made of wound thread, easy to install, secured with grooves. The industrial version consists of a set of pins and beads that inhibit slipping. The disadvantage of this type is the frequent tightening of knots;
- cambrics are rubber or silicone tubes with which the fishing line is attached to the keel of the float. The bright acid colors of the cambrics serve as artificial bait and provide additional fixation of the knots that hold the hooks. The rubber clamp secures the float well to the fishing line and is convenient when fishing from a boat.
- Stopper knots are limiters knitted according to the principle of line to line. The best material for knitting them is wool or monofilament thread. According to the advice of professionals, knots should be knitted in double quantities, this way the resulting mechanism is better fixed;
- bead – a limiter made of rubber. Its task is to protect components from mechanical influences. The retainer is easy to put on, is clearly visible, and glides perfectly. This durable and reliable piece of gear is worn, especially for carp hunting. The regularity of its tightening depends on how the bead is installed.
Why homemade stoppers?
Learning how to independently tie a stop knot on a fishing line is more a necessity than a fashion statement. After all, these skills give the fisherman a number of significant advantages, even over the possibility of constantly using purchased devices. Having mastered the skill of knitting a stopper knot from wool thread, you can install the retainer already on the assembled equipment, which is impossible to do with a purchased stopper, because it is mounted directly when completing the installation at the very beginning of assembling the equipment.
Knots made of soft material absorb the impacts of heavy sliding floats when casting equipment and have the least impact on the passage of fishing line through a number of rod guides, without creating obstacles in the feeding range of the rig. Filament fasteners do not require additional investment in the purchase of a device, and the ability to quickly and efficiently tie an effective limiter will be useful not only for assembling equipment with sliding floats, but also in feeder and also in spinning fishing, where specific and narrowly targeted installation is not possible without such devices.
Sliding float for long casting - practical recommendations
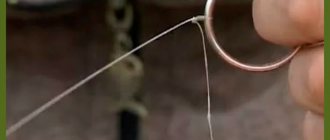
You should remember certain features of fishing with a sliding float. For example, it is sometimes attached through a ring on a fishing line or connected using a swivel. In the first case, the main line may overlap with the hooks, and in the other, the type of installation to some extent prevents this phenomenon.
- Float selection ↓
- Main components of equipment when using a sliding float ↓
- 1. Sinkers ↓
- 2. Fishing line ↓
- 3. Swivels ↓
- 4. Motoviltsa ↓
- 5. Other components ↓
- Installation of equipment ↓
- Gear collection in general ↓
- Technique of use ↓
- Float mount ↓
- Quick tips ↓
Then, it should not be lowered close to the hooks while casting. This can lead to overlap of the line, after which the cast will be unsuccessful and again you will have to deal with the resulting “beard”. To avoid adverse consequences, it is necessary to place a limiting clamp on top of the upper sinker (approximately 20 cm) to prevent the float from approaching the hooks.
Advantages:
- The loaded float makes it possible to place a small weight on the leash, so that the fish will not feel it when biting.
- It can be thrown under the edge of the reeds, since some types of fish (crucian carp, tench) prefer to be there.
- The ability to cast further and more accurately, since the thrown tackle has one center of gravity;
- Less susceptible to wind drift, risk of drowning the fishing line;
- Possibility of changing the float and loading in one motion;
- Greater sensitivity (unless you take a plug, of course)
- If you attach a large weight, it will be able to hold the bait quite firmly near the bottom.
Flaws:
- It is impossible to catch “hold” because the float begins to sink.
- During windy weather, accuracy and casting range decrease.
- The loaded float makes it possible to place a small weight on the leash, so that the fish will not feel it when biting.
- It can be thrown under the edge of the reeds, since some types of fish (crucian carp, tench) prefer to be there.
- The ability to cast further and more accurately, since the thrown tackle has one center of gravity;
- Less susceptible to wind drift, risk of drowning the fishing line;
- Possibility of changing the float and loading in one motion;
- Greater sensitivity (unless you take a plug, of course)
- If you attach a large weight, it will be able to hold the bait quite firmly near the bottom.
We knit stopper knots
When tying knots be sure to wet the line so that when tightening it does not burn out from the frictional force of tension.
There are several types of tying stopper knots for a sliding float. Let's look at the 2 simplest ones:
When tying knots
be sure to wet the line so that when tightening it does not burn out from the frictional force of tension.
What should the stopper be like?
A properly connected float stopper meets some of the requirements necessary to carry out the fixing function intended for the device. Once installed on the fishing line, the knot should be movable, but for this the angler will need effort to move it. These forces will be higher than the forces exerted on the device by the float, which in no way should independently move the stopper. There is no doubt that the knot cannot have the ability to self-unbind, so only impeccable adherence to the binding technology can guarantee the final result, which requires high reliability.
The knot on the main line is formed into a compact and even thickening, only these tying conditions will ensure the unhindered slipping of the device through the small-diameter guide rings of the match rod. The locking knot will also be informative. A noticeable latch gives the angler clarity in determining the depth of the bait. An important factor is the formation of a locking tie after the final clamping, which does not deform the main line.
How they work
As a rule, rigs with sliding floats include a pair of stoppers. The first of them is installed on the main line in front of the float. The second clamp is mounted behind the signaling device, almost right next to the sinker. It prevents the heavy float from coming into contact with the load, which occurs as a result of casting the rig on the backswing and during the flight of the equipment. When casting, the float moves toward the end of installation, and the stopper prevents tangling of equipment elements, stabilizing the position of the alarm, thereby increasing the aerodynamics and flight qualities of the equipment.
The upper stopper comes into operation after splashdown of the installation, which entails immediate, under its own weight, deepening of the load with bait. The stopper on the fishing line will stop the float rising upward along the thread at the mark required by the fishing conditions and will reliably hold the installation in the required water horizon. To change the horizon of setting the equipment or the depth of the bait, the angler needs to move the limiter along the line in one direction or another and calmly continue fishing.
Types of fishing and fastening
The range of gear in which this element of equipment can be used is quite wide, for example, for a feeder or a sliding float.
Feeder equipment
To detect gentle and weak bites, you need equipment of a very sensitive design. One of the most unpleasant moments in the feeder is when you pull out a sucked bait, the fish eats the bait, and you don’t even notice. This is especially noticeable when fishing with a feeder in the current using heavy feeders.
To detect such bites, feeder equipment was invented using an elastic band as a shock absorber. Plug rubber is used, since it is commercially available and you can choose different diameters. The diameter is selected according to the strength of the current; a stronger current means a larger diameter.
A stopper is used to limit the stretching of the rubber. The elastic should stretch at the bottom until it stops. For example, a cambric can serve as a stopper.
The elastic band is passed through a cambric (stopper) and tied to an anti-twist located on the fishing line. The length of the cambric is 1 cm, the diameter is equal to the diameter of the anti-twist. The elastic band can be tied with any knot or loop.
Sliding float
This is the most common equipment for a float fishing rod - a match rod, a plug rod, or a Bolognese fishing rod.
The fisherman’s task is to select the equipment in such a way that the fish does not get scared, but calmly approaches and takes the bait.
The carrying capacity of the float affects the weight of the sinker. To balance the float and at the same time make the tackle as inconspicuous as possible, they place not one large, but several delicate weights, separating them with stoppers.
By changing the location of the sinker, you can change the loading pattern in order to withstand the wind or wave, which constantly displaces the hook from a given point; such displacements occur through the movement of the stopper.
It is possible to stop the float using a lead pellet pressed around the fishing line, but in this case there is a high probability of damaging the fishing line.
What is required from a stopper in a sliding float rig:
- Fix the float.
- It is good to pass through the rod guides.
- Fit tightly to the fishing line, do not fall off arbitrarily, but at the same time have the ability to move when changing the equipment pattern.
Depreciation
By installing a stopper on the line in front of the swivel or leader, you increase the strength of the equipment. After all, a heavy sliding load will certainly damage the knot with which the leash or swivel is tied.
Three types of locking units that are simple and reliable
The stopper on the fishing line can be installed in different ways, and each angler has the right to independently make a decision on the method of forming a knot or installing a retainer based on his experience and practical skills. We would like to offer optimal options for locking units, which are characterized by ease of formation, but at the same time, reliable clamping and high performance. The practice of using these particular technologies has already proven the low influence of knots on the ability of lines to deform, and the miniature nature of the knitting has a small effect on the range of even light rigs.
After a couple of simple training sessions, the tying pattern is quickly memorized and the formation of a knot can be carried out not only at home, but also directly during fishing trips without much time. If the clinch knot is widespread among fishermen, and many know how to knit using this technique, then the Kremkus and Dunken knots are less known to fishing enthusiasts. Next, we will present to the reader’s attention easy-to-understand algorithms for forming the stopper nodes presented above.
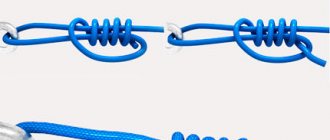
Clinch
The clinch is the most popular and easiest to produce locking knot. To knit it, you will need a piece of wool thread 30 cm long. We fold a thirty-centimeter piece in such a way that one end of the thread is 5-7 cm longer than the other. We apply the folded piece to the main fishing line, where you need to form a stopper. We make 5-7 turns with the long end of the thread, going around the piece of fishing line and the thread attached to it in a spiral. After winding the spiral, we pull the tip of the thread into the formed loop and begin to tighten the winding. Before tightening, we wet the materials, preventing burnout and minimizing the resulting friction. We perform self-tightening with uniform efforts, not allowing the coils to overlap each other.
Important! The final clamping force should allow the twist to move along the line with little effort.
We cut the remaining ends of the thread to a length of at least 2 cm. Shorter tendrils make the knot rigid, hitting the rings hard when casting. The 2 cm tips increase the elasticity of the knot, and when it relaxes, they allow the stopper to be tightened to the optimal density for moving along the fishing line.
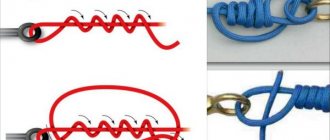
Kremkus
Tying a kremkus locking knot is even easier than tying a clinch knot. But it is worth noting that the volume of kremkus is much larger than other types of locking knots, since it is knitted from double wool thread. The knitting algorithm begins with preparing a piece of woolen thread suitable for the retainer, 35 cm long.
The segment is folded exactly in half, after which, stepping back 6-7 cm from the forked end of the folded material, they begin to wrap the main fishing line with woolen thread. Wrapping is done in wide turns, making 3-4 full turns. After turns, the thread wound at both ends onto the warp should leave 6-7 cm of free, double-folded wool. We twist the remaining ends together 3-4 times and pull them into a regular knot. After wetting the twist, gently pinch the knot and trim off the excess material, leaving the ends of the thread at 2 cm.
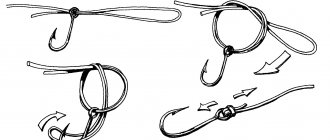
Duncan
Duncan is a practical knot that is distinguished by a high degree of reliability of tightening and is almost never subject to loosening. To tie a danken knot you only need 20 cm of wool thread. The method of tying a knot is not particularly sophisticated. We apply a woolen piece of thread to a nylon fishing line, holding the point of contact with our fingers, leaving a free tail of 4-5 cm in length. Next, from the long tail, bringing it behind the fishing line, we make a large loop. Press the resulting loop tightly with your fingers to the main fishing line. We wrap the fishing line with the long tip of a woolen thread, pulling the tip into the loop. Before tightening the twist, you will need to make 4-5 such turns, forming the body of the knot. Before final tightening, we wet both threads and apply a clamping force that allows the knot to slide along the line under tension. We cut off the excess ends, as in previous cases, to 2 cm. A miniature and soft knot is suitable both for fixing the movement of a sliding float and as a limiter for the movement of loads spread along the fishing line.
Features of using locking units
Attaching the float to the fishing line
A stop knot on the main line is one of the simplest, most reliable and convenient options for limiting the movement of the float along the line. The knot does not require the purchase of any additional accessories or elements of tackle; it is quickly knitted from a piece of fishing line of the same diameter as the main one.
The sequence of performing one of the most popular knots among anglers, the “clinch,” looks something like this:
- A loop made of fishing line of the same diameter must be attached to the main fishing line, with one end of the loop being slightly shorter than the other.
- The loop is applied to the main line with the shorter end. And then they make 5-6 turns with the longer end of the loop, capturing both the short end and the main line.
- After all the turns have been completed, the end is passed through the formed loop, the knot is tightened, having previously been moistened with water.
- The excess fishing line is cut off, leaving a few centimeters so that, if necessary, during the fishing process the knot can be tightened.
One of the easiest locking knots to perform and master for float fishing. If necessary, having a needle with you (and they are often built into extractors), such a knot can be quickly untied without damaging the main line.
Important! One of the most important features of stopper knots, compared to other options - silicone stoppers, beads and the like - is that the knot easily passes through the guides without damaging them when casting.
There are, however, other, quite often used as locking, knots that may be more durable, but be a little more difficult to knit:
- "Improved". It is knitted using a needle - a piece of stop fishing line is applied to the main line along with the needle, 5-6 turns are made with the end of the fishing line, after which it is threaded into the eye of the needle and the knot is tightened, having previously been moistened with water.
- "Cremkus". A double knot is quite simple and quick to learn. A double-folded piece of fishing line is wrapped around the main one, a loop is formed and 3-4 turns are made inside it. After this, the knot can be moistened and tightened. The ends are cut off, leaving about 2 centimeters.
- "Duncan." Some fishermen consider this knot one of the most practical. A loop is made from a piece of fishing line, which must be attached to the main fishing line at the intersection of the ends. One of the ends should be passed under the fishing line and threaded through the loop 4-5 times so that the lower part of the loop is held by 4-5 turns. The knot is wetted and then tightened.
The Kremkus knot is knitted quite simply, however, due to the fact that it is double, it turns out to be large and passes through the rod guides somewhat worse.
How to put ready-made stoppers on a fishing line
Some fishermen, in order to save precious time on reservoirs, knit stopper knots at home, preparing in advance a supply of restrictive devices for future fishing trips. Thus, not only do you need to be able to tie a knot correctly, you should know how to integrate a ready-made fastener into the assembly being assembled.
For these purposes, a simple and quite accessible device is used, the role of which is suitable for a hollow plastic tube from an ordinary sweet candy or an empty refill from a ballpoint pen. The required number of knots are tied onto the tube and taken with you fishing. During the process of assembling the equipment, the main cord is threaded through the tube and the finished knot is pulled together, tightly clamping it to the fishing line.