One of the significant disadvantages of transom wheels is their relatively high cost. Not every fishing enthusiast is ready to shell out 4-5 thousand rubles to buy a device that only allows you to transport a boat, for example, from a car to a body of water. For this reason, many are interested in the possibility of making a device with their own hands.
Unfortunately, among the huge amount of information presented on the Internet, more than half is devoted specifically to the installation procedure, even if the topic includes making homemade wheels. As a result, the boat owner is offered to buy ready-made components, the cost of which is unlikely to be less than the cost of a ready-made kit.
We are interested in homemade products and the stages of its production from the very beginning. The only exception would be the wheels themselves, because you can’t do without buying ready-made elements. Everything else is not only doable, but also quite elementary.
Main types
This issue needs to be raised, since all devices are different from each other, and when designing a drawing, these differences will have to be taken into account. Traditionally, there are four types of transom wheels. They are determined depending on the characteristics of the mounting flange.
- The reversible wheels can be moved to two positions. In the first position, they ensure transportation of the boat on land, and in the second position, they rise up and do not interfere with the movement of the boat through the water.
- Quick-release wheels are mounted on the transom in only one position. When they are not needed, they are unfastened using a special mechanism.
- Wheels with clamps are popular because they do not require any complex devices or devices for fastening. The wheel stands are attached to the transom with clamps.
- Wheels with studs can be called a special case of quick-release devices, since installation and dismantling comes down to a couple of simple steps to fix the cotter pin.
The presented classification is not enough to immediately start making a device for transportation, so let’s look at some more differences between different types of wheels. First of all, they differ in the size of the stand. Typically, this parameter refers to the distance from the mounting to the flange to the wheel axle. The entire rack geometry is selected based on several fundamental conditions:
- The minimum distance from the bottom of the flange to the bottom edge of the transom is 5 mm.
- The minimum distance between the wheel and the bottom of the boat is 20 mm.
- In the case of making changeover wheels, the latter should fold freely and not cling to the elements of the boat's skin.
Another important point is the choice of the shape of the rack, so transom wheels for payol boats are unlikely to fit LPND (low-pressure inflatable bottom) boats. In the latter, the bottom protrudes beyond the plane of the transom, so it will be impossible to install straight wheel stands. For such boats, the racks have a bend, the magnitude of which is calculated based on the parameters of the model.
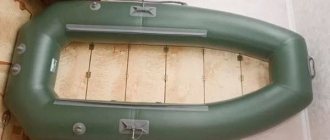
Do-it-yourself installation of transom wheels on a PVC boat
Modern fishing cannot do without high-quality watercraft. But to simplify the task of transporting a PVC boat loaded with fishing tackle and equipment to a specific body of water, fishing equipment manufacturers offer a wide range of transom wheels.
If you have the desire and opportunity, you can make wheels for moving the vessel yourself at home. It is especially important to have transom wheels when fishing alone.
Transom wheels for PVC boats are transport chassis, for fastening of which brackets (2 pcs.) are used. It is the brackets that bring the wheels into working condition (up and down).
This functional accessory allows one person to freely move along the shore, launch and unload an inflated boat from the water onto land. The convenience of transom wheels is that there is no need to remove them after the watercraft splashes down; just lift them up and you can sail.
When installing the chassis, special attention should be paid to the placement of the brackets on the transom , since the running characteristics on the shore, as well as the turning ability of the motor when operating the boat, will depend on this.
Materials and equipment
Before you have decided on the drawings, you can make an approximate list of materials and equipment that will be required for the manufacture of boat wheels. Wheels will have to be purchased ready-made. It is advisable to pay attention to copies with a camera. They will provide greater stability and smooth transportation.
Pay attention to the presence of bearings, or rather, their absence. Since the boat will have to be launched by pushing it into a pond, the bearings will quickly fail.
There are special bearings with a reinforced housing, but they are installed on boat trailers. Considering the fact that a boat on transom wheels will move short distances, bushings rather than bearings are quite suitable.
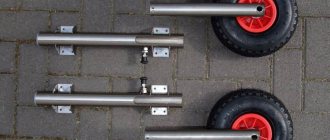
The wheel stand is made of a pipe with a diameter of 25 mm and a wall thickness of 2.5 mm or a metal profile 25x25 mm. Preference should be given to materials made of stainless steel, galvanized or with anti-corrosion coating. If the stand is made of a pipe, then you can make a bend by preheating it with a burner. This procedure will not work with a profile, so you will have to cut it into pieces and then weld it to the desired geometry.
Attaching a wheel to a rack is not as difficult as it might seem at first glance. There may be several solutions here, and each master has room for experimentation. It is necessary to make cuts 4 cm long in the walls of the pipe on diametrically opposite sides. A plate of appropriate thickness is inserted into them, which will protrude from the end of the pipe by 15 - 20 mm. At the cut points, the plate is welded to the pipe.
The result will be a platform for the future wheel axle, which will be a regular bolt. The diameter of this bolt depends on the inner diameter of the wheel hub. When using the profile, you won’t have to invent such inventions. You can weld the bolt to the side wall of the profile.
To secure the wheel, you may need washers, nuts of the appropriate size, or cotter pins. The mounting method will be written about later. The flange will be made from a piece of U-shaped profile. You will also need bolts or cotter pins to secure the posts to the flange. You should also remember about attaching the flange to the transom and you need to purchase the appropriate fittings.
Why use it
Fishermen who use inflatable boats without boat wheels know how difficult it is (even with two people) to move the equipped vessel from the car to the water. The reason for this is the total weight:
- inflated PVC boat - about 50 kg;
- motor - about 35 kg;
- anchor - at least 10 kg;
- oars, transom and additional equipment - approximately 40 kg.
Read: Fishing for pike with a spinning rod
You can also add here the weight of the canister with stored fuel, which is about 25 kilograms. In total, the boat ready for launching weighs at least 160 kg.
The wider the wheels, the more maneuverability they can provide. Important! Transporting a watercraft by dragging is dangerous, as there is a risk of damaging the bottom from stones, glass and other objects that may be on the shore. Obviously, the presence of wheels can solve the issue of launching.
On clamps
The fact that you can install transom wheels on a PVC boat or rubber inflatable boat using clamps makes it possible to manufacture devices in a fairly simple way that are no different in functionality and reliability from factory ones. Wheel stands on clamps are mostly straight, so they can only be installed on deck boats. It would seem that the racks can be made with a bend and wheels can be adapted for an NDND boat, but this type of device has a platform on which the boat rests with its bottom. Naturally, the protruding bottom of the ND will not allow this.
The material for the rack should be a stainless steel profile. All your skill will have to be directed to attaching the axle for the wheel. It is more preferable to use a bolt for these purposes, since it is convenient to scald it along the edges of the bolt head. The finished thread will allow you to secure the wheels by screwing on the nut and locknut, but there are solutions with a cotter pin. A wheel is put on the bolt, then a washer is installed. A hole is drilled for the cotter pin, and the remaining part of the bolt is cut off with a grinder.
Advantages of homemade wheels
Today on sale are various quick-release, folding wheels for PVC boats, as well as other types of designs. They are made of materials that are not subject to corrosion. If the wheels are made of metal, the surface must be treated with special compounds. The presence of defects on the material indicates low quality of the product.
Read The best oscillating lures for pike and techniques for catching predators
The cost of purchased structures for transporting a boat can reach 10 thousand rubles. Not every fisherman can allocate a similar amount of money from the family budget to purchase wheels. Homemade structures cost about 2 thousand rubles.
These wheels are ideal for a PVC boat. When creating them, you can take into account the configuration and features of the vessel. In this case, you can create a stable, durable structure. It will serve its owner for many years. Wheels can be purchased at specialized stores. But you can make the frame and supports yourself.
Reversible
Our goal is to produce wheels that fit on PVC boats, regardless of the type of bottom. Their functionality should allow you to quickly prepare the boat for transportation. Let us immediately note that the method of attaching the wheel to the rack does not depend on the type of flanges, so you can use the tips given above. As an alternative, we will offer another method.
The drawing shows the wheel mount. The role of the axis is performed by a bushing welded into the rack. The result is an almost finished device.
Please note that the bending of the rack is ensured by connecting the profile at an angle. The welding site is carefully processed, so the seam is practically invisible. It remains to think through the design of the changeover device. In the simplest design, which requires the least cost, the tops of the racks look like this.
The flange is made from a U-shaped profile. It is equipped with a pin, so the stand is securely engaged in any position.
In this design, you will also have to drill holes for the bolts, because the flange must be attached to the transom of the boat. In general, you can rewrite the algorithm for installing transom wheels again and in order.
- It is most convenient to work when the spoon lies bottom up.
- The finished rack is tried on the transom. It is necessary to ensure that there is a gap between the wheel and the boat cylinder. The gap between the tire and the bottom should be about 4 cm so that dirt stuck to the wheel does not interfere with transportation.
- With the parameters set, it is necessary to spread the wheels to the maximum possible distance, thereby increasing the stability of the boat.
- In the designated places, drill the transom with a 3 mm drill, and then with an 8 mm drill. The drill should be held perpendicular to the plane of the transom.
- Install racks.
Manufacturing process
Making transom chassis at home is not difficult. Every self-respecting man probably has everything he might need in his garage.
There are a lot of well-known, simple ways to place transom wheels on a boat, both with fasteners and those that do not require traditional fastening.
One of the easiest ways and quite quick in time is to install transom structures on a small boat, on the rear on balloon handles.
To do this, you will need a plastic barrel, from which two main elements 20 cm wide will be cut.
Special ties are cut along the edges of the barrel, which will act as the basis for fasteners. And the chassis itself will be installed in the middle of each part on four stainless steel bolts. All holes must be filled with silicone as a sealant.
Of course, every fisherman has his own methods for improving the boat; for this, you may need various additional parts installed yourself, which will significantly save effort, time and money.
There is also an excellent option for installing transom chassis on special stainless steel brackets. It is the most practical and simple of all known and inexpensive.
So, to make transom wheels with your own hands you will need:
- square pipe 25*25*2 – 1.2 m;
- round pipe 20 mm, external Ǿ 17 mm and internal Ǿ – 0.5 m;
- round pipe 23 mm (outer dia.) 20.5 mm (inner dia.) – 0.05 m;
- rod Ǿ 16 – 18 cm;
- Washers Ǿ 20 – 4 pcs.;
- Washers for M10 bolt – 8 pcs.;
- Bolt with nut M10 – 4 pcs.;
- Cotter pins Ǿ 4 – 2 pcs.;
- Electrode 3.2 – 2 pcs. for the manufacture of knitting needles;
- Furniture plug 25*25 – 2 pcs.;
- Wheels 26*85 with needle bearings – 2 pcs.;
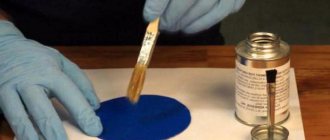
- Special primer for metal structures;
- Special enamel;
- Transparent silicone;
- Drill Ǿ 20;
- Drill Ǿ 4;
- Grinding wheel;
- cutting circle;
- brush.
So, having prepared everything you need in advance, you can safely move on to making transom wheels. Initially, you need to prepare the wheel itself, for example, from ordinary wheels from a children's bicycle or purchase ready-made ones.
From the prepared pipes, make the base of the bracket according to the drawing.
Some joints will need to be welded, since there will be a large load on the frame and the threaded connection may not withstand it. For welding work, it is better to invite a specialist who has specialized equipment in his arsenal.
It is best to order special rotating pins on which the wheels will be mounted from a turner, who will perform the work in accordance with GOST with tolerances and appropriate fits for the hole.
Read How to make winter fishing rods for trolling
In the finished structure, drill holes for future fasteners and clean them with a file.
After the frame is ready, at the last moment it is necessary to install the fingers and put the wheels on them. This way the transom wheels will be ready for installation. This kind of work takes little time, but the savings are enormous!
Quick release
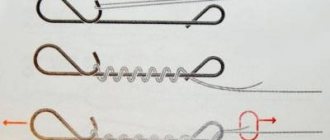
The idea of creating quick-release wheels is based on a special flange mechanism, which allows you to quickly unfasten the racks or fasten them if necessary. The most convenient option is a spring mechanism. At first glance, it may seem that it is impossible to make such a device with your own hands, but if desired, the mechanism is somewhat simplified and becomes accessible for design.
First of all, let us note one detail in each type of folding unit - there is a movable pin, which is a kind of latch that holds the stand in the mount (flange). The spring-loaded movable pin is manufactured according to several scenarios. We will give just one example.
A cutout is drilled in the rack, with a thickness equal to the diameter of the pin and a length of 25 mm. The pin itself should have a length equal to the diameter of the pipe from which the stand is made, plus it protrudes 5-6 mm on each side. A groove must be made in the middle of the pin. This location will be hidden inside the rack. The spring will be hooked onto the groove. The second end of the spring is fixed in the desired location of the rack with a screw, for which the thread is pre-cut.
To make a flange, you can use a U-shaped profile or a metal blank 3 mm thick. Recesses for pins - clamps are cut out with a grinder and then processed mechanically. The fixed retainer is made in the form of a pin, which is inserted into the hole and welded in a circle. It is important to remove excess slag and align the seam so that the pin projections fit freely into the flange recesses.
Useful tips
Surely the reader has noticed that we are not trying to present a unified and undeniable theory, giving the novice master the opportunity to show his imagination. Indeed, there cannot be a single assembly scheme for transom wheels. As an example, we will give two options for manufacturing racks for the NDND boat. A distinctive feature is the presence of a protrusion of the bottom, so it will not be possible to use straight racks, since they will rest against the bottom chamber.
- In the first case, you can use a stand bent at an angle of 120 degrees. It is attached to the transom and first runs parallel to its plane. The knee of the rack is just in front of the protrusion of the bottom, and the rack itself is bent so that the wheels are shifted slightly back.
- The second option uses 0-45 flanges, which initially fix the posts at an angle of 45 degrees to the plane of the transom. The rack first goes back a little, going around the ledge, and then bends towards the stern. Thus, the wheels are “hidden” under the boat.
The first option of transport wheels is preferable to use if you move the craft bow forward, and the second option - stern forward. However, there are no strict requirements for the shape of the stand.
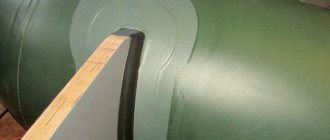
In all cases, except for the use of clamps, you will have to drill the transom. Moisture getting into the holes will cause the plywood to swell quickly. To prevent this from happening, sealant must be filled into the holes. Naturally, such a connection does not involve permanent installation and dismantling of flanges. That is why the procedure for removing wheels or rearranging them should be convenient and easy.
The manufacture of flanges and stands is associated with such popular works as metal cutting and welding. It is recommended to process each part with a file, remove burrs, knock down slag, and chamfer. If you ignore this advice, you may get injured or damage the material of the boat.
All manipulations are carried out slowly. The main thing to remember is the basic rule about sevenfold changes. If in some sources you find a project that is more successful in your opinion, do not be lazy to read the author’s reviews after the tests. Please note that not a single calculation of forces was given here, and yet for factory production this is an integral procedure.