Boat inspection
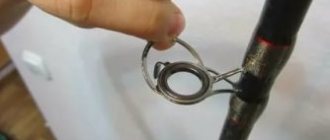
A visual inspection of the structure may not reveal any external signs. Bleeding of air indicates the need to coat the filled compartments with foaming detergent. A sponge will work well for this. The area that allows air to pass through can be easily identified by the presence of bubbles. To mark it, use a regular pen or marker.
Repairing a rubber boat starts with the valves. If there is a leak, a mark is made and the gasket is replaced. The flow of liquid into the cockpit of a swimming device without bleeding the air on the sides causes problems in the area where the elements are attached. The damaged area can be easily found by carefully checking the bottom and its joints with vertical structures. The entire surface of the bottom and seams is subject to inspection, which makes it possible to find a number of violations:
- scuffing;
- worn;
- detachments of regulators and press elements.
After inspecting the entire structure, you can begin repairing the rubber boat. Among the main methods for restoring rubber boats, 2 methods are widely used:
- Cold.
- Hot.
Features of the material and storage conditions of fishing boats
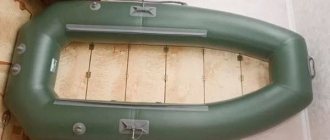
What is the best way to store a PVC boat? It would seem that there should not be any difficulties or problems here, since unlike inflatable boats made of rubberized fabric, which rot and rot, PVC boats are much more durable and impervious to moisture in a warm atmosphere and tight twisting, which literally kills rubber boats.
This is achieved by using more modern materials in the technological process, from which PVC boats are made, where the main role is given to polyvinyl chloride, polyurethane and hypalon. These are, as they say, unkillable materials that not even every bullet hits. But even such seemingly eternal boats have weak points that cannot withstand the manifestations of an aggressive external environment. And this is, first of all, mechanical damage from impacts on sharp stones, when the boat is thrown onto a rocky shallow at speed, as well as collisions with sharp knots of floating logs and snags. Sometimes the cause of boat damage is driftwood standing on the bottom in a vertical position. It happens that on such driftwood there are sharp shells and nails that were once driven into the logs.
Caring for a PVC boat is also necessary because no matter how durable the boat is, it will quickly lose its attractive appearance from prolonged direct exposure to ultraviolet rays, that is, from the scorching sun. And this happens when a boat lies abandoned for a long time on the shore right under the rays of the midday star. First of all, the material itself will burn out, and at the first stage only the pigment will discolor, but then the polymer base composition of the PVC material will begin to change. “Well, let it be, should we admire the boat and not fish?” - some careless owner of a small boat will say. There is some truth in this. The boat is a workhorse. But a real owner will take care of his horse so that it serves faithfully for a long time. In addition, most fishermen prefer to be in a clean and beautiful boat, calling it “swallow” and other affectionate epithets.
Storing a PVC boat in winter is a topic of special discussion. We will return to it later. But in both summer and winter, a number of other factors also often have a critical impact on the material of the boat. And these are scratches, which often turn after some time into real wounds on the body of the boat, as well as oil stains and the use of solvents to destroy them on the sides of the boat. Additionally, the wrong detergent that is incompatible with the material that that particular boat is made of can be critical. The harmful effects of high temperatures, which most often occur in hot summers, can kill a boat at other times of the year if you forget how to properly store a PVC boat in winter, by leaning it against a central heating radiator or placing it nearby. The other extreme is storing a PVC boat in a garage where there is no heating. In regions with low average winter temperatures, such garages often freeze to the bone, and it is often colder inside than outside. Although PVC boats are more resistant to low temperatures than rubber boats, frost can begin to degrade the material and cause its structure to crack.
PVC boats have not only conventional enemies, but the most living and active ones. These are various rodents, among which mice are the most dirty and active, which can gnaw on completely inedible things just to gnaw... More intelligent and pragmatic rats commit such sabotage less often, although they are also seen in these senseless acts of vandalism. They can very readily attack a rubber boat, which, for better preservation, has been sprinkled with starch for the winter.
Cold patch application method: preparation of materials
The technology is implemented under acceptable temperature conditions outdoors and indoors. In domestic conditions, a coating is prepared for repair work. It is important to ensure a smooth and clean surface that is periodically treated with a rag to remove stains from the adhesive solution.
Do-it-yourself repair of a rubber boat requires the preparation of materials:
- scissors;
- rolling roller;
- abrasive sandpaper;
- brush;
- glue and gasoline.
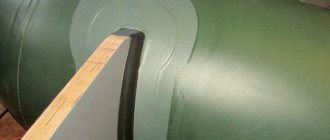
For minor damage to the side and bottom, round or oval patches are required. Longitudinal incisors are covered with similar-shaped overlays. The corners must be rounded, ensuring minimal risk of tearing off when using the swimming structure in action.
Features of applying the patch
Repair of rubber boats is carried out under conditions of covering the damaged area by 2.5–3 m in both directions. Great attention is paid to the selection of materials. The ideal option would be a product close to the spare parts or an analogue of a rubber surface.
In extended tear zones, thread stitching is provided. Increasing the level of adhesion with the adhesive composition and the surface of the inflatable boat can be easily achieved by sanding with coarse sandpaper. Treatment with a solvent (gasoline) helps clean the coating from accumulated dust, degrease and improve the level of swelling of the rubber lining. Before applying the patch, the products are dried.
If you plan to repair a rubber inflatable boat (seam) "Omega 2", the place where the patch is applied is treated with glue. Using a clean brush will provide a similar thin, even coat to the rubber coating of the patch. Its further storage is carried out in an airtight container. The adhesive composition of normal consistency is stirred until uncorking. The thick mass should be diluted with a solvent.
Glue processing stages
When repairing the Ufimka rubber boat with your own hands, it is important to choose the right glue. It is a modification included in the spare parts for the boat, or a rubber compound on a rubber base. Self-vulcanizing glue, which has high strength characteristics, is less commonly used.
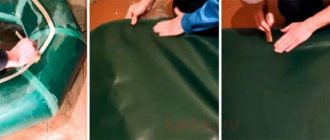
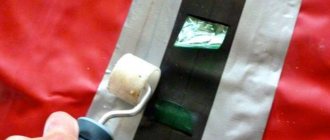
The first layer is coated. After 10-15 minutes, the absence of stickiness is checked and re-treatment with glue is carried out, without allowing it to dry completely. The patch is taken by the edges and placed on the area to be reconstructed.
Repair of a rubber boat along the seam is ensured by applying a protective layer to one side and then spreading it over the damaged area. It is allowed to apply the patch with the middle on the damaged surface, straightening it to both edges. A carelessly laid plate will cause a number of inconveniences; preliminary tests can be carried out on other products.
Reconstruction of a boat in the field
Outdoor renovations come with a number of requirements.
- On a warm, windless day, you can successfully sit in the shade, eliminating the formation of a film of glue in the sun.
- Cool and damp weather necessitates the need to find shelter (in a tent or hut).
- The presence of debris on the adhesive base is eliminated with a sliver or knife.
If a rubber boat is repaired in the field, clean water is used instead of gasoline for cleaning. This reduces the level of strength, as does scraping the coating with a knife instead of sandpaper. The best option would be a fully prepared repair kit with several pieces of rubber of different parameters. Pre-treatment with sandpaper will eliminate the loss of time when cutting out a patch that was previously packaged in a plastic bag.
The gap from the surface of oarlocks, end holders of the line or valve flanges allows you to use the cold method. Replacement of the canvas, fixation of partitions and prevention of further rupture are ensured across several compartments.
Brodyaga-02 › Blog › Self-repair and tuning of PVC boats (glue)
Any owner of a PVC boat sooner or later has a problem with repairs or tuning. And the main question is how and with what glue to do this or that work. I bring to your attention a selection of video instructions for almost all occasions.
Technician No. 2 Installing an anchor eye on a PVC boat
Technician No. 3. Tuning Set of reinforcements for the bottom of a PVC boat
Technician No. 4. Repair of the partition between cylinders in a PVC boat
Technician No. 5. Replacement, repair of drain valve on a PVC boat
Technician No. 6. How to properly peel off molded fittings from a PVC boat
Technician No. 10. How to repair a cut PVC boat
Video from Alex_Ural: Quick repair of PVC boat
Installing internal patches
Dismantling and restoration of the seam of a PVC boat
Useful video channel www.youtube.com/channel/UC9XoOPirXk0hFYRUZ7OCIzw An extremely useful topic on Russphishing. Of course, there is a lot of different information on the Internet, but in my opinion these are the best, most professional video tutorials.
Comments 12
Hello. Can you tell me: does dismacol need to be activated after 15-20 minutes? Is it possible to warm it up, say, in a day or two? Will he keep?
I don’t know. It’s unlikely that anyone performed such experiments. What for?
I want to make a large cheesecake, tomorrow at work I’ll start measuring/cutting, so here it is: you can’t just glue such a large area together, I think I’ll first spread it with glue, wait until it dries, then start stitching. When I sew, activate the glue, the seam itself will play the role of oppression (partly), sew another sling along the edge (for reinforcement), and glue under it too, followed by activation. I just thought: since it starts to “float” in the sun and then hardens again, maybe it will work here too?
I doubt the quality of the glue.
I am also tormented by doubts... I read it as a “liquid patch”, as I understand it - this is something like PVC melted by chemicals, which can be applied to PVC fabric (cut) and it will be welded, as it were. the chemical in this glue will slightly melt the base layer and evaporate and harden, forming, as it were, a monolith. This method seemed to me to be quite high quality, so another question arises: the material of the bun is not PVC, but something like reinforced rubber - a drill shelter, maybe you know what to seal it with? Maybe there is a more suitable glue for rubber?
Since this is not PVC, it means that the glue is different, rubber. But here I gave up.
Hot technique
Repairing rubber boats in special conditions is relevant when increasing the level of tightness at the junction of the sides and the lining of the partitions. Lag, movement or wrinkling of the on-board regulator requires special equipment. Under production conditions, a selection of adhesive compositions and rubber patches with a high level of compatibility with respect to rubber compositions is provided.
The imparting of hermetic properties at the junction of the sides is ensured by delamination of the joining unit using a solvent and a steel ruler, and the sealant is removed. The tape is cut at a distance of 1-1.5 cm from the extreme part of the regulator. Its replacement is accompanied by imparting abrasive properties and treating the new material with a solvent.
Repair of a rubber inflatable boat is ensured by applying a double layer of rubber glue. The joint assembly is assembled with an overlay of unvulcanized tape and a sealed compound. In the cut area of the regulator, a protective plate with a cross section of 5 cm is applied. Scuffs in the rubber lining are treated with a 0.4 mm layer of unvulcanized material. The formed knot is rolled with a metal roller. A film material is applied to the borders of the restored section of the sides to give a smooth surface.
A board with a porous rubber gasket is placed at the bottom of the segment. A metal plate and tile are placed on top. This is followed by fixation with clamps and vulcanization. It is important to observe the specifics of the technology: heating the tiles - 140 ± 5 ° C, mode - 30 minutes. Upon completion of the technology, the tile is turned off and cooled to a level of 80-90 °C. The clamps are released and the tile is removed. The quality of fixation is checked after 4 hours.
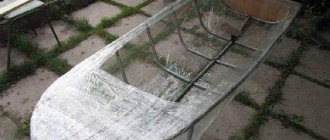
DIY rubber boat repair
The boat requires constant maintenance. Only in this case will it serve for a long time. Extending the life of an inflatable boat is not so difficult.
ANNUAL PREVENTION OF RUBBER BOAT
Every year, before launching, you should carry out a simple surface treatment with an adhesive solution. The solution consists of one part rubber cement No. 88 and two parts aviation gasoline. The components must be thoroughly mixed and applied in a thin layer to the rubber surface. In this way, microcracks through which air escapes unnoticed are sealed, the joining seams are strengthened, the old rubber absorbs the amount of liquid rubber it needs and becomes elastic.
It is advisable to carry out prophylaxis at least once a year.
REPAIR OF DAMAGE TO A RUBBER BOAT When operating inflatable boats made of rubberized fabrics, various damage to the bottom and sides is possible. Sometimes the place of damage is not visible outwardly, but the sides bleed air. In this case, the surfaces of the filled compartments of the boat are covered with soap foam, preferably using a sponge. The location of the air leak is determined by the bubbling of dusty foam and marked with a ballpoint pen so that you do not have to look for it after removing the soap foam. It is advisable to start searching for damage with the valves. If a leak is detected in one of the valves, it should be dismantled, cleaned, rinsed with clean water or the gaskets replaced. If water enters the cockpit of the boat, but the sides do not bleed air, it means that the bottom or the junction of the bottom and the side is damaged. In this case, the location of the damage is found by carefully examining the bottom and its connection to the sides. Moreover, it is necessary to examine the entire plane of the bottom and joints, since the boat may be damaged in several places, have burrs, abrasions, or peeling of sealing tapes or press parts. Only after the entire boat has been inspected can repairs begin. There are two main repair methods: cold and hot.
The most common is cold , which does not require special equipment or special skills and can easily be performed at normal temperatures both at home and in camping conditions. If the repair is carried out at home, then you should prepare the surface on which the boat is being repaired. It should be smooth and clean. During operation, it is recommended to periodically wipe it with a cloth to remove traces of dried glue. To carry out repairs, you must have scissors, a roller and a disk for rolling, sandpaper for stripping the rubber layer of the fabric, a brush for applying glue, glue and solvent. If a roller and disk are not available, you can use a suitable cylindrical object. Small punctures, scuffs, tears and other damage to the sides and bottom are repaired by applying round or oval patches to the damaged area. If the tear is oblong, then the patch should be shaped like a tear, but its corners must be rounded to minimize the possibility of them being torn off during operation of the inflatable boat, and the patch should cover the damaged area by 25-30 mm in each direction. It is recommended to use the material that is included in the spare parts, or identical to the one on which the patch is applied. If the patch is of a large area, it is necessary to ensure that the warp and weft (longitudinal and transverse threads of the fabric base) of the boat material and the patch match. Long sections of the tear are first stitched before gluing. To improve adhesion to the glue, the bonded surfaces are cleaned with coarse sandpaper, treated with a solvent (most often gasoline, ethyl acetate or mixtures thereof), which cleans the surfaces of dust formed during processing, degreases them and promotes swelling of the rubber lining. After treatment, the surfaces are thoroughly dried. You should no longer touch them with your hands, and if you need to take a patch, then take it by the edge. The glue is applied to both surfaces to be glued in a thin, even layer with a clean brush. Rubber glue is stored in a hermetically sealed jar. Before use, it is mixed, and if it is too thick, then it is diluted with a suitable solvent, otherwise the glue does not adhere well to the material and lays down in a thick, uneven layer. You can use the glue included in the spare parts for the boat, or rubber glue based on rubber, compatible with the rubber of the outer lining of the rubberized fabric. Sometimes repairs are made with self-vulcanizing rubber adhesive, which is stronger than regular rubber adhesive. The method of using this glue is the same as simple rubber glue.
YOU SHOULD KNOW In good weather, repairs should be carried out in the shade, since in the sun the glue applied to the surfaces to be glued quickly forms a film, which impairs its adhesive ability. In unfavorable weather conditions, such as rain or wind, repairs should be carried out in a weather-protected place, such as a tent, to protect the adhesive-coated surfaces to be bonded from moisture or debris. If a speck gets on the surface of the glue, it is best to remove it with the tip of a knife or wood chip.
10-15 minutes after applying the first layer, when the glue has dried, apply the second layer and allow it to dry so much that the knife blade barely sticks. You should not breathe on a surface coated with glue in order to accelerate the evaporation of the solvent, since moisture from breathing is deposited on the surface and significantly impairs the bonding strength. The patch is taken by the edges, without touching the surfaces to be glued, and applied to the damaged area exactly at the location of the damage, either by placing it with one edge and then directing it to the area to be repaired, or by placing the middle on the damage and spreading it in both directions. A carelessly placed patch worsens the quality of the repair and causes a lot of trouble, and it is very difficult to change its position. If there is still a need to remove the patch, then do it with a jerk. The applied patch is pressed well with your hand, smoothed from the middle to the edges and rolled with a roller. You need to make sure that there is no air bubble under the patch, and if one appears, you need to squeeze it out. Moreover, this must be done carefully so as not to stretch or wrinkle the surfaces. The outside of the patch is sprinkled with talcum powder to eliminate the possibility of other parts of the boat sticking to it. It is recommended to repair the boat at a temperature not lower than 15 °C. If there is no solvent, you can rinse the damaged area and the inner layer of the patch with clean water, and then dry them thoroughly. However, in this case, the adhesion strength is lower. If you don’t have sandpaper, you can clean the surfaces with a knife, but this should be done carefully so as not to pierce the rubberized fabric or touch the textile base. To facilitate repairs, it is recommended to take with you on a hike several pieces of treated rubberized fabric of various shapes and sizes, so that on the spot you can cut out a patch of the desired shape and size from them. These pieces of fabric should be packed in a plastic bag. When oarlocks, handrail washers, valve flanges and other rubber press parts become detached, repairs are also carried out using the cold method. Repairs that require replacing panels, gluing partitions, sealing tears that occur across two or more compartments, or delamination of seams, require sending the boat to specialized workshops, since such repairs can only be performed using self-vulcanizing adhesives and special equipment. It is not recommended for the owner of an inflatable boat to do it himself.
Hot repair is mainly used when the tightness of boats is broken at the place where the sides are joined and where the partitions are glued, or when peeling, displacement or wrinkles form on the tape (regulator) of the sides. Such repairs are carried out mainly in special workshops equipped with the appropriate equipment, and at manufacturing plants that have the capabilities to select adhesives and unvulcanized rubber plates from rubberized boat fabrics compatible with rubber.
For example, eliminating leaks in the Nyrok boat at the point where the sides are joined using a hot method is carried out as follows.
The docking unit is laminated using gasoline and a metal ruler, cleaned of sealant, the joining tape is cut at a distance of 10-15 mm from the edge of the regulator, the regulator is cut out, the laminated surfaces are roughened and washed with gasoline. Then coat it with glue twice, allowing each layer to dry. The joint assembly is assembled one by one, applying an unvulcanized regulator and sealant. A patch of unvulcanized fabric 50 mm wide is applied to the cut site of the joining tape. An unvulcanized plate 0.4 mm thick is applied to the scoring of the covering rubber. The assembled assembly is carefully rolled with a metal roller. To obtain a smooth surface, pieces of cellophane or lavsan film are applied to the boundaries of the repaired area of the boat's side. Then a board with sponge rubber is placed underneath the repaired area, a metal plate and a heating tile are placed on top, then all this is secured with clamps and vulcanization is performed in the following mode: tile temperature 135-145 ° C, time 30 minutes. At the end of the vulcanization process, the tile is turned off and allowed to cool to a temperature of 80-90 ° C, after which the clamps are loosened and the tile is removed. The boat is tested after repair no earlier than 4 hours later. Obviously, it is quite difficult to collect the necessary materials at home.
It seems interesting to carry out temporary repairs of inflatable boats using special aerosols based on synthetic rubber, which can seal the damaged shell from the inside. To do this, just attach a can of chemical vulcanizer to the boat valve and release a stream of aerosol there. After a couple of minutes, the aerosol will self-vulcanize and seal the boat for a while.
This post may contain affiliate links. This means I earn a small commission from links used at no additional cost to you. See my privacy policy for more information.
unique, content, article, fishing, homemade, fishing, repair, free