Bells on the feeder - types and methods of fastening
In some situations, a bell on the feeder is still used, although in the classic version it is customary to track the bite by vibrations of the quiver tip. During active tempo fishing there is no time to bother with bells. However, when fishing is slower, for example, when waiting for large fish or when fishing with flat rigs, many amateurs consider the use of such alarms to be advisable. Let's look at how to install the bell on the feeder correctly and what technical solutions to use for this.
Feeder alarms
In feeder fishing, many different bite alarms have been invented. These are a variety of pendulums, rattles, swingers, side nods, electronic signaling devices and, of course, bells or bells. Most often, all these solutions are used for targeted fishing for carp or carp, when the gear is installed for a long time. At the same time, the fisherman is engaged in some other business on the shore, and reacts to the activation of a sound or light detector. Read more in the article about feeder alarms.
This kind of fishing is highly specialized and more similar to carp fishing. For ordinary amateurs, all these bells and whistles are not needed, but sometimes an alarm is required, especially when bites are not frequent. In this case, the principle “the simpler the better” works. The main inconvenience of all these gadgets is installation problems. Additional structures appear on the gear, making it more difficult to work with. If this is justified in the waiting tactics, then in active fishing problems may arise - overlaps, entanglements, loss of time for installation. The vast majority of anglers use simple bells. If you need it, you put it in, if not, you take it away and you catch it using the quivertip. Let's look at how to place the bell on the feeder correctly so that it does not interfere with active work with the tackle.
Bells
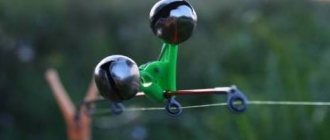
Finding the bells themselves is not a problem - there are plenty of them in all fishing stores for a penny price (unlike expensive special alarms). These are both ordinary sleeves with tongues, which used to be hung on hooks, and spherical bells with balls inside on a clothespin, attached directly to the fishing rod. You can hang a bell on the feeder on the rod itself, as well as on a stand for it.
Bells on a clothespin
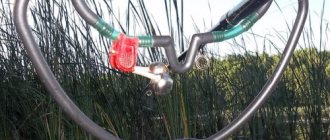
The most common option is ordinary bells on a clothespin for donks. You can hang the bell on the feeder directly behind the quivertip. You can find a variety of fastening designs in stores. In addition to clothespins, these can be various connectors, magnets or latches. The standard method of attaching rods with clothespins leads to the following problems:
- The bell flying off while working with tackle, especially when hooking.
- The bell may fly away during casting. Each time you have to remove it and install it after throwing it. This is inconvenient, especially on long rods.
- Constant snagging of any clothespins, and especially metal crocodile clips, on the quivertip leads to microdamage to this part of the rod, which will ultimately render the tip unusable.
- Some anglers simply don’t like too loud sounds and ringing when reeling in or retrieving gear. This violates the general silence and idyll on the pond.
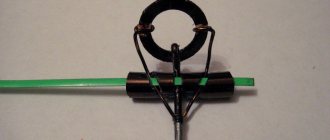
With axial fastening for quivertip
Problems with bells constantly flying off, taking off and putting on when casting are solved by another design - on a bar with axial grooves for snapping right on the tip of the rod. The bell for the feeder can be secured more firmly with this design. It can still fly out when casting. And fishermen easily solve this problem by wrapping the attachment point with a couple of turns of electrical tape. You can tear off a regular bell with a spring from a clothespin and tape it to the quivertype with electrical tape. However, such fastening of the bell to the feeder gives rise to another problem - an increase in the likelihood of the braid getting caught on this alarm when casting, which, when using heavy feeders, leads to the shooting of the braid or breakage of the quiver tip.
There remains an ethical drawback - a constant and loud ringing while working with the feeder. To get rid of the constant ringing that plagues everyone, some fishermen make structures using neodymium magnets. In them, the bell jingles when there is a bite, but with strong vibrations (reeling, casting) it sticks to the magnet and is silent. However, this design is also located on the rod itself and can lead to overlap.
Installation options
You can also install a clothespin with bells on the spinning rod as an effective alert.
There are two ways to hang a bell on a feeder rod: directly on the fishing rod or hung on a stand. It should be taken into account that when installed on a stand, the sensitivity of the bite response is significantly reduced, so it is better to stick it loosely into the ground. The fishing rod must be placed on the flyers close to the quiver tip. A plumb line with a weight suspended on a chain helps the fisherman notice a bite through the oscillating movements of the swing alarm and changing the degree of tension of the fishing line.
The standard method of attaching a clothespin to the rod tip can lead to some problems.
The bell flying off the fishing rod when hooking or actively using the tackle. An insecurely attached bell also irritates fishermen when it is necessary to quickly catch fish.
During the casting process, the bell may fly off into the water or into the bushes. Therefore, each time you need to remove it, and after throwing it back, install it again. This method is very inconvenient and impractical, especially for long rods.
Regular hooking of clothespins and metal crocodiles onto the quiver tip can lead to the formation of microdamages to this part of the feeder, which subsequently gradually disables the tip.
Not all fishermen like the loud sounds and bell ringing they make when fishing or reeling in fishing gear, which significantly disturbs the silence on the reservoir.
The feeder, as a rule, has increased sensitivity of the rod tip in contrast to bottom tackle. The flexible tip is used on feeder rods as a highly sensitive and high-speed signaling device due to a reliable plug connection to the blank. The twitching of the colored whips allows you to notice any touch of the fish to the bait being thrown.
When equipped with modern accessories, feeder alarms respond to the activation of a built-in light or sound bite detector. In the dark and in conditions of limited visibility, in order to visually notice a bite, you should choose a bell with a groove for fireflies. Factory-made fireflies contain a plastic capsule with an illuminated chemical liquid inside. Battery-powered devices are used as electric signaling devices that change the color of the indicator when bitten.
Problems of weak fastening are solved by installing a structure with axial grooves for snapping onto the tip of the feeder tackle, especially if the bell often falls off, or it has to be removed and put on every time after casting.
Installation on a stand
Experienced feederists argue that even if you use a bell, you need to hook it to the stand on which the feeder is installed. This immediately solves all the problems - there is no constant ringing when casting and retrieving, there is no need to farm anything on the rod itself, there is no need for constant installation and removal when casting. Installing the bell on the feeder by attaching it to a stand is the most correct option. However, there are pitfalls here too. A bell that is incorrectly attached to the stand may simply not respond to bites. The rod should be placed on the stand so that it lies on it in the upper third, almost at the quiver tip. In this case, the farthest (first) stand, closest to the tip, on which the bell is hung, should not be inserted tightly, but hingedly and have a slight movement to the right and left. Then, when biting, vibrations will be transmitted to the bell, and it will jingle.
A convenient option for an amateur is a swinger on a chain, without any electronic fillings (then it costs 100-200 rubles). It operates on the principle of a simple counterweight, like on the good old kiosks. This gadget is needed in cases of hatching rarely biting fish when fishing not with a quivertip, but with free reeling. For example, when fishing for carp or carp, especially with inline montages. Moreover, if the tackle is left for a long time, a large fish can simply pull the feeder into the water if the clutch is not loosened. The swinger is attached with a chain to the stand, and the heavy part is attached to the fishing line in the area of the first ring from the reel with special hinges. When jerked during hooking, it simply breaks off the braid and remains hanging on the stand. A bell is placed on the chain, and when the swinger twitches during a bite, the ringing will be heard from afar. This is useful when fishing with several gears installed at a distance from each other.
Improvement of the bite alarm “bell”
I heard the bell - hook up!
Using a metal bell as a bite alarm is not new.
This method is common, simple and accessible, especially among novice fishermen.
But factory models often suffer from flaws. The main inconvenience is that the factory holder can be difficult to remove from the line at the time of hooking.
The alarm remains in place, during the fishing process it rests against the upper ring of the rod, complicating the reeling of the tackle. You have to reset it by hand.
Using a short spinning rod for donkey, you can be distracted for a couple of seconds. When working with a long carp rod, it is difficult to reach the top and keep the rig with the fighting fish under control. Possible gathering.
Bottom tackle and its types
The oldest gear of mankind remains the most popular among fishing enthusiasts. The advantages of a bottom fishing rod are that fishing can be done from the shore, boat or other watercraft. The process is carried out using spinning rods, often without it.
The main advantages of a bottom fishing rod over other fishing devices are the ability to fish in quiet waters, lowland rivers, and reservoirs. Fishing works well over long distances and great depths. Bite control does not depend on waves or wind.
Like any device for catching fish, fishing with this gear is problematic in areas contaminated with snags and hard vegetation. It is not suitable for fishing fish that live in the upper layers. Not suitable for fishing in mountain rivers.
Devices for fishing in the bottom part come in a variety of types:
- A spinning rod is a simplified tackle for fishing from the shore and short distances. Such a fishing rod must be installed and secured to a peg on the shore, and the bite is determined by attaching a bell to the bottom.
- The device – “rubber band” – is a type of donkey used for fishing from a boat. The advantage of the “elastic band” is active deep fishing in baited areas.
- Bottom tackle - a feeder - is the most effective model for fishing. The feeder simultaneously serves as a sinker and equipment holder.
- The ring device is an option for catching river white fish such as bream, white bream, ram, and silver bream. The ring does not scare the prey and saves bait by covering the feeder. The made donka of this option is used when fishing from a boat or raft.
When choosing fishing locations - calm water or river currents, you should determine the type of bottom fishing rod. Having made a donk with your own hands, you can always modernize it to suit yourself.
After all, any fisherman has a specific type of fish for his favorite activity, so the tackle must be catchy.
Modification of the bite alarm holder
The problem is solved by replacing the retaining device. First you need to remove the entire factory cover from the bell.
Next, you need a piece of rubber hose with thin walls, about three centimeters in diameter. Cut an even ring approximately 1.5 cm wide.
Having examined the end of the workpiece, determine its geometry. The location of the incision depends on this.
If the cutting has the shape of a regular circle, then it can be cut at any point. If you have an oval in front of you, it is better to cut off one of the elongated sides. Then the top of the oval will become a natural hook for hanging on the rig.
At the very beginning, you should prepare a bolt that will fit freely into the ear of the alarm and a nut for fixation.
Having given the hose ring the shape of a hook, you need to make a hole in its long part for the bolt.
Assembling the “bell”
Having put the rubber on the bolt, you can string a piece of fishing line there, making a loop on it. Let the fishing line be at least a meter thick so that it does not get tangled. With its help, you will tie the bell to a guard, a rod or other support (stand) for the fishing rod.
This is done so that at the moment of hooking the alarm does not fly far. And it will fly off instantly. In addition, this leash will not allow the bell to slide down the working line into the water.
Following the loop of fishing line, the bolt enters the eye of the signaling device, and the entire structure is tightened with a nut.
For transportation, it is better to wrap the holding line around the holder.
Assembling the "bell"
Having put the rubber on the bolt, you can string a piece of fishing line there, making a loop on it. Let the fishing line be at least a meter thick so that it does not get tangled. With its help, you will tie the bell to a guard, a rod or other support (stand) for the fishing rod.
This is done so that at the moment of hooking the alarm does not fly far. And it will fly off instantly. In addition, this leash will not allow the bell to slide down the working line into the water.
Following the loop of fishing line, the bolt enters the eye of the signaling device, and the entire structure is tightened with a nut.
For transportation, it is better to wrap the holding line around the holder.
Parting words
This modification method is very simple and effective. The main thing is that the alarm works clearly and does not cause any trouble.
And one moment. Once a fishing trip is over, bells are often forgotten. So they hang sadly on the guardhouses, having completed their mission, forgotten by everyone.
Take care of your gear, it will not let you down. Happy fishing!
Nurzhan Suindik (nurzhan) – Specially for Homemade FISH, Russia, Kuznetsk
DIY bite alarm
Bite alarm, that's what it's called now. Previously there was a regular bell, but now it is a bite alarm. Of course, today on the shelves of fishing stores there are not only primitive bells, but also bite alarms. Equipped with electronics and all possible quirks and bells and whistles.
But let’s start from the very bottom first, namely what they are needed for and whether they are needed at all, what signaling devices were and what they have become today.
From my experience, I can say that previously bells with a special eye were used as a signaling device and these bells were attached directly to the fishing line. Yes, specifically on the fishing line and not on the rod itself as it is now. Previously, they used to catch more fish with hooks, and mostly carp were caught with hooks. And since fishing on the top is a long song, to increase the chances they used not one, but several tackles. And they hung bells so that they could immediately recognize on which gear there was a bite.
When I didn’t have bells, I just hung a piece of clay on a fishing line or twig. Yes, I have to say that I had much less gear than my father. So this was enough for me. Clay is of course much more convenient. When the bite is good, sometimes in a fit of passion many people often forget to remove the bell before casting the tackle, and as a rule, the bell flew into the water. And there is no need to remove the dirt or clay, it simply fell off on its own when hooking. Nowadays you can also see tackles with clay at the end. I often see such lumps on my grandfathers when fishing. By the way, the float is also a bite alarm, if you look at it like this, it also signals a bite.
How to do it yourself?
To properly assemble a visual alarm with your own hands, you can use side nods, floats, fireflies or foil. To assemble and attach the pendulum nod to the blank, the spring should be attached to the tip of the feeder rod, and on the reverse side, thread the fishing line into the pass ring, and secure the jig to the tip of the fishing line. To make a homemade nod movable, you can attach a plastic or rubber tube to the tip of the fishing rod.
To make your own float, it is recommended to take a dense piece of foam, while maintaining the proportions between the weight of the alarm and the rod.
To construct a light signaling device used for fishing in the dark, you can use reflective foil, fluorescent paint or an LED.
The foil needs to be cut into strips 5 mm wide, and then glued to the top of the float using waterproof glue. When the rays of a flashlight are directed at it, a noticeable glowing effect is created on the equipment.
Glowing paint is applied to a float or a self-made capsule.
To assemble the firefly, you need to take a flashlight from a lighter and a paper clip. Having removed the LED from the lighter with the battery, you should secure it in the center of the eyelet hole in the clothespin.
To make a foil tube, you will need a tube wrapped in several layers of foil. A fishing line is threaded into the hole in the first ring on the feeder and then pulled through the entire rig. This way the tube will sag between this ring and the coil.
To make an audible alarm in the form of a bell, you need to take a small piece of a thin metal tube, through the hole of which a fishing line is then threaded, and a bolt is hung on a thread inside. The device is attached between the coil and the feeder ring. If the bolt hits the walls of the tube, a sound signal will sound.
You can install a simple signaling device made from a wine cork on a bottom fishing rod by drilling it along the axis and slightly cutting it on the side with a blade to a hole. This method of rigging will allow the installed element to easily slide along the fishing line when casting and reeling in the tackle, signaling a bite without damaging the rod blank
Thus, over many years of experience, experienced fishermen have accumulated various methods of attaching alarms to fishing rods to provide an audible and visual warning in case of a bite. Today, indicators are improving and taking the form of advanced electronic devices. They differ in the degree of sensitivity and type of fastening. The most budget-friendly options are bells and bells, which have disadvantages due to their frequent flying off the form and the need for constant reinstallation. If a fisherman does not want to spend money on purchasing expensive fishing equipment, he can make simple alarms with his own hands from scrap materials.
The best bite alarm is a bell.
Today, bells with a special clothespin are more often used in everyday life, which is fixed on the top of the spinning rod of the bottom tackle. This is a very convenient thing. It has so many advantages that there are practically no disadvantages visible. It's worth a penny, meaning you don't mind losing it.
It weighs quite a bit, which increases its sensitivity. Now they use two rattles - this is excellent audibility, plus they have rattles on springs, which means that when they take any bite they start ringing and can be heard along the entire shore. The plastic body is not capable of damaging the tip. And the last advantage of this alarm is that almost all of them have a hole for inserting a firefly into it for catching at night. So this is an almost indispensable thing for a fisherman.
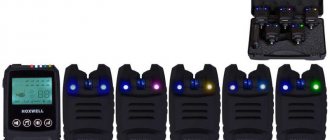
Electronic bite alarms
But let’s not hold on too much to the past and move on to the bite signals of the future. The signaling devices of the future include electronic signaling devices that also work on the principle of fishing line tension. Such signals scream and glow at the same time. So you will know exactly where to run and which stick to pull.
The principle of operation is as follows. After casting the tackle, we thread the fishing line into a special recess under a special roller and release the reel clutch. At the slightest twitch of the fishing line, motion sensors are immediately triggered, which close the complex electronics, which begin to beep and glow. Many electronic signals serve as a rod stand, which is always very convenient.
But still, many fishermen remain faithful to the usual bell. Who always serves his master well and faithfully. Even if they are inconvenient because they need to be removed when casting. Let them be loud so that they can be heard along the entire shore. But they have always been and will ring on the banks of reservoirs. Bells are by far the most popular bite alarm.
How does a bite alarm work?
The principle of operation of the donkey guard is based on the fact that at the moment of a bite, the fishing line transmits vibrations of the equipment, recorded by a signaling device. The fish, having grabbed the bait, moves in any direction. The donkey alarm responds to fishing line pulls, regardless of their strength.
A powerful jerk is much more noticeable - it can be recorded by both a factory and a homemade device. Large fish often bite cautiously, and it is important for the alarm to be sensitive in order to detect such a bite.
Requirements for signaling devices for donkey:
- high sensitivity;
- simplicity of design;
- protection from water;
- reasonable price.
Each angler chooses bite indicator devices depending on:
- fishing conditions;
- own needs;
- weather conditions;
- expected fish in the catch;
- time of day.
At night, visual indicators are ineffective, even with lighting. It is impossible to sit for several hours without taking your eyes off the rod, and if you are distracted, you will miss the bite. Therefore, at night, sound sensors are needed for donkeys. And if they also provide a visual effect, the return on such equipment increases significantly.
The weight of the transducer is important, and this concerns not only the convenience of the angler. In strong winds, a lightweight design will show false bites, and the meaning of the device itself is tripled.
Buying a signaling device is not difficult; stores sell models for both summer and winter fishing. But quality equipment doesn't come cheap. Therefore, many fishermen prefer to make sensors themselves from scrap materials; it is cheaper and takes a little time.
Donka for crucian carp: how to make it yourself
The design of the gear is simple: the equipment consists of a rod (you can do without it), main fishing line, weight, leashes and hooks. It is easier to wind the vein onto the reel by attaching a lead weight to the end using a blind or sliding method. The number of leashes depends on the preferences of the fisherman, but there is no point in knitting more than five pieces. Hooks must match the size of the bait.
Using a rod and reel allows you to cast bait over a long distance, and large crucian carp prefer to live away from the coastal zone. In reservoirs with a clean bottom, you can send the tackle to the required place and aim it with your hand, choosing the correct weight of the sinker. When fishing with this equipment, worms, maggots, corn, potatoes, and dough are used as bait. Having installed a small live bait, you can hope to catch pike, pike perch, and perch, but it is worth remembering that the tackle is “tailored” for peaceful fish.
Source
DIY bite alarm
The most common homemade donkey gatehouses are:
- pendulum type;
- nod type.
A homemade universal signaling device for donkey is mounted on a fishing line and attached to the rod rings. When a fish bites, the tackle, which is in a tense state, changes its position in the water, and the fishing line moves, transmitting vibrations to the guard.
The advantage of such a signaling device is that it is attached to the rod and remains hanging on its ring when hooking. However, the fisherman needs to monitor the bottom tackle with a hand-made pendulum sensor for the bottom in order to make a hook in time.
How to make a bell with your own hands?
A bell is a simple acoustic bite alarm, the features of which include:
During fishing, the alarm begins to act like a rattle, immediately emitting vibrations in the water when biting. Of course, you can buy a regular bell in a store and make modifications to improve the signals.
To save money, it’s easy to make the device yourself at home:
The result should be a bell with a rubber hook, which will remain suspended on the fishing line closer to the tip of the fishing rod to avoid losing the device at the time of hooking.
This design is quite simple and will begin to work immediately after casting the tackle and when the fish approaches.