Many feeders prefer to install additional bite indicators on their rods. There is no such need except for athletes at competitions, when the equipment is thrown every couple of minutes. The bite alarm is especially important in feeder carp fishing, since the gaps between bites can be significant, and the angler can move away from the gear. Bite alarms for feeders can be very diverse, from simple mechanical devices like a bell to quite expensive electronic alarms.
Advantages and disadvantages of electronic signaling devices
Such devices are used by experienced fishermen in conditions when it is necessary to catch a trophy specimen.
The peculiarity of electronic devices is that they can distinguish true bites from false ones and react to the slightest movements of the gear. Therefore, it is simply unrealistic to miss the moment of a bite. Some models can take into account wave strength, currents, etc. If you analyze what the advantages and disadvantages of electronic alarms are, then you should take into account not cheap Chinese models, but products from well-known companies. As a rule, cheap models from dubious manufacturers do not meet the stated requirements
They also do not differ in reliable operation and reliability, which cannot be said about real proprietary developments.
The advantages of electronic alarms include:
- Very high sensitivity.
- Absence or minimum of false alarms in difficult fishing conditions.
- The ability to adjust the tension of the fishing line in windy conditions and the presence of waves, the presence of a strong current or the movement of a load along a slope.
- When fishing with several fishing rods, it is easy to determine where and on which fishing rod the fish took the bait.
The disadvantage of such devices is their high cost, which limits their use for some categories of fishermen. In addition, counterfeits are possible or, in other words, you can purchase counterfeit products. In addition, you need special stands for fishing rods, which is an additional cost. Some feeders use regular racks, although at least two are required. At the same time, it still turns out cheaper.
Electronic fishing alarms are used by avid feeder fishers. Models with a pager are good for carp anglers: after thoroughly feeding a promising place, you can go to a tent and relax a bit. Catching trophy carp has its own characteristics: there can be no more than 3 bites per night. In this case, it makes no sense to sit near the fishing rod all night waiting for bites.
Electronic and visual bite alarms for crucian carp killers while fishing.
Watch this video on YouTube
Classification of alarms
All devices for fixing bites are divided into two types: mechanical and electronic. The first includes the sensitive tip of the rod (usually a noticeable bright color), all kinds of guards and nods, bells, fireflies, and pendulums. Electronic ones are represented by small devices powered by artificial power sources (miniature battery or battery). They are triggered by vibration of the rod or by the slightest movement of the fishing line between the contacts.
The method of signal transmission may be different, so devices are also divided into:
- visual;
- sound;
- hybrid (notify about a bite with both vibrations and sound).
The alarm can be attached to the tackle anywhere, for example, at the very tip of the rod. Sensitive feeder tips themselves are quite informative, but an additional device will never be superfluous. With this method of fastening, some products (for example, a bell) have to be removed before or after cutting. This is a significant disadvantage, thanks to which the fish have a chance to escape the cage.
Some alarms are installed closer to the handle, between the first pass ring and the second. These are the so-called side nods, made of various springy materials. Most often they are used when it is not possible to install the fishing rod perpendicularly or at a large angle to the coastline.
The third option is to mount it on a rod rack. You can attach bells with a clip or a nod to it, but this method is not always justified
Especially if the fish bites too carefully
This is interesting: Leashes for the feeder - what length should be, how to knit a fishing line with your own hands
From old fountain pens
Such products belong to rotating signaling devices. Old or new (if you don’t mind) stationery pens or markers will be used. They are usually made of bright plastic, which eliminates the need for varnish. We will need:
Using an awl, we pierce the tip of the cap (remove the second one) where there is a fastening to clothing. We put the cap itself back on, smearing glue on its junction with the base. We wrap a little insulating tape at the output end - this will be the sinker. We run the fishing line through the pen, and attach the clamp to the guide ring of the rod.
Video: How to attach a bell while fishing
Despite the fact that many amateur fishermen still prefer to use proven old-fashioned gear for donka fishing, the modern donka is also gaining popularity. This is no longer a wooden reel with fishing line, weights and hooks, which, in order to cast, need to be untwisted above your head.
This article will discuss how to catch crucian carp using a modern donka. Modern bottom tackle is, first of all, a fairly rigid rod that can withstand the casting of a load, and a spinning reel.
You can use several rig options with this rod. Solid fastening of the load With this type of equipment, the load is tightly secured at the end of the fishing line and does not move along it.
This type of installation is used in cases where a large fishing distance is required. In this case, the load and hooks secured in this way will necessarily lead to self-hooking.
Sliding fastening of the load This fastening is used if the crucian carp in your pond is very careful and can spit out the bait when it feels the weight of the equipment. The fishing line is passed through the sinker, then a piece of nipple about 1 cm is put on it, which will absorb the shock of the load along the end loop to which the leash with a hook is attached.
There is an option to use two leashes, which in this case are tied not to a loop, but to a plastic tube, which is located behind the sinker. The plastic tube will prevent the leashes from getting tangled.
Instead of a tube, you can use a piece of wire with loops to secure the hooks.
Since with this type of fastening the load slides freely along the fishing line, the use of this installation requires mandatory hooking. Bite alarms In order to catch crucian carp on a modern donka, you will need bite alarms, which can be divided into three types.
The first type is a bell on a clothespin, which is hung on the top of the rod rather than on the fishing line. As a rule, the bell in this case simply signals that self-cutting has occurred.
This type of signaling device is usually used for end installation of cargo. The second type is a bell attached to the fishing line itself.
Here you need to take into account that if the fastening is quite tight, then the fishing line can overheat and become deformed. The second method of attaching a bell is more advanced and safer for the fishing line.
The bell hangs on the fishing line and flies off at the moment of hooking. To implement this method, the bell must be tied to a peg, which is driven into the ground next to the bottom.
The third type is a ready-made alarm that resembles a swinger for carp fishing; it can be purchased at any specialized store. As a rule, it is attached to one of the rod rings.
It is very convenient to catch crucian carp on a donk with such a signaling device. It does not interfere at all either when casting or when retrieving fish.
The use of this alarm is possible if one simple condition is met. The rod and line should be positioned in one line, or, in extreme cases, the angle between them should be as close as possible to 180 degrees.
Fishing is not only about beautiful nature and fresh air, it is something more. This is something that cannot always be described in words.
Very often, it is while fishing that real miracles happen that a person so needs. The list of these miracles is simply limitless; it completely depends on the internal state of a person.
For some people, fishing provides solutions to all their problems. For others - rest, good mood and well-being.
While fishing, all quarrels and grievances are forgotten, relationships between children and parents are improved. Maybe you have once watched how your children change while fishing, they become interested, cheerful and happy.
It will be extremely difficult, and maybe even impossible, to repeat all this joy and storm of pleasant emotions in another place. What really makes me happy is that all this grace is available to absolutely everyone.
Even for disabled people, whose opportunities in life are severely limited, fishing will be a pleasant consolation. After all, fishing is not about catching crucian carp in a nearby river.
Fishing is a kind of meditation that helps you dive into your consciousness and figure everything out there. They say that time spent fishing does not count towards life.
Fishing is a vacation that is suitable for absolutely everyone. There are no disadvantages or restrictions in this holiday, it is suitable for the whole family, it is truly useful and interesting.
Making a nod
A side nod can be purchased at any specialized store or made by yourself.
Option 1
In this variation, you will need to prepare spring material. The most affordable in this case will be a plastic clamp, the length and thickness of which will allow you to easily adjust the sensitivity of the nod.
Before production you should prepare:
- copper wire – cross-section 1 mm;
- electrical tape;
- plastic clamp;
- rings;
- Super glue;
- heat shrink.
Step by step process:
- We construct a tulip with a small middle ring from wire .
- The rings are fixed to the clamp (to the smooth side without a notch) using several turns of insulating tape.
- If the given conditions are observed, the summer jig will spring well. If desired, you can use a couple of drops of superglue for better fixation.
- Next, the heat shrink is put on.
- Using copper wire, we construct a corner that will serve as an attachment to the tip of the tackle.
- The smaller side of the angle is fixed to the clamp in a similar way to fastening the ring.
- If desired, you can decorate the product. Insulating tapes of various tones, heat shrinks in bright colors, and varnishes for nail plates are suitable for this.
- Using insulating tape or a price tag, we make a flag on the top of the nod. This accessory will provide an opportunity to monitor bites without stress when fishing in the reeds.
Option 2
No less popular is the method of making a nod based on a plastic bottle.
When manufacturing a product, you cannot do without the following materials:
- plastic bottle 1.5 l;
- sharp scissors;
- flat file;
- paper clips;
- threads
Step by step process:
- Having prepared the body of the bottle using scissors, you should cut out the body of the summer jig, focusing on the recommended dimensional characteristics: length - 25 cm; width (base) – 0.7 cm; width (top part) – 0.4 cm.
- We process each cut line with a file. Be sure to remove all burrs and smooth out ribbing.
- Having straightened the paperclip, we form a ring with a diameter of 0.4 cm with two outlet legs.
- The legs are pressed against the body of the summer jig (at the top). We fix them by tightly wrapping the thread.
- The wrapping area is treated with waterproof glue.
Experienced fishermen recommend making 2-33 nods with varying lengths and base widths. This will be the key to success in fishing. Hard nods are usually used in conjunction with a heavy jig, and the soft version of the product is equipped with a light nozzle.
Option 3
If desired, you can make a side type of summer jig using broken tackle. In this case, the product will be universal, meeting all requirements.
Specifics of nods and their types
The same thing is a guard for a bottom fishing rod; there are no fundamental differences in its operation. It is a plate (or wire) made of flexible material, with a ring for fishing line at the end. Sometimes elastic components are not required. They are also made from coiled springs of varying stiffness. The nods are painted with a bright reflective varnish of green, red or yellow so that the angler can see the fact of the bite from afar. Sometimes additional sound alarms are hung on them, for example, small bells. This is a good help for those fishermen who cannot constantly look at the gear.
Lodges are used for both winter and summer fishing. They have four types:
- soft nods;
- intermediate (medium hardness);
- hard alarms;
- heavy guards.
The first type is used on lakes, ponds, backwaters and other bodies of water where there is no current. Suitable for catching any type of fish. The second type should be used on quiet rivers. The rigid nod copes with its task both in places with strong currents and during windy conditions. The latter type of alarms is used for deep (from five meters) fishing, including with live bait.
It is best to place a hard or heavy plate guard on the bottom (depending on the depth and the target fish). For the feeder, spring devices are needed, because they do not imitate a bite during waves or wind. They are used mainly for winter fishing.
Experienced fishermen advise bending the feeder nod spring down slightly so that the alarm does not react even to increased water vibrations.
Based on functionality, nods can be divided into the following groups:
- bendable;
- rotating (inflexible);
- sound;
- with automatic cutting;
- combined (when one device includes several characteristics).
Bendable guards bend when signaling a bite down, rotating guards rotate, and sound guards ring. Self-hooking alarms work like this: the fish pulls the bait towards itself, the mechanism is triggered, sharply pulling the line towards the fisherman.
DIY methods
Experienced fishermen prefer to independently assemble their gear for winter fishing. They say that the most popular devices are Shcherbakov's nods, plastic devices, and models made from clock and coil springs. Here are the famous nods for winter fishing, which are not difficult to make yourself. Therefore, even a beginner can handle this task.
Shcherbakov nod (bearing)
Such multifunctional homemade nods for winter fishing rods are significantly superior to purchased ones, since they can be customized to your own preferences. Shcherbakov's nod is very sensitive, therefore, thanks to the device, you can catch even shy carp. How to assemble the structure:
- A small diameter bearing is taken and fixed at the end of the fishing rod. This detail forms the basis for the entire product.
- An iron spoke is mounted to the bearing. It must be fastened securely. Soldering is used for this purpose.
- To ensure good balance, a weight is attached to both ends of the spoke. The weight of the load is selected based on the type of artificial bait. A loop is attached to one end of the knitting needle.
- Finally, a fishing line is inserted through the loop. This completes the work.
Homemade plastic device
The material for the future gatehouse will be an ordinary plastic cup. It is allowed to use plastic from bottles containing various drinks. Device assembly method:
- First, take a glass and make strips from it. The size of the strips is 10*1 cm. You only need to cut from the sides.
- The strips should be given an arched shape.
- At this stage, take an awl or needle. Step back half a centimeter from the edge of the strip and make a hole. Then the part of the strip with the hole should be treated with waterproof red varnish.
- Next, take a 7 mm cambric and put it on the back side of the strip.
This model is usually used on reelless machines.
Clock spring device
This gatehouse option is easy to manufacture. The material used is an old watch containing a spring. This will form the basis of the device for winter fishing . If such watches are not available, they can be purchased on the market or online. A spring product is made like this:
- The spring is removed from the watch and needs to be aligned. The process is labor-intensive, but without an even spring it will not be possible to make a high-quality nod. Then you need to cut a piece of the spring 15 cm long.
- One edge of the spring needs to be narrowed to 2 mm. This can be done using a grinder or other tools.
- After narrowing one of their edges, hangnails will remain. They should be sanded with sandpaper.
- Then the wire is taken and a loop is made from it, the diameter of which should coincide with the cross-section of the narrowed spring - 2 mm.
- The loop is soldered to the edge of the nod. This is done using solder, acid or a soldering iron.
- The sealed area should be sanded with fine-grain sandpaper.
After this work, you will get a device that can be used to catch roach and perch, but using a jig. Spring guards for winter fishing are considered universal and have medium rigidity.
Coil spring product
To catch fish on a balance beam, it is recommended to make the nod more rigid. The initial manufacturing process is no different from the design of a clock spring nod. Assembly of the device is done in stages:
- Initially, a coiled spring is taken. A certain piece should be cut off from it with scissors. A wire loop is also made. It is recommended to sand the ends of the workpiece using sandpaper.
- At the next step, a loop is soldered to the workpiece, but in such a way that the soldering turns out to be in the form of a small ball.
- The resulting spherical solder must also be cleaned with fine-grained sandpaper.
- Then two pieces of 1 cm in length are removed from the cambric. Then they are fixed on a nod.
- Finally, the surface of the nod is painted. Colors should be bright.
For such a nod, it is necessary to set the correct rigidity and its degree is influenced by the mass of the bait. Therefore, you will have to perform an accurate calculation, otherwise the efficiency will be minimal. The device is adjusted by decreasing or increasing the length of the manufactured part.
Another way to make a structure
There are many types of nods and they all have different assembly technologies. This option is very successful. The structure is assembled as follows:
- Aluminum wire is purchased and a section is removed from it.
- A bend is made on one of the edges of the wire using pliers, but taking into account that it is possible to clamp the fishing line.
- Next, take a fishing line with a cross-section of 1 mm, or more, and fix one edge. The wire is taken in hand and the fishing line is wound around it in a spiral. The approximate length of the future spiral should be from 10 to 15 cm.
- At the other end of the wire, the second edge of the fishing line is clamped.
- In this step, heat the water in a saucepan until it boils. The finished product is placed in the container. The time the workpiece is in the water is 15 minutes.
- It is important to quickly cool the workpiece, so after boiling, the wire with the wound fishing line is immediately placed in cold water.
After the work has been done, the wound fishing line is removed from the aluminum rod. It will look like a spiral. This completes the process.
How to make your own electronic signaling device
Principle of operation
An electronic bite alarm installed on a feeder is a device that reproduces the action of opening and closing an electrical circuit through a feeder line during a bite. The alarm has both sound and light warning signals.
How it is made
To manufacture the alarm, you will need a housing, which may consist of a plastic box. The indicator of the alarm can be operated by an LED, which will be mounted on the housing. The sound capsule is attached to the wall inside the housing in a tight-fitting manner. The battery is also installed in the inside of the case. You also need to place a corner in which the spring will be attached at one end. Next, a small ring should be attached to the top of the spring.
It is necessary to take into account the attachment of a piece of additional fishing line, which will be attached at one end to the ring on a spring, the free part of which is brought out through a hole on the body located opposite the ring. A clothespin is attached to the free part of the fishing line, which will be located on the outside of the body. The electronic parts of the alarm will be located inside the housing. The reed switch is attached to the free edge of the spring, which must be fixed with threads. A magnet attached to a metal plate is attached to the side wall of the housing and is located on the side of the reed switch, which facilitates its movement towards the magnet.
The signaling device, during its operation, must be attached to the rod. The clothespin must be hooked onto the main fishing line. When the fishing line is pulled, an action mechanism is activated, as a result of which the reed switch will begin to approach the magnet, as a result of which the alarm goes off. At the same time, the electrical circuit will work, which contributes to the lighting of the light bulb and the operation of the sound capsule.
Light
Such indicators will come in handy if you plan to go fishing at night. A simple option is to paint the float with fluorescent paints. And if there is a need to make a signaling device to attach to the tip of a fishing rod or fishing line, you can make an electronic firefly.
| Materials | Tool |
| cocktail straws | scissors |
| battery (button) 3 V | hot glue gun |
| heat shrink tape (thickness should be equal to the diameter of the battery) | lighter |
| LEDs | |
| small crocodile hair clips |
Manufacturing stages:
Cut a piece from the straw, about 3-5 centimeters long. You can choose the size yourself, depending on what kind of firefly you want to make. The piece of straw must be filled with glue from a hot gun. Make sure that there are no voids when filling. While the glue has not hardened, insert an LED into one side of the piece of tube. It should enter the glue with its head about a centimeter and a half. Leave to cool completely. We insert the battery into the shrink tape. The length of the piece of tape should be equal to the diameter of the battery + a centimeter of reserve on one side. We take a whole straw and insert it into the shrink tape on the side where we left a free edge. Using a lighter, grab the tape. Be careful, as you will have to act very quickly at this stage.
It is important not to let the heat shrink around the tube completely harden. After removing the lighter, quickly remove the straw and insert it back again.
Repeat this action several times until the cooling heat shrink takes the shape of a place where the tube will be freely inserted and from where it will be easy to pull out. Run the flame from a lighter over the heat shrink on the back side of the battery (opposite from the one you formed in the previous step). Be careful, you do not need to completely solder the battery. The last step is to glue a crocodile clip to one of the flat sides of the battery using a hot gun.
How to make a bite alarm for a feeder with your own hands
To use such a light indicator, you need to connect its two parts (with a battery and with an LED). To do this, slightly straighten the legs of the diode and insert it into the finished hole so that the legs are on both sides of the battery, according to the polarity. After activating the firefly with a bobby pin, you can place it on the tip of the fishing rod or on the line between the reel and the first winding ring.
Important! If you don’t use a crocodile, but insert another tube from the opposite end of the battery and secure it with heat shrink, you will get a full-fledged firefly for attaching to a float or the tip of a fishing rod.
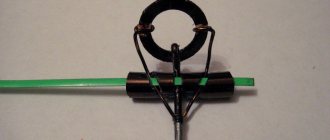
We make a simple signaling device for a donut from a cable tie
To make it yourself, you first need to prepare the items:
- moderately hard cable clamp;
- high-quality electrical tape;
- one small bell;
- multi-colored varnishes.
White cable ties cost no more than 8-10 rubles. a piece
We will use a piece of thick cable clamp as the main material. If there is one, then you can take a whole, but short fastener (the shorter, the stiffer it will be), no longer than 15 centimeters. The second option is better; we’ll explain why later.
Electrical installation stores sell black, blue, and dark green ties. You should use white ones: the varnish will stand out more on them.
So, simple instructions for making a guard from a clamp:
- Take the cable tie and cut it. We need the part with the “head”. There is a pointed latch inside the lock; we knock it out with a flat-head screwdriver. The vacated space will serve as a free passage for the fishing line.
- We clean the surface of the workpiece, degrease it, carefully apply varnish and wait for it to dry. If there are no paints, then you can wrap small strips of bright electrical tape, for example, yellow or blue, in different places.
- We tie a bell to the “head” of our guard. It will ring when there is a bite and will lower the plate down.
- We press the flat end to the desired part of the rod and forcefully wrap the tie with electrical tape so that the tape is stretched but does not tear. That's it, let's run the fishing line and go fishing.
Why short ones are better. Firstly, you won’t have to cut anything, and secondly, each clamp at the end has another place with a ribbed surface. These “ribs” will allow the insulating tape to better fix the nod on the fishing rod. But long ties have another advantage.
Feeder signal nod
A striking example of this signaling device is the very sensitive tip of the feeder rod (whip, feeder tip, quivertip, can be called differently, the main thing is that its sensitivity is sufficient to transmit a bite signal). When we cast the tackle and put the rod on the stand, we reel in the line so that the whip is a little tight, and now when the fish is pulled, it will bend even more, and when released, it will straighten out.
Homemade feeder bite alarm nod
But it is not always possible to use a rod with a sensitive tip, and in general, due to budget constraints, many anglers use a regular spinning rod. In these cases, fishermen often equip their forms with homemade alarms, which are called “side nods”. This nod is attached between the coil and the first ring. Fishing stores sell metal nods for winter fishing rods with an elastic band that has three holes, one for attaching the elastic to the rod, the second for the nod and the third for the fishing line. We attach such an elastic band, using electrical tape or adhesive tape (3-4 turns), to the rod at a distance of 10-15 cm from the reel, so that when we insert the nod, it is perpendicular
Side nod
the rod, first on an elastic band, in the place for attaching the nod, cut through the electrical tape with a knife. At the opposite end of the nod we have a ring, we cut a small hole in it so that after casting we can wind the line. The tackle is ready. To better secure the fishing line on the rod, you can make an additional hook on the nod itself. It is made from ordinary wire, one edge is bent in the shape of a hook, the second is threaded into the nod ring and bent. And with the help of pliers we firmly fix it. Then, take another piece of wire and fold it in half, then bend one edge. We attach the resulting second hook to the rod as in Fig. 2. When attaching it to the rod, in order not to damage the form, you must first wrap two or three turns of electrical tape on it, and then attach the hook to it.
Side nod fig. 2
You can also use any other soft tube 4-5 cm long and 2-3 mm in diameter to make a similar feeder alarm. Then we take our nod, a springy wire 15-20 cm long is suitable for the role of a nod, just don’t take it too hard, otherwise the sensitivity will be weak. From one end, bend the edge 3-4 cm at an angle of 90 degrees and fasten it into the tube. At the opposite end we make a bend shaped like the letter Z, each bend of such a hook is 1 cm long. After we have cast, we pull the fishing line and put it into the Z-shaped hook of the alarm. For better visualization, we need to paint our hook in a bright color.
Do-it-yourself side nod for donkey or feeder
Currently, bottom tackle with a bottom feeder is used quite successfully for fishing. Some people popularly call it a feeder, although this is a little incorrect, but it seems. Therefore, in the future I will call it that. Many “budget” fishermen use these as bite alarms:
They work well, but have one significant drawback. In the wind, even not very strong, especially from the side, this alarm sways, and it is almost impossible to see a careful bite when using a donkey.
To eliminate this drawback, the side signaling device is used. Making such a signaling device for donkey turned out to be quite simple. We buy a signaling device like this from a fishing store, which is attached to the tip of the rod, and carry out reconstruction.
To begin with, at the end of the nod we remove the ball of smaller diameter, the spring and the fastening unit. It turns out this is the preparation
Then we will need a piece of rigid foam measuring approximately 2.5 by 2.5 centimeters,
.On one of the faces, use a large round file to select a notch
so that the side nod design fits well on the rod. The next stage is selecting grooves for the elastic band that will secure this entire system. To do this, we make such a cutout with our own hands
We continue our work on improvement. Using sandpaper, give the product the shape shown in
We saw off a small piece of plastic from an old toothbrush or other
The main thing is that it melts when heated. We heat the end of our nod free from the ball and insert it into the plastic rod
At the end of the foam holder we make a hole the size of our plastic rod. Lubricate the rod with “Moment” type glue and insert tightly
Now we bend the nod with our hands perpendicular to the direction of the rod
Pay attention to the location of the nod depending on whether you are right-handed or left-handed, although the design is thought out so that it can be used in both cases.
At the end of the nod, where the big red ball is, we attach a fishing line holding knot. To do this, glue a piece of copper wire with a diameter of 1 millimeter, having previously spilled its end about 2 centimeters long, to the nod, wrap it with a nylon thread with sizing, and get the result
We bend the wire in such a way that we get a hook-shaped bend. Our fishing line will cling to this hook. It seems our side warning light is ready for use in the blue open spaces. It is attached very simply: it is applied with a notch to the rod and tightened with a simple elastic band folded in half
We saw off a small piece of plastic from an old toothbrush or other
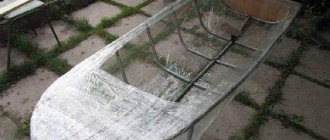
Spinning rod for donkey
A thin whip with a reel for fishing line stuck into the shore is the most famous rod for bottom fishing . At the same time, it is very convenient to use a regular spinning rod equipped with a spinning or inertial reel as a bottom fishing rod. Fishing with bottom tackle does not require frequent casting, so a reel and spinning rod can be the simplest.
Spinning allows you to make long and accurate casts of bottom tackle and confidently land caught fish. Both telescopic and plug-in spinning rods can be used as bottom fishing rods. To place a spinning rod on the shore, it is recommended to use special stands.
Structurally, a feeder or a rigid spinning rod equipped with bottom equipment similar to a feeder is ideal for catching fish in the current: a sliding weighted feeder and one hook at the end of the main line.
Electronic signaling devices
Having thought about the alarm and appreciating its advantages, I want more from it. A mechanical alarm requires mandatory control by the fisherman over its operation, that is, being near the fishing rods all the time. What if you want more? To go away for natural needs, cook food, just relax and stretch your legs, here an electronic alarm comes to the rescue, it is also called a swinger for fishing. It does not require constant presence near the rod and will indicate a bite with a visual (light) or sound signal. There are a sufficient number of types, types and models on sale.
Can be divided into types:
- visual
- sound
- combined
The principle of operation is just as simple - the fishing line passes through the slot, there is a small reel in the slot, and when it moves, a signal is triggered.
So, we described primitive mechanical alarms and briefly talked about factory-made electronic alarms, which are sold in stores. Now we’ll tell you how to make a more or less simple design of a mechanical signaling device, as well as how to assemble an electronic one yourself.
Portable electronic bite alarms for feeder
Portable alarms are, of course, inferior in functionality. Their main advantage is their relatively low price and compact size.
For night fishing, a good option would be the Strike Alert light signaling device. It has special grooves on the body with which this signaling device is attached to the tip of the fishing rod.
In working condition, it lights up green; when a bite occurs, it lights up red. It detects a bite by the vibration of the blank; it has a board inside that allows you to ignore the effects of waves and wind. True, in a strong wind they can
be false positives.
"Megatex" Jay 3 is suitable for fishing both during the day and at night. Has 5 sensitivity levels. For fishing on a still body of water, the most sensitive ones are 5 and 4; for fishing in the current and in the presence of wind, 2 and 3. Also in this alarm you can adjust the signal volume and tone. All this is done with the help of one button. If you press it, the indicator will turn on, if you press it again, it will turn off. By holding the button, you will hear characteristic signals (peaks). In order to set the fourth sensitivity level, you will need to release the button after the fifth signal. The melodies change on signals 7, 8, and 9. In order to disable the function of automatically turning off the signal when cutting, you must wait for the 10th signal. In order to set the tone, you need to hold down the alarm and wait 20 seconds, then it will start playing a melody with different volumes and tones. In order to select the sound range that suits us, we need to release the button and the alarm will remember the mode we have chosen.
When the fish bites,
Our light diode located on the case also works. It lights up for 20 seconds, then turns off, and lights up every 5 seconds so that we can understand which rod the bite occurred on. The sound time of the sound signal is 4 seconds.
This electronic bite alarm for the feeder is attached to the rod, preferably on the first leg of the blank, since when hooking it automatically turns off so as not to discharge the battery and not irritate the angler with its signal. Therefore, we re-throw the tackle again, place the rod on the stand and turn on the alarm; the previously set settings are saved. The battery of such a signaling device is enough for 5 years of active fishing.
This alarm also has a board that can ignore wind, waves, and the feeder rolling down a slope.
Electronic bite alarms for feeders on clamps. There are different types of them (YOLO, Akara) the point is that the alarm is attached to the rod on the first leg of the blank using a special clamp, preferably it has rubber seals for better fixation on the rod. The alarm body itself may have grooves, a wheel, or a hook for securing the fishing line. At the moment when the fish attacks the bait, tension in the fishing line will be created and the alarm will notify about the bite. In cases where the fish bites when it is relaxed, that is, towards the shore, this alarm will not work, so it must be used in combination with a swinger. It is necessary to select these alarms so that you have the opportunity to adjust the volume and tone, especially if you are fishing with several rods; it is also desirable that this alarm be equipped with an LED that periodically blinks after a bite, letting us know where exactly the bite occurred. But you shouldn’t expect much from these rods, and despite the presence of a board, be prepared in advance for false alarms in strong winds and waves
If you are going to catch small fish, pay attention to the force that must be applied for the alarm to work; some are not designed to recognize weak bites
How to mount the alarm
Proper mounting of the alarm is important from the point of view of the sensitivity of this device and maintaining the fishing line in working condition. If the bells are attached to the tip of the rod using a plastic clothespin, which will not damage the blank, then the swingers or bats are attached directly to the fishing line and can damage it if handled carelessly.
Every fisherman has had cases when the main line broke off while fishing for a trophy, but not everyone knows that the cause of the break was damage to the base by the signal device. Therefore, you need to control the distance between the swinger’s antennae, by which it is attached to the fishing line, and, if necessary, make adjustments.
The swinger's antennae should not fit too tightly to each other, because in this case, damage to the fishing line occurs when putting on the guard. The distance between the antennae should be such that there is a maximum gap, but at the same time, the swinger is held on the fishing line.
Sound bite alarms
Sound alarms, unlike visual ones, also indicate a bite using sound, which makes their use more convenient.
The alarm is attached to the top of the feeder. The source of the sound signal can be bells, bells, hollow metal tubes in which small metal elements or bearing balls are placed.
In a situation where there is a bite, the device attached to the top of the feeder begins to twitch, which is certainly reflected by a sound signal.
Types of alarm:
- bell;
- bell.
The only nuance of this type of alarm is the requirement for careful handling. The implementation of throwing should be done smoothly and preferably at a close distance
Otherwise, the alarm will be tangled!
Clip-on signaling devices
When choosing a bite alarm for yourself, it is advisable to pay attention to models that use clamps for fastening. There are quite a lot of similar models, so there shouldn’t be any problems with choosing.
The principle of fixation on the rod blank is simple - due to special clamps. In this case, it is desirable that the clamps have rubber seals for more reliable fastening. There are grooves on the body of the product, as well as a wheel or hook with which the fishing line is secured.
When a fish takes the bait, tension appears on the fishing line, causing the alarm to emit a sound and light signal. If after a bite the fish begins to move towards the shore, then the alarm does not respond to such bites. In such cases, it is better to use a swinger.
When choosing such a device, you should pay attention to models with manual volume and tone control. Such functions are indispensable if fishing is carried out with several rods
A light signal will not hurt, which will help you more accurately determine the rod where the bite was. This is especially true in the dark.
At the same time, one should not expect anything beyond natural from such devices, since such models do not differ in great functionality. If fishing conditions are difficult, then frequent false alarms are possible. When catching small fish and, especially in conditions of active biting, it simply does not make sense to use such alarms, since they are not designed for such conditions. Their purpose is to catch trophy specimens.
Definition of a bite alarm and its purpose
Bite alarms are used to provide timely notification that a bite has been detected. They come in several types and differ in signal output, but have the same principle of operation. It consists in the fact that the fish, having swallowed the bait, moves, tightening or loosening the fishing line. It is to these maneuvers that the alarm reacts, informing the fisherman that it is time to take measures to reel in the catch.
Alarms are divided into several types:
- Mechanical . They are performed in the form of a sensitive rod tip or by installing a certain weight on a slack line between the first input ring and the reel. Tension or sagging of the fishing line, which alternate periodically, signals that there is a bite.
- Swinger. A type of mechanical beacon, the essence of which is as follows:
- plastic head with a fishing line clamp, attached near the first ring;
- a kind of lever is mounted on the opposite side of the clamp to secure the load;
- the second side of the lever interacts with the bracket, which is mounted on the fishing rod;
- the fishing line is inserted into the clamp and signals changes in tension by moving the weight along the lever.
- Electromechanical . These are the so-called “tweeters”. Their principle of operation is that when the fishing line is activated and vibrates, the device emits a sound and light signal, which is very convenient both for night fishing and just for a kind of rest when you have to be distracted.
All types of signaling devices presented can be built with your own hands. This process will not take much time, money and effort, but will save some money compared to factory-made analogues.
Types of alarms
- Pendulum. This type has been used for a long time. It consists of several parts: a wooden stick, a metal wire and a plastic tube, which are connected to each other. It is in the plastic part that a kind of firefly is installed, which will serve as a signaling device. This method has more disadvantages than positive aspects. It cannot be used in strong winds. The alarm itself constantly sways and cannot be fixed in one position, especially when the fish bites.
- Sound. Various models are also presented here: from the simplest to the more complex. Primitive models allow you to control only the strength of the sound, depending on where the fisherman is going to be during the process itself. They are quite convenient to use. More expensive devices also have a pitch control, which makes it possible to select a specific sound pitch. This option is convenient for those who use several fishing rods. The most modern devices are equipped with regulators that are super sensitive. When the device is set to high sensitivity, it alerts when the line tension is up to 5 millimeters. This option is ideal for carp fishing or in bad weather conditions. Settings to low sensitivity give an alert when the line tension is 70-80 millimeters. You can see even the weakest bite. This method is good to use at night and during strong gusts of wind. Many fishermen are faced with the problem of bats and muskrats touching their fishing line.
- Light. A special light indicator is installed at the end of the rod. When the line is at rest, the green light is on; as soon as a fish is caught on the feeder, the red light begins to flash. The device itself runs on batteries. This type of device is ideal for night fishing. The signaling device is adapted in such a way that external interference: wind, waves, currents do not give a signal and the red color does not appear.
- Swinger. This is an additional device that is necessary for full operation. In specialized stores you can find a huge variety of swingers. The electronic device itself consists of a plastic head, which includes a fishing line clamp and a weight on a metal fastener. A special mount is provided for it. This device is ideal for bottom fishing or carp fishing. The swinger works on the principle of bite tracking thanks to special movable weights, and when a catch is made, external alarms notify the fisherman.
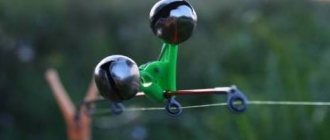
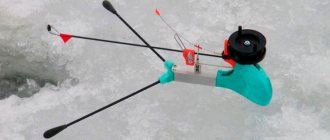
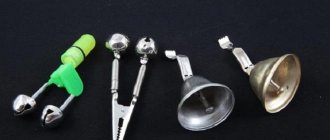
Bells
Finding the bells themselves is not a problem - there are plenty of them in all fishing stores for a penny price (unlike expensive special alarms). These are both ordinary sleeves with tongues, which used to be hung on hooks, and spherical bells with balls inside on a clothespin, attached directly to the fishing rod. You can hang a bell on the feeder on the rod itself, as well as on a stand for it.
Bells on a clothespin
The most common option is ordinary bells on a clothespin for donks. You can hang the bell on the feeder directly behind the quivertip. You can find a variety of fastening designs in stores. In addition to clothespins, these can be various connectors, magnets or latches. The standard method of attaching rods with clothespins leads to the following problems:
- The bell flying off while working with tackle, especially when hooking.
- The bell may fly away during casting. Each time you have to remove it and install it after throwing it. This is inconvenient, especially on long rods.
- Constant snagging of any clothespins, and especially metal crocodile clips, on the quivertip leads to microdamage to this part of the rod, which will ultimately render the tip unusable.
- Some anglers simply don’t like too loud sounds and ringing when reeling in or retrieving gear. This violates the general silence and idyll on the pond.
With axial fastening for quivertip
Problems with bells constantly flying off, taking off and putting on when casting are solved by another design - on a bar with axial grooves for snapping right on the tip of the rod. The bell for the feeder can be secured more firmly with this design. It can still fly out when casting. And fishermen easily solve this problem by wrapping the attachment point with a couple of turns of electrical tape. You can tear off a regular bell with a spring from a clothespin and tape it to the quivertype with electrical tape. However, such fastening of the bell to the feeder gives rise to another problem - an increase in the likelihood of the braid getting caught on this alarm when casting, which, when using heavy feeders, leads to the shooting of the braid or breakage of the quiver tip.
There remains an ethical drawback - a constant and loud ringing while working with the feeder. To get rid of the constant ringing that plagues everyone, some fishermen make structures using neodymium magnets. In them, the bell jingles when there is a bite, but with strong vibrations (reeling, casting) it sticks to the magnet and is silent. However, this design is also located on the rod itself and can lead to overlap.