Types of trimmer heads for reels
The main element of the trigger is the mowing head, which is a cylindrical body with a reel (spool) inserted inside. The fishing line (cord) is tucked into it. The heads differ from each other in the method of feeding and threading the cord. There are three types of heads in total:
- Automatic. The line is fed after this as the user reduces the engine speed. Automatic cord feeding is very convenient when you need to do a large amount of work. The disadvantage of such a head is the high thread consumption.
- Semi-automatic. The use of such a head does not require the user to perform any complex manipulations. The principle of its operation is designed in such a way that the fishing line begins to automatically lengthen while the trimmer is operating at full speed. You just need to lightly hit the head of the device on the ground (this will remove the blockage of the fishing line), and the cord will move out of the bobbin due to centrifugal force. Then the fishing line is cut to the required length with a knife, which is located on the protective casing.
- Manual. To lengthen the cord, you need to stop the machine. After this, the line will need to be pulled out manually.
Types of trimmer reels
Line selection
In order for threading the fishing line into the trimmer head to be successful, it is important not to make a mistake with the choice of consumables. The thicker the cord you set, the thicker and tougher the grass it will be able to cut. A universal fishing line with a diameter of 2 mm is often used. You can select the diameter suitable for the mower in the following ways:
- Check the instructions that came with your trimmer for line thickness information.
- Pay attention to the bobbin itself. Sometimes it contains information about possible fishing line diameters.
- Another option is to try inserting the cord into the outlet hole. If it fits through it without difficulty, then the selected fishing line diameter is suitable for use.
Reel for trimmer
You can select the cord thread according to the type of engine. If the line is too thick, the resistance to rotation will increase - in this case the engine will overheat greatly and will soon fail. Useful tips:
- For an electrical device with a motor less than 500 V, a thread with a thickness of 1.3 mm is suitable. If you can’t find one, then you can use a 1.6 mm fishing line. If the power is more than 1 kW, then choose a cord with a diameter of 2 mm.
- With a gasoline trimmer, the shaft mower matters. For the bent version, a 2 mm cord is often used. If the shaft is straight, then install a thread of 2.4–2.5 or 3 mm. The thickest fishing line is installed on powerful devices - from 1.3 kW.
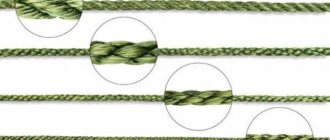
Pay attention to the type of cross-section of the cord thread. Some popular options:
- The most common fishing lines are with a round cross-section. They mow down fresh grass well, but cope less well with shrubs and dead wood.
- Twisted (spiral) cord is not very strong, but is well suited for thin young grass.
- The jagged thread with sharp edges is ideal for large weeds in neglected areas.
- You can mow your lawn more evenly with a rectangular, star or square trimmer line, but they are not very strong.
- The strongest is a two-component cord with an internal core and a round cross-section.
Types of fishing line for trimmer
Please note that you cannot use wire, metal strings and cables, or regular fishing thread instead of fishing line. The device will be dangerous both for the user and for others. So the cable or similar products will gradually begin to work, as a result of which their ends will unravel and small pieces will fly apart at high speed.
Which fishing line to choose
Before stocking up on this material for refilling the trimmer, you need to make a choice. After all, the usual so-called round fishing line is far from the only existing type. How to choose the most suitable one? First you need to determine the working conditions.
Select by type . Round fishing line is the most common. It will fit any reel with rare exceptions. This type of consumable is suitable for mowing fresh, juicy grass. But this type may no longer cope with mowing the so-called dead wood. There is no point in even mentioning attempts to mow shrubs with this thread.
In addition to the usual type, there are others that have sharp edges . Usually they are made with an “asterisk” or “square”. The presence of sharp edges is the main feature and key difference between these threads.
It is thanks to this feature that threads of these types are able to mow dry weeds. But sharp-edged threads are not without their drawbacks, the main ones being rapid wear and strength, which is noticeably inferior to the round type.
In addition to the types of fishing lines already mentioned, there are also interesting and frequently encountered varieties. Particularly noteworthy among them are fishing lines, inside of which a metal wire is stretched . Threads of this type are often used in tools that run on gasoline and have an engine more powerful than one and a half horsepower.
Threads with a metal core can be either round or sharp-edged . Regardless of the type of section, such threads are ideally suited for overcoming difficult-to-mow plants. Threads of this type easily mow not only dry grass, but even small shrubs.
Threads with wire inside compare favorably with other types of consumables due to their incredible wear resistance . But unfortunately, this feature has a more than noticeable impact on the price of this type. The cost of threads with a core significantly exceeds the cost of other types of threads.
Selection by thickness
In addition, special attention should be paid to the thickness of the consumables. For mowing young grass, a thread with a diameter of within one and a half millimeters is suitable. The larger the diameter of the thread, the drier and coarser weeds it can handle.
There is one “but” when choosing fishing line thickness. It is important not only to evaluate the capabilities of the material, but also to take into account the features of the trimmer. Be sure to look at the user manual , which comes with the tool, and find information about the requirements for the cutting element.
Using the wrong thread may result in tool failure . Using thread that is too thick will overload the device's motor. And using a thread that is too thin will significantly increase wear on the rotating mechanism.
That is why the choice of consumables must be approached no less responsibly than its refill into the trimmer. When a suitable fishing line has been found and purchased, you can begin to consider ways to wind it onto a reel.
Removing and disassembling the coil
The mowing trimmer head consists of a casing, a spring (not available in every model), a bobbin with cord, and a cover. Before you begin disassembling the coil of the electric unit, be sure to unplug the trimmer from the mains. The method of disassembly depends on the mounting of the mowing head. First option:
- To remove the cover covering the inside of the head, press the latches (latches) located on both sides of the head.
- Remove the cover, under which you will see the bobbin - remove it from the housing. Some trimmer reels have a spring under the bobbin, which should also be carefully pulled out.
- After removing the bobbin, you will see a screw in the center of the case. Unscrew it using a screwdriver.
- After removing the fasteners, take the body of the part and, rocking it in different directions, remove the gearbox from the shaft.
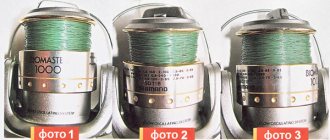
Winding line
Threading fishing line into the trimmer reel is a relatively simple procedure, provided you follow a certain algorithm of actions. When you need to determine how many meters of consumables are enough, wind it onto a bobbin so that the skein does not exceed the diameter of the sides. Once you have decided on the length of the cord, follow these instructions:
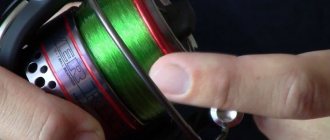
- Fold the consumable in half so that one end of the fishing line is 10–15 cm longer than the other.
- Charging should begin from the central side, which divides the trimmer bobbin into 2 parts. Find the groove where you should insert the cord. Bend the last one in half.
- Determine in which direction you need to wind the line. To do this, take a closer look at the bobbin, which may have an arrow or inscription on it. It indicates the winding direction. If there are no marks on the reel, then look at the arrow on the mowing head - wind in the opposite direction.
- The consumables should be washed carefully, turn to turn. Try to maintain the maximum thread tension.
- Once the cord has been laid, fasten the short end of the material first. To do this, insert it into a groove on the side of the reel that matches the diameter. Attach the second end (longer) to the groove on the other side of the trimmer bobbin.
- Having fixed the fishing line, trim its ends. Don't forget to leave allowances of approximately 10 cm.
- Install the threaded reel to the mowing head of the device. To do this, you need to alternately insert and pull the thread into the outlet holes of the head, in order to then place the bobbin of the device into the skin.
- Applying the required force, pull the cord out of the fixing grooves and tighten the material. Once this step is complete, put the cover back on and secure it with the latches.
Step-by-step winding of fishing line on a reel
You can wind the cord on a trimmer in another way, in which two pieces of material are charged instead of one. Replacement is done as follows:
- Bend one end of the cord into a hook.
- There should be a hole at the bottom of the bobbin that is designed to secure the fishing line. Insert the bent end of the thread there.
- Wind the cord material in the direction of the arrow to the desired level, which does not exceed the diameter of the trimmer spool.
- The same steps must be done for the second bobbin cell.
- Assembling the device head is similar to the first method.
What you need to know about trimmer line
Fishing line is a consumable material that consists of nylon and serves as a cutting device. Using this equipment, the grass is cut, which is ensured by rotating the tool head at a high frequency. This material has different thicknesses, which depends on its use on the corresponding tools: low-power electric (from 1 to 1.6 mm), electric from 500 W (2-2.4 mm) and gasoline trimmers with brush cutters (from 2.4 to 3 ,2 mm).
The more powerful the tool, the correspondingly thicker the cutting equipment should be. This affects not only the quality of grass cutting, but also the service life of the material. If you are wondering how to wind the trimmer coil, then it’s time to change and recharge the tool. With the onset of spring, this question becomes more and more in demand, so it’s time to understand the step-by-step instructions for replacing the fishing line in the trimmer reel.
How to choose a trimmer line
A trimmer bought in a store is already ready for use - it is loaded with a standard nylon fishing line. It cuts the grass, but does a poor job - it quickly breaks down and only mows down young, thin plants. It does not take old grass and weeds with woody stems at all or cuts them with difficulty, quickly wearing out. It only lasts for a short time, after which you need to replace the line in the trimmer.
It is not recommended to use fishing line; it is better to take a special thread with a fiberglass core. It is sold in construction stores. Opt for an option with a square or triangle cross-section - their sharp edges will work like knives.
The consumption of trimmer line when using faceted and reinforced consumables will be reduced by 2-3 times, and productivity will increase by the same amount compared to round line and line not reinforced with fiberglass.
Purchase material with a diameter no less than that recommended by the manufacturer. If the diameter is unknown, you need to look at the size of the holes on the outer housing of the mowing head: the diameter of the working thread should be slightly smaller than the hole in order to pass through it freely.
Buy a sufficient supply of cutting thread (for 2-3 replacements), try buying different options to compare which one will work best.
Having found out how much material is needed for one winding, be guided by the length of the line during your next purchases so that there are no pieces left too short for winding.
To replace the line on a mechanical scythe with your own hands, you need to disassemble the mowing head and remove the reel on which the working thread is wound.
How to Wind Line on a Lawn Mower Video
When spring comes, people often spend their free time at their summer cottage. With the advent of warm days, they try to free their area from such problems as weeds and grass.
It is difficult to do this manually, especially if the area is very large, so a lawn mower will help. Thanks to this technique, of course, trimming the grass and removing weeds is a suitable device for mowing unnecessary plants near a fence, at home, between rows in a garden in a flower bed, etc. Read here to find out how to choose a lawn mower that is suitable for your needs.
The cutting element in this device is a fishing line (strong polyethylene thread), which is wound on a special element - a reel. However, after some time the fishing line wears out and it is necessary to replace it.
The thickness of the polyethylene thread depends on the model of equipment and varies from 1.5 to 4 mm. You will like them better:
- with a round cross-section - this is the strongest material for mowing herbaceous plants;
- with a figured section - used for mowing soft plants;
- twisted - used for narrow grass;
- professional type, not suitable for all models of equipment.
To change the line on a lawn mower, you need to purchase a cutting thread , which will be perfectly suitable if you want to use a different type of mower.
There is an option to soak the thread in a bowl of water for a couple of minutes to increase elasticity and strength.
The structure of the element where the nylon thread is wound is very common. This element is called a coil. There are two “paths” - upper and lower. Between these paths there is a special partition with a recess. A fishing line is wound around all these tracks. First you need to pull it through the notch.
To be able to remove the reel without any obstacles, you need to unscrew the special button, which is located on the mower body.
Features of changing fishing line on video.
READ How to Thread Line on a Champion Trimmer
It is worth noting that the reels in mowers will be different:
- for functioning with one antenna;
- for functioning with 2 antennae;
- the fishing line must be threaded through a through hole, which is located inside the element.
This part should not be confused with an extension cord for a lawn mower on a reel, since, despite the similar name, these are two completely different elements.
Small. The excavator chainsaw is designed for light work and people who prefer to hold the device with one hand.
This article will tell you what it really is, how much the ZIL 130 dump truck weighs, what this vehicle is capable of.
Read here //machinspec.com/lesozagotovitelnaya/benzopila/stanok-dlya-zatochki.html how to assemble a machine for sharpening chainsaw chains at home quickly and easily.
In the first option, winding the cutting element is painfully simple:
- There is a locking eyelet on the inside of the spool element.
- One tendril of thread is inserted there.
- The nylon thread must be threaded in the direction opposite to the rotation of the spool element.
- Only 2 to 4 meters of fishing line will be useful . When the winding process is completed, put the small end of this cutting element outward and fix it in the groove that is needed to fix the fishing line so that it does not unwind during operation of the mower.
- If there is no special groove, then the end should be held with your hand so that the cutting element does not unwind during the upcoming collection of the element.
- At the final step, you need to thread the outer end of the thread into a special hole located on the outside of the element. Then the reel can be inserted into the mower.
Changing fishing line on a brush cutter.
When the roller works with 2 ends of the polyethylene thread, then you need to take the following steps to thread the line into the lawn mower:
- On the inside of the reel you will see how many recesses there are for winding (two or one). If there is only one recess, then both ends of the thread will be laid along this recess. If there are two of them, then the antennae are laid out separately - some according to their own recess.
- You need to unwind from 2 to 4 meters of polyethylene thread and thread its two ends into the hole.
- Wind both threads in the same direction, opposite to the rotation of the drum.
- When all the fishing line is wound, the ends should be fixed in the grooves, in other words, held with your hand.
- Both ends are threaded into the eyelet on the outside of the roller body.
- After which the drum is assembled and inserted into the mower.
READ Brushcutter Which Gasoline
Tips and steps for changing fishing line on video.
To insert a fishing line into a lawn mower, in which the reel contains two grooves, you need to use the previous option for threading this polyethylene thread. In this case, either end of the fishing line will be wound along its own groove. Our client is left with other actions similar to the previous process.
The reel element, or the roller, contains a completely different design, different from the previous two options. The fishing line can be threaded through the eye, which is end-to-end and located inside the reel. This way there is no need to disassemble the roller drum and manually wind the polyethylene thread.
A polyethylene thread is threaded through the hole and rotates when a special button is pressed. This button is located on the body and is intended for performing equipment work , so that it is possible to release the fishing line during wear.
There is no need to worry that the polyethylene thread will be wound in the wrong direction, because in this design it can only rotate in one direction.
How to wind fishing line onto the mowing head of a brush cutter (trimmer)
To quickly and safely change the fishing line on the mower reel, you need to follow safety precautions. Before removing the reel to wind the line onto the lawn mower, you need to disconnect the equipment from the power supply (if the mower is powered by electricity). Here I would like to mention the reliability rating of electronic lawn mowers, which helps you choose a harmless assistant.
Another fundamental safety rule that must be followed is pressing the lock button . You can find out its location on the equipment body using the operation controls. For example, you can find instructions on how to operate a manual gasoline lawn mower here.
READ Trimmer Echo Carburetor Adjustment Video
It should be noted that the cutting element must be adjusted. There is an adjustment button on the body of the unit. If the process does not start automatically and the thread tension is weakened, then the button is pressed and the fishing line is forcefully stretched out of the spool.
You need to know that changing the line in a lawn mower is a fundamental process that requires responsibility. Everything needs to be done in stages, and only a special polyethylene fishing line should be inserted into the reel. A metal cable, some kind of high-quality wire, or even reinforced fishing line will not work here.
Watch the video summary.
If you have a summer cottage or a large plot of land near your own personal home or cottage, then for the convenience of removing grass and weeds you need to use a lawn mower. For which the design is intended, if you are thinking about choosing an electronic lawn mower or a gasoline one, then click here and you will find the comparative properties of the various models.
Over time, the line on the mower wears out and needs to be changed - this is done without the help of others. You need to choose this polyethylene thread based on the mower model. It is also worth looking at other parts of the unit; here, for example, you will find information about blades for Craftsman lawn mowers, which also wear out and lead to irreversible consequences.
The design of the reel into which the fishing line is inserted is very common. However, it differs depending on the duration of the project; a reel with one or two tendrils of thread works. It is important to follow safety precautions when changing the fishing line in the reel.
Source
How to remove fishing line
To change the line in the trimmer, remove the head cover. To do this, press the latches of the latches located on both sides of the cover with your fingers and pull the cover up. Access to the coil will open. After that, pull it out by pulling it up along the axis on which the coil sits. If the ends of the fishing line stick out from the holes in the head, then lift the reel along the axis and pull the remaining fishing line inward from the holes in the head. Now the part does not hold anything and it is easy to remove it and remove the remaining working thread.
The coil is divided into two parts by a central partition with a cutout. Different models of braids have different parts in size, so you need to check how much fishing line you can wind on the reel. Its length varies between 1 and 4 m.
Winding technique
Before you begin winding the fishing line onto the spinning reel, you need to install the device itself on the spinning rod (or fishing rod), or secure it in the machine, if you have one. After securing, you need to stretch the fishing line or braid through the rod rings, starting from the last one and ending with the reel itself.
Before you start winding the line, you need to tie it to the reel. You can read about how to tie a fishing line to a reel in this article.
First method
- First you need to wrap the line around the reel spool (the same is done with braid).
- The working end of the fishing line needs to overlap with one of the veins, this is necessary to create a kind of loop.
- Then you need to twist the loop, which involves 4-6 turns.
- After this, you need to tighten the tip into the loop that is formed as a result of twisting, and tighten the knot.
- Now simply reel in the line using even movements of the reel handle.
Second method
- A loop of small diameter is formed at the end of a fishing line or braided cord.
- Now the main core is inserted into it to form a kind of loop with a large diameter.
- After this, a large loop is thrown onto the reel spool and tightened (you need to be careful, otherwise it is very easy to confuse the tightening direction).
- Then the process of evenly laying the line onto the reel begins.
Third method
- First, a double loop is formed, which is then put on the spool.
- After this, the working end of the fishing line is inserted into the loop.
- Then the knot needs to be wetted and tightened, you should get something similar to a clinch knot, but with an additional large diameter loop.
After winding the fishing line onto the spinning reel is completed, it is necessary to lay it evenly. For this process you need to create some tension on the cord or fishing line. For this process, various devices are used, or an assistant holds the blank with fishing line in his hands.
The assistant needs to hold some kind of rod in his hands; a pencil is best for this. This fall you need to put on a bobbin with fishing line or braid that you want to wind. Now all that remains is for one to turn the reel handle, and the other to hold the reel in such a way as to create the necessary tension in the fishing line.
Some fishermen use a small plastic bucket to carry out this process. The bobbin must be placed on the bottom of the bucket, while holding it between the legs. This way you can constantly monitor the reel and it will not leave your field of vision. You can create additional tension using the fingers of the hand in which the spinning rod is located during winding.
Easel method
To make winding fishing line onto a spinning reel easier, you can use a special machine that is sold in a store or made by yourself. Today there are a lot of such devices, they differ in modifications and appearance, but their operating principle remains standard.
- The machine is rigidly fixed on a flat surface (usually a table), using a suction cup or a special clamp.
- The bracket is equipped with one or two axles, which have springs with clamping mechanisms.
- After this, you need to install the bobbin on it and firmly clamp it.
- Increasing or decreasing the pressure on the springs allows you to change the tension force during winding.
If winding the fishing line was carried out during the fishing itself, then we go through the same stages, and throw the reel into the water near the shore. Just watch where you throw it. Of course, this should not be done in extreme conditions.
How to thread line into the trimmer reel? Video instruction
Warranty production of the trimmer's factory refill will inevitably require replacement of the fishing line. Having a very rough idea of how to thread the line into the trimmer reel on their own, beginners are reluctant to take on this task. However, with some skills, mastering this simple science does not present any difficulties, and the similar instructions presented below will make this process as easy as possible.
Line arrangement in the mower
The structure of the element on which the nylon thread is wound is very simple. This element is called a coil. It has two “tracks” - upper and lower. Between these tracks there is a special partition with a recess. A fishing line is wound around these tracks. It must first be pulled through the notch.
To be able to pull out the reel without any obstacles, you need to unscrew the special button located on the mower body.
Features of replacing fishing line on video.
The above-mentioned unit can be made with your own efforts, and this article will tell you how to build a lawn mower from a trimmer with your own hands.
Preliminary preparation
First of all, to wind the fishing line, you need to remove the reel (spool, spool) from the trimmer - specific actions will depend on the complexity of the configuration and the type of the product itself:
- small electric trimmers with a working arrangement of the motor and coil in the lower part, as a rule, have side keys on both sides of the reel. By pressing them simultaneously, the upper part of the reel, along with the internal contents for winding the fishing line, is disconnected, while the lower part remains on the trimmer. It is advisable to disassemble the bobbin on a flat, smooth place so that the spring included in the structure does not jump out and get lost;
- electric and gasoline trimmers with a curved rod without the ability to install a knife, as a rule, have reels with a special wing: in such designs, you should hold the spool in a stationary position with one hand, and with the other, rotate the wing nut that secures the reel on the rod counterclockwise. After disconnecting the nut, the entire reel is removed.
- electric and gasoline trimmers with the ability to install a knife on a straight rod (for example, Stihl trimmers) have a hole under the reel. To keep the rod stationary, a screwdriver or other suitable object is inserted into this hole and, with slow rotation, such a relative position is achieved when the screwdriver enters the hole and the reel is fixed. After this, the coil body is rotated clockwise (with a left-hand thread) and removed from the trimmer.
For the second and third cases, the coils, depending on the design, are disassembled in different ways. In bobbins with a wing, the wing is unscrewed; in bobbins with latches, the latches are pressed and one part of the bobbin is released from the other. If the halves of the spool are connected by thread, then it is enough to turn them by hand in opposite directions until they are completely unscrewed.
How to remove the spool from the trimmer and remove the fishing line
Initially, before threading the fishing line into the trimmer reel, you need to remove it from there. The reel or pointer is a device that is located inside the mowing head, reel or drum. Heads come in different types (depending on manufacturers), but the principle of replacing line on a reel is the same for all. First of all, let's figure out how to remove the head from the tool, as well as how to get the drum with fishing line out of it.
This is interesting! You can replace the equipment directly on the tool, but if you are doing this for the first time, it is still recommended to remove the head and study the detailed winding process. After the technology has been mastered, replacement work can be carried out using a trimmer, lawn mower or lawn mower.
The instructions on how to unscrew the manual head on a trimmer are as follows:
- Turn the tool upside down and, if necessary, clean it of dirt. With two fingers of one hand, grasp the cover latches (on the mowing head), which are located symmetrically to each other. After lightly pressing them inward, remove the protective cover from the drum
- Next, remove the fishing line spool from the drum shaft. It is mounted on a shaft without fastenings, so it can be dismantled with one hand
- The main part of the drum is secured with a screw, which must be unscrewed with a screwdriver with an appropriate tip or bit
- To unscrew, you need to hold the base of the drum with one hand and use the other to unscrew it counterclockwise with a screwdriver
- After this, you can begin dismantling. To do this, you do not need to pull it with all your might, but by slightly rocking it to the sides, slowly disengage it from the metal shaft on which the drum is mounted
- When reinstalling, the head should be seated in the tetrahedral slots
This process is not difficult, and as you understand, there is no need to dismantle the entire head if you know how the replacement is carried out. When dismantling, consider the following nuances:
Knowing how to disassemble the drum, you should continue to figure out the process of replacing the trimmer line. The video below shows the detailed process of how to open the trimmer coil and disassemble it.
We wind the fishing line
Slowly completed disassembly of the spool reel without losing its spare parts allows you to move on to the main task - winding fishing line into the reel. The technological features of the spool design and the number of working antennae determine the sequence of actions.
Reel with one working antenna
The simplest option and simple sequence of actions:
- The dimensions of the reel and the length of the original factory winding determine the recommended length of fishing line for winding - 2...5 m.
- One end of the fishing line is inserted into the fixing technological hole located inside the spool.
- The fishing line is wound onto the drum in the opposite direction to the rotation of the spool on the trimmer product - as a rule, on the inside of the reel an arrow indicates which direction the winding is going.
- A small section of the fishing line is left free to be brought out - it is fixed in a specialized groove on the inside of the bobbin, designed to hold the winding when assembling the spool into working condition.
- The remaining end of the line is passed through the hole in the outer part of the reel.
- The reel halves are assembled and put on the trimmer rod.
Reel with two working antennae
In this type of spool, you should determine the number of grooves for winding line lying on the inside of the reel:
- one groove - both tendrils are wound together along one groove;
- two grooves - each tendril is wound along an individual groove.
For both cases, a fishing line 2-3 m long is taken. In single-groove reels, the fishing line is pulled into a through hole, its ends (tendrils) are folded together and aligned, after which they are wound in the direction opposite to the direction of rotation of the reel on the rod - the inside arrow usually indicates the correct winding direction. If there are locking grooves, the ends of the fishing line are threaded into them or held with the fingers of your free hand, threaded through the through hole of the outer half of the reel, the spool is closed and attached to the trimmer rod.
The difference between winding line in two-groove reels is that initially a piece of line 2-5 m long is folded in half (to determine the middle fold), and the fold loop is inserted into a special groove between the grooves. Both antennae of the fishing line are wound each along their own groove; fixing the antennae and assembling the reel is similar to the option discussed above with one groove.
The first implementation of this procedure may seem lengthy and quite labor-intensive, but with time and experience this task will be solved much faster and easier.
The video below will clearly show how to thread the fishing line into the trimmer reel and wind it correctly - this operation is not difficult and, with some patience, will definitely be successful:
Replacement instructions - how to insert fishing line
It should be noted that the reels in mowers can be different:
- for functioning with one antenna;
- for functioning with two antennae;
- the fishing line must be threaded through the through hole, which is located inside the element.
And you should not confuse this part with an extension cord for a lawn mower on a reel, because despite the similar name, these are two completely different elements.
The mini chainsaw is designed for simple work and people who prefer to hold the device with one hand.
This article will tell you how much the ZIL 130 dump truck weighs and what this vehicle is capable of.
Read here //machinspec.com/lesozagotovitelnaya/benzopila/stanok-dlya-zatochki.html how to assemble a machine for sharpening chainsaw chains with your own hands quickly and easily.
In the first option, winding the cutting element is very simple:
- There is a locking eyelet on the inside of the spool element.
- One tendril of thread is inserted into it.
- It is necessary to thread the nylon thread in the direction opposite to the rotation of the spool element.
- You will only need 2 to 4 meters of fishing line . When the winding process is completed, move the small end of this cutting element outward and fix it in the groove, which is necessary for fixing the fishing line so that it does not unwind while the mower is operating.
- If there is no special groove, then the end should be held with your hand so that the cutting element does not unwind during further assembly of the element.
- At the last stage, it is necessary to thread the outer end of the thread into a special hole located on the outer part of the element. After this, the reel can be inserted into the mower.
Replacing fishing line
When the roller is working with both ends of the polyethylene thread, then the following steps need to be taken to thread the line into the lawnmower:
- Inside the reel you will see how many recesses there are for winding (two or one). If there is only one recess, then both ends of the thread will be laid along this recess. If there are two of them, then the antennae are laid out separately - each in its own recess.
- It is necessary to unwind from 2 to 4 meters of polyethylene thread and thread its two ends into the hole.
- Wind both threads in the same direction, opposite to the rotation of the drum.
- When all the fishing line is wound, the ends should be fixed in the grooves or held with your hand.
- Both ends are threaded into the eyelet on the outside of the roller body.
- After this, the drum is assembled and inserted into the mower.
Tips and steps for replacing fishing line on video.
To insert a fishing line into a lawn mower in which the reel contains two grooves, you must use the previous option for threading this polyethylene thread. In this case, each end of the fishing line will be wound along its own groove. All other actions are similar to the previous process.
The reel element or roller may have a completely different design from the previous two options. The line can be threaded through the eye, which is end-to-end and located inside the reel. In this case, there is no need to disassemble the roller drum and manually wind the polyethylene thread.
A polyethylene thread is threaded through the hole and rotated by pressing a special button. This button is located on the body and is intended for the operation of the equipment , so that it is possible to release the fishing line as it wears out.
Rules and recommendations
Do not worry that the polyethylene thread will be wound in the wrong direction, since in this design it can only spin in one direction.
Automatic winding of line onto reel
There is a type of reel in which an automatic mechanism produces winding on its own - the user only needs to thread the line correctly. The fishing line is passed through a hole on the inside of the body, its tendrils are threaded through the hole on the outer body without winding, the bobbin is assembled, and when the winding button is rotated, the fishing line inside is wound on its own. In such a spool it is impossible to wind incorrectly: the mechanism itself will determine the correct direction, since it can only spin in one direction.
How to choose a fishing line - length, diameter, restrictions
IMPORTANT TO REMEMBER! Do not use fishing line or metal cables for the trimmer. Such a replacement is ineffective and dangerous. The cable can injure not only the mower himself, but also those around him.
As for the length, you should count on the expected frequency of use of the trimmer. The more often, the more consumables it costs to stock up.
Information about the possible diameter of the fishing line can be found on the body of the trimmer reel. Most likely, the range will be indicated there. Thickness varies from 1.2 to 4 mm. Choose the appropriate option, taking into account the characteristics of the area being treated. The larger the diameter, the easier it is to cut tough grass.
What you need to know about trimmer line
Fishing line is a consumable material that consists of nylon and serves as a cutting device. Using this equipment, the grass is cut, which is ensured by rotating the tool head at a high frequency. This material has different thicknesses, which depends on its use on the corresponding tools: low-power electric (from 1 to 1.6 mm), electric from 500 W (2-2.4 mm) and gasoline trimmers with brush cutters (from 2.4 to 3 ,2 mm).
The more powerful the tool, the correspondingly thicker the cutting equipment should be. This affects not only the quality of grass cutting, but also the service life of the material. If you are wondering how to wind the trimmer coil, then it’s time to change and recharge the tool. With the onset of spring, this question becomes more and more in demand, so it’s time to understand the step-by-step instructions for replacing the fishing line in the trimmer reel.
Preparation - remove and disassemble the spool
In most models of electric and gas trimmers, you will need to remove the spool to change the fishing line. The FUBAG tool allows you to skip this step. To make the instructions universal, we will still look at it in detail:
1.
Lock the shaft. Insert the locking element into the corresponding hole. It can be a thin screwdriver or a metal rod.
2.
Unscrew the spool housing. In our example - strictly in a clockwise direction.
3.
Unscrew the cap in accordance with the direction indicated on the housing.
4.
Take out the winding spool.
The preparatory stage has been completed. You can proceed to winding the fishing line.
How to wind line on a trimmer reel
Winding algorithm
2. Insert the resulting loop into the groove.
3. Lay the line in accordance with the direction indicated on the element body.
4. Insert the short end into the groove on the side of the reel.
5. Secure the long end into the opposite slot.
6. Place the spool with the line wound into the spool body.
7. Pull the line out of the fixing slots.
8. Put on the cover and secure it.
9. Trim the ends of the fishing line, leaving 10 to 15 centimeters.
The replacement of the fishing line is completed and now all that remains is to screw the spool onto the trimmer and you can work.
What you need to know about trimmer line
Fishing line is a consumable material that consists of nylon and serves as a cutting device. Using this equipment, the grass is cut, which is ensured by rotating the tool head at a high frequency. This material has different thicknesses, which depends on its use on the corresponding tools: low-power electric (from 1 to 1.6 mm), electric from 500 W (2-2.4 mm) and gasoline trimmers with brush cutters (from 2.4 to 3 ,2 mm).
The more powerful the tool, the correspondingly thicker the cutting equipment should be. This affects not only the quality of grass cutting, but also the service life of the material. If you are wondering how to wind the trimmer coil, then it’s time to change and recharge the tool. With the onset of spring, this question becomes more and more in demand, so it’s time to understand the step-by-step instructions for replacing the fishing line in the trimmer reel.